A guide to the perfect Scandi inspired weekend in the UK with ideas for where to stay, eat and shop for a stay full of Fika and fun
Read MoreHow I Transformed My Hallway With An Affordable Alternative to Crittall
When people ask us if we can ever see ourselves moving house, Mr Malmo and I often give contrary answers. He is very much “Remain” on the basis that moving involves a) spending money and b) the very real risk of me “losing” in any move i) his collection of Sheffield Wednesday Programmes dating back to 1989 and ii) the maroon sweatshirt he loves but which I think makes him look like a cross between a teenager on day release from Borstal and a Songs of Praise presenter. My answer is also “Remain” but with the caveat that I would instantly trigger Article 50 and leave for a house with a double width hallway like this.

The spacious hallway of my dreams. Picture credit www.livingetc.com
I have this yearning for double width because our house is semi-detached and the hallway is an L Shape. You can’t see the stairs when you first come in the house as they are located in the middle of the house. If that makes about as much sense as inviting Jim Davidson to be the keynote speaker at a vegan mindfulness seminar then hopefully the two photos below will clarify what I mean.
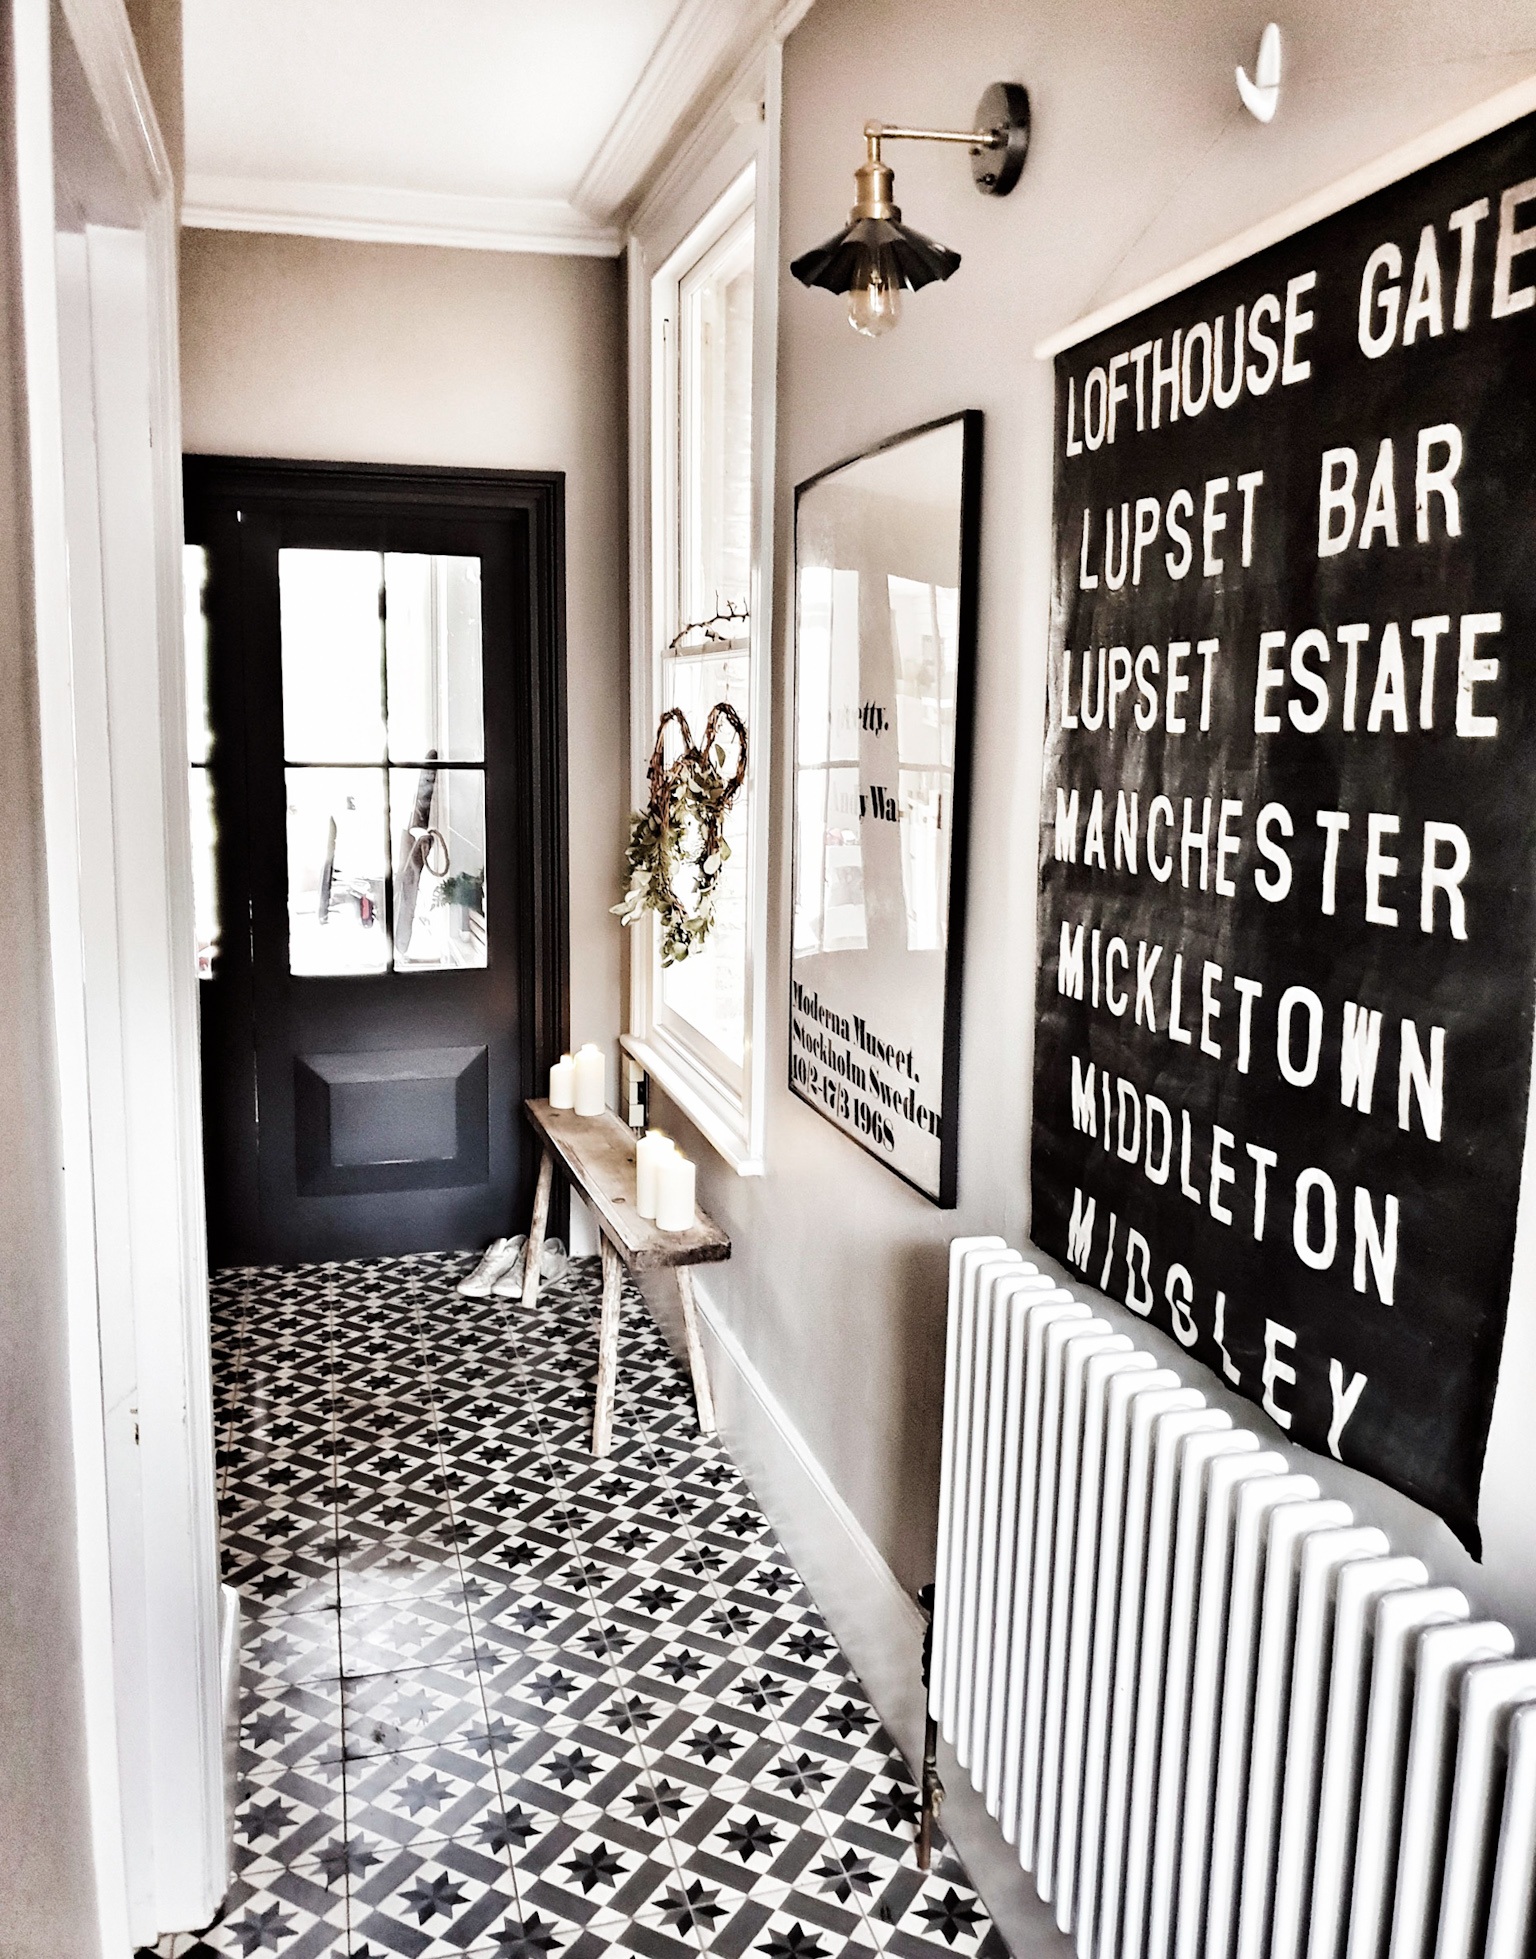
The hallway as you come in the front door

The view looking backwards towards the front door. With the stairs in the middle of the house to the right
When we first moved in the hallway was dark, narrow and a bit damp (which I realise sounds a bit like a tagline for a vaginal deodorant). My first tactic to brighten it up was by painting both the walls and floors in a lighter colour. From memory the colour I chose was Farrow & Ball’s Slipper Satin although I could be suffering from a bad case of middle class amnesia and getting my Slipper Satins and Wimborne Whites mixed up.

The hallway after my initial attempts to brighten it up by painting the walls and floors in Slipper Satin
This definitely helped to bounce more light around the space but there is only so much Slipper Satin can achieve when your only source of natural light is a window on to a side alley and you have to contend with the shadows cast by the army of anoraks that come with having three boys (and a husband with a penchant for a Liam Gallagher mac). I started dreaming of a more radical solution to the problem involving replacing the wall between the hall and dining room with a crittal partition like this.

Crittal doors in the hallway of House Curious (Picture credit www.livingetc.com )
However, after getting a couple of quotes, I started to realise I had crittal dreams on a cornflake budget. They were coming it at around £7-10K for doors to fill a 2 x 3 metre space. It was actually Kevin my quotes guy (who had come round to price up making the opening for the doors) who came up with the idea of installing timber panelled doors instead of crittal ones. A quick Pinterest later and I realised this was a compromise I could live with. Compared to crittal the price of having bespoke timber doors made was just £2K (with the labour for knocking the wall through and making the opening about £1.5K ).

These timber doors from Plain English (pic credit www.remodelista.com) made me realise that there was life after crittal!
This is what the space looked like just before “Project Partition” began. Although it was to be hastily renamed “Project Opening” after realising the former sounded less like a plan to remove a wall and more like Hitler’s code name for his plans to annex the Sudetenland. Project Opening admittedly did have slight working title of a 1970s porno connotations but it at least had less #annexationovertones.

The view from the kitchen before “Project Partition” commenced

The night before work commenced on taking out the wall and putting the doors in
The builders took the wall down in stages and I have to confess that I nearly called the whole thing off after they took the plaster off the wall and left me alone with the exposed brick wall of my dreams for a night. #BareBrickBradPitt as it became known even scooped me the honours in #myhomevibe after the addition of some festive pom poms and illuminated Noel letters around Christmas time. But just like Angelina Jolie, I ultimately waved Brad goodbye with the rest of the wall being knock down and temporary supports being put in place.

For one night only: #BareBrickBradPitt in all his glory

It’s totally normal to decorate your building supports in the style of a Winter Wonderland right?
The builders had originally thought that it might be necessary to put a steel in above the doors as it is a load bearing wall but it turned out there was already a timber beam in place that did the job which saved us a bit of money. After the opening had been made good, the bespoke doors were installed unpainted.

The unpainted doors installed and waiting for me to decide on a paint colour
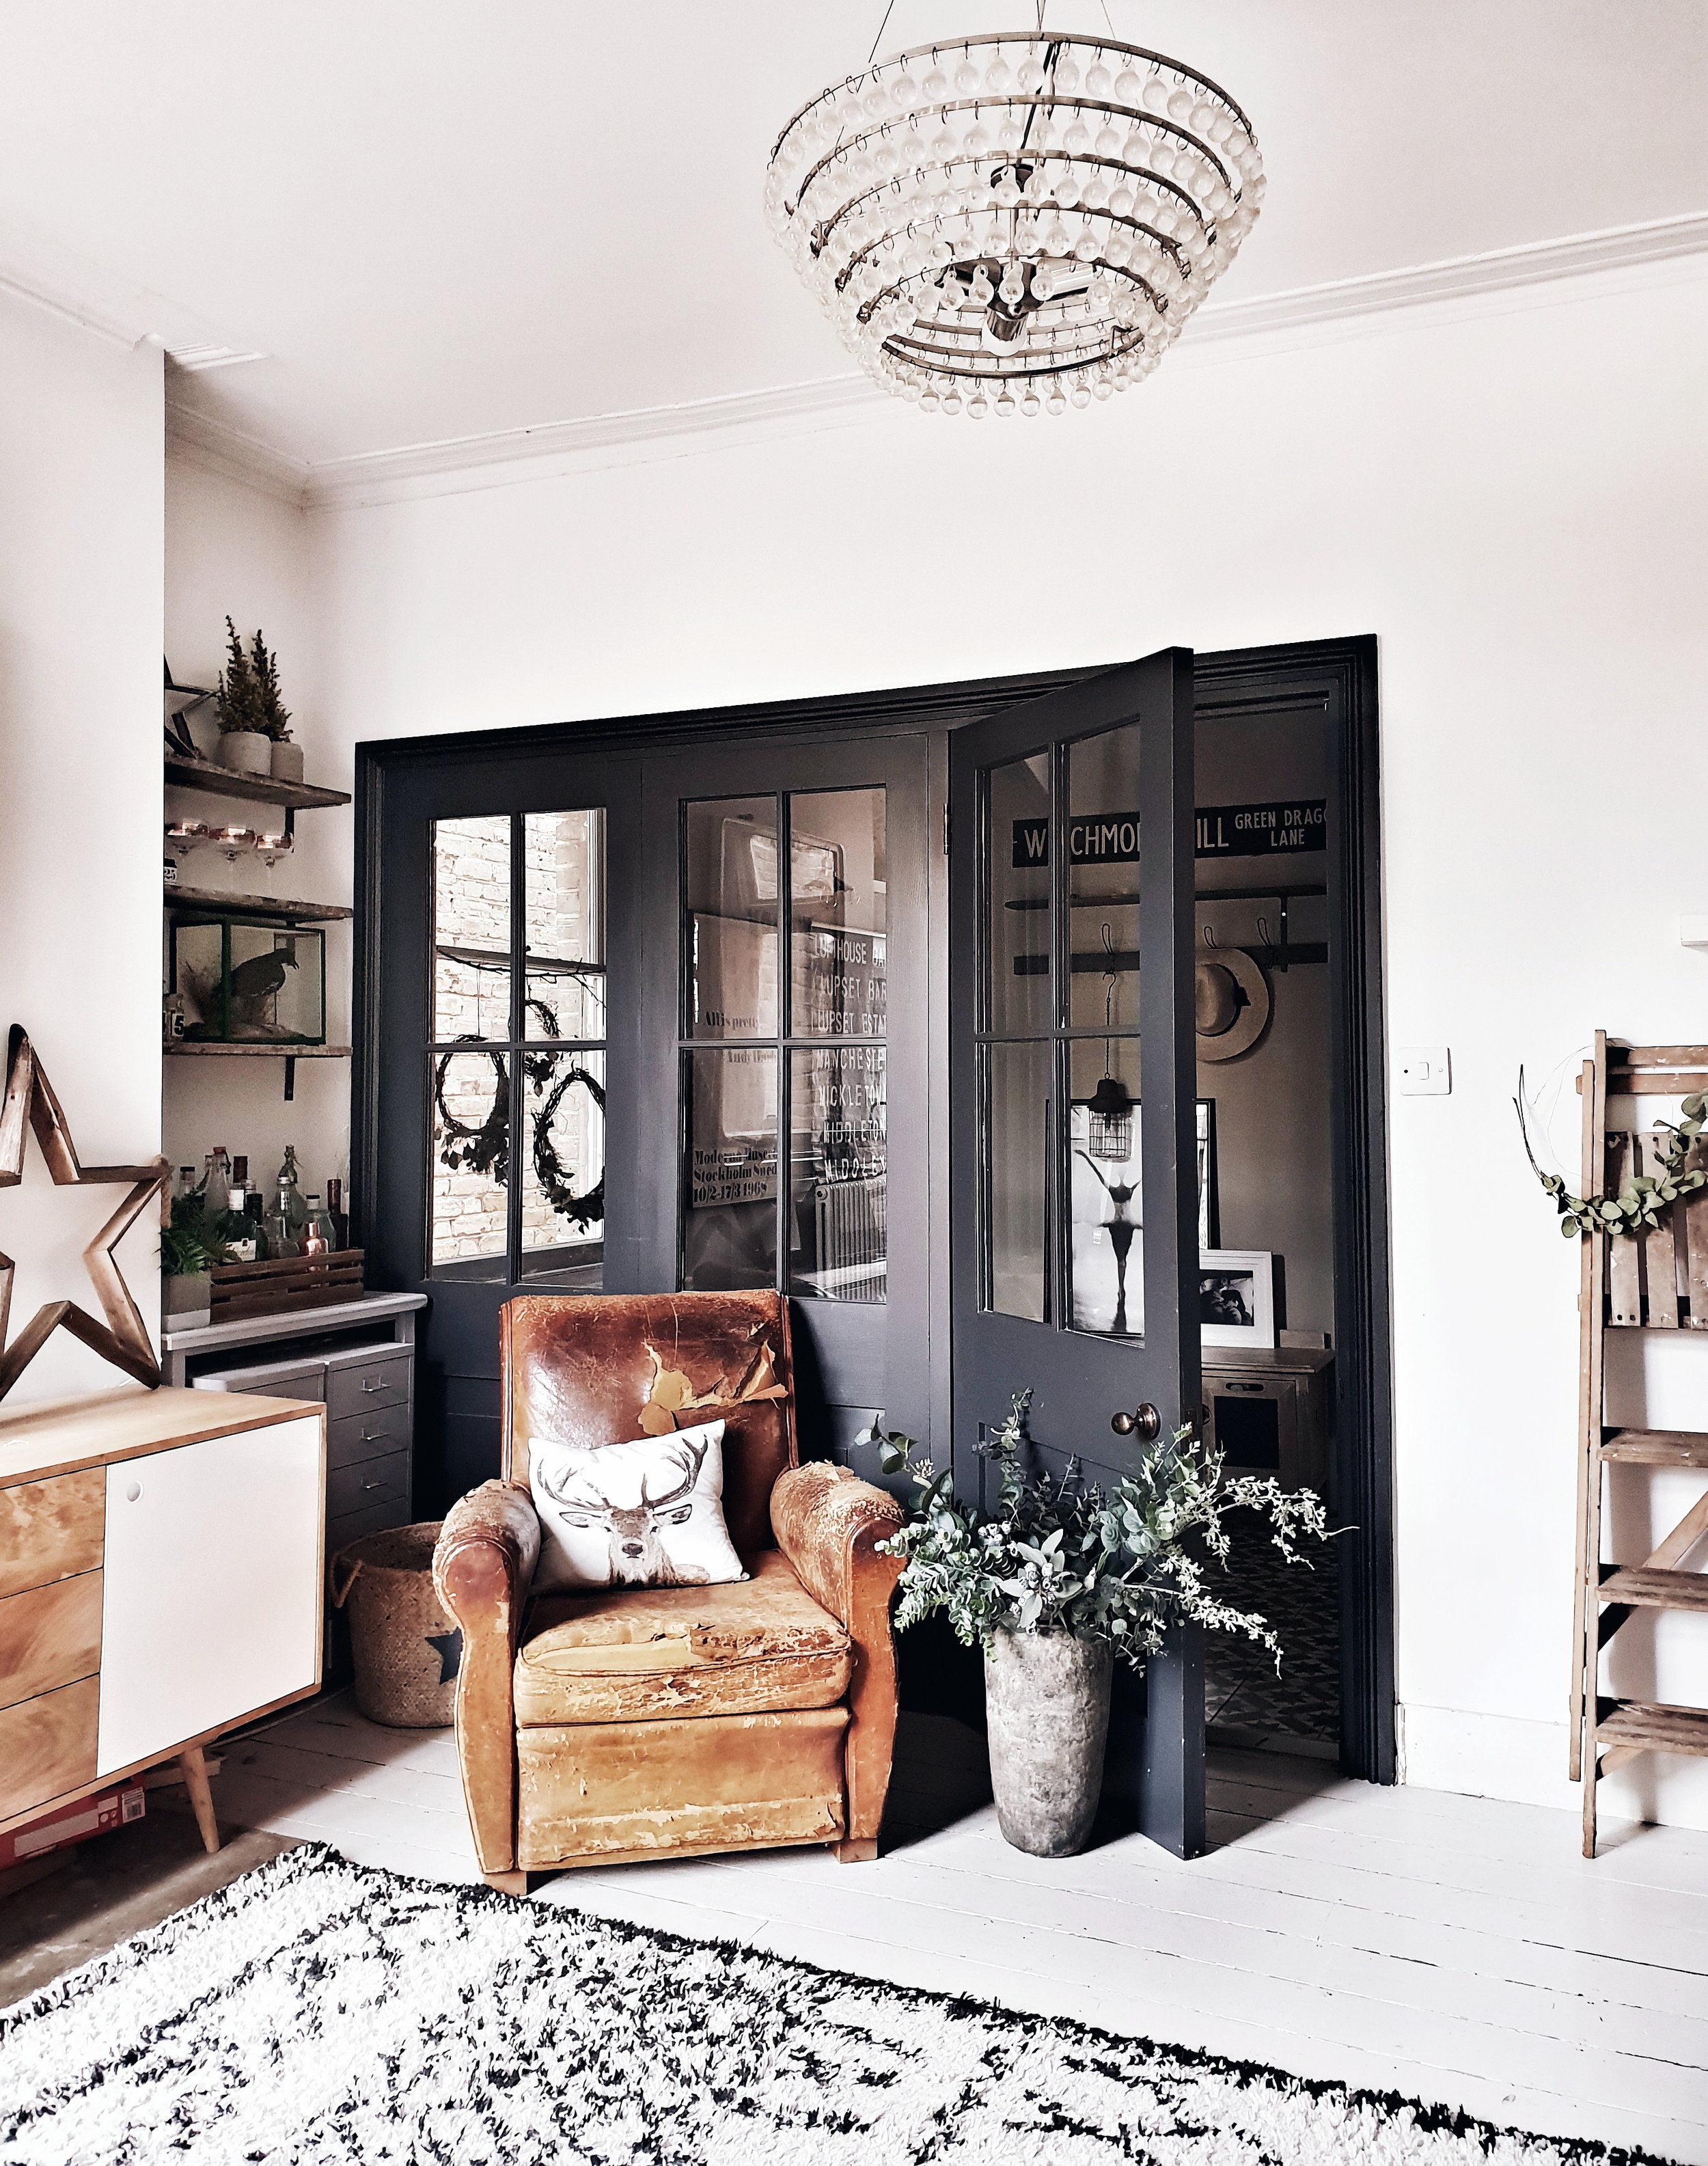
Only one of the doors opens (the furthest to the left if you are looking at them with the front door behind you) but it has hinges that mean it can be folded right back. If I was to go back in time I think I would have opted for them to be concertina doors so that we could have the option to fold all three of them all the way back. However, that is but a minor quibble because with the doors in place we now have a view straight through the house out to the garden when we open the front door and there is so much more light in the hallway.

This door folds right back but the other two are fixed in place.
After much deliberation about what colour the doors should be I ultimately decided to go for a really dark colour and chose Charcoal from the Valspar paint range at B&Q (not an ad!). I am really happy with that choice now but I like the fact that because they are timber I can change the paint colour to change the feel of the room in future if I wanted to. (something I couldn’t do if there were crittal!).
The finished doors in Charcoal paint by Valspar. I wanted to them to look crittal-esque which is why I went dark with the paint colour

A lovely spot to hang out pretending to read an interiors book.

Having the doors in place lets lots more light into the hallway from this room

I love the new view from the kitchen with doors in

The other big change we made at the same time as installing the doors was to replace the original floorboards with a tiled floor instead. Whilst I love wooden floors there were lots of gaps in ours so that in winter it was like being on the set of “Whistle Down the Wind”. I was really torn as to whether to go for a statement Victorian style floor with some colour in it (inspired by the picture below from Living Etc) or something more muted.
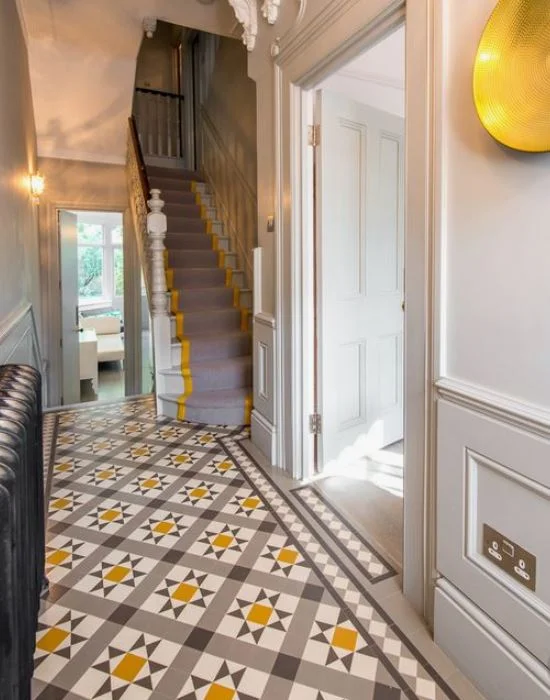
The tiles I spotted in Living Etc (Pic Credit www.balancemedesign.com) which for a brief moment tempted me to go for something bold in the hallway
Ultimately I chose a monochrome design from Mosaic del Sur which at about £900 came in about £4000 cheaper than the Victorian tile option! They have proved pretty hard wearing so far. We don’t clean them with any special products (perhaps mistakenly so!) and they actually show up mud much less than the wooden floors they replaced. Every now and again I have a pang and wonder if I actually ought to have gone for polished concrete floors but that is a project for a different house me thinks, maybe one with that double width hallway that makes me trigger my Article 50

I am really happy with my ultimate choice of monochrome encaustic tiles from Mosaic del Sur.. Sheepskin placed there entirely for instagram purposes…

They are a good balance between a modern and traditional tile


The next step in our hallway renovation is to tackle the stairs and bannisters. The sisal carpet we laid after a couple of years suffered a horrendous middle class atrocity when it had a tester pot of Annie Sloane Chalk Paint thrown down it by our toddler. Let’s just say Sloane and Sisal don’t mix. What I would actually like to do is to replace the Jackson Pollock carpet with a runner, painting the stairs and banister at the same time. The current banister is the kind of shade of mahogany that David Dickinson turns after 5 weeks on the Costa Brava so I am desperate tone it down or potentially paint it dark but even thinking about the amount of sanding required to get that project going makes me feel tired so, for now, it is on the back burner.

David Dickinson banister is on my 2019 hitlist as in the #SloaneOnSisalShitShow you can see on the stairs!

Hopefully this view will include the carpet runner of my dreams once I have found the motivation to sand down and repaint 30 plus stairs

But for now I am just going to enjoy hanging around here holding an impractical hat
Thanks for reading all about my hallway overhaul hope it inspires you to see that you can achieve a crittall look on a cornflake budget afterall!

A Weekend at Eden Hall Cottage, Norfolk
Does anyone remember the TV programme ‘Challenge Anneka’? The basic premise was that Anneka Rice (sporting a blue jumpsuit that made her look like an errant Kwik Fit employee) had 48hrs to complete a seemingly impossible task like reintroducing an obscure species of Owl to the UK or persuading Lawrence Llewellyn Bowen to wear beige. It sadly disappeared from our screens some time around 1994 but I think the BBC should bring the show back and set Anneka a new challenge. Find a holiday cottage near the coast in the UK that sleeps 10-12 people (without anyone having to sleep in a drawer) with interior’s that don’t look like the inside of your Auntie Pat’s conservatory all for less than £5000 a week. I suspect it would make reintroducing that obscure owl look like child’s play. But fear not Anneka, I’ve got this one. In my little black book of holiday cottages is a place that ticks all of those boxes and more: Eden Hall Cottage.

The gorgeous back porch of Eden Hall Cottage which is a traditional flint cottage on the North Norfolk coast
About the Cottage
The cottage is located on the North Norfolk Coast on the so-called secret side (i.e. the stretch that is not overrun with men called Tarquin down from London for the weekend who are partial to red trousers). Eden Hall’s owners are Vicky and Chris White. If I tell you that Vicky is the founder of the beautiful home and lifestyle brand Plum & Ashby you will start to appreciate that this is going to be a pretty special place.

Edenhall as it looked when Vicky and Chris first went to view it
Vicky, Chris and their dog Bertie live in Olney (Bedfordshire) but have always been regular visitors to the Norfolk coast. They got engaged there and, in 2015, they started to look for a property they could turn into the coastal holiday home of their dreams. After two years of searching and several close misses, in November 2017 (on their shared birthday) they went to view Eden Hall Cottage and fell in love.

The Renovation
It took some vision to see it’s potential as a beautiful beach bolthole because it was, at the time, completely run down with rats in residence and a random toilet in the middle of the drive. However they were able to look past the loo and having secured the property, brought an architect on board to help them restore it to it’s former glory. Their ambitious goal was to have the property ready for its first visitors by the summer of 2018.

The inside of the property had seen better days but the potential was easy to see

Some gorgeous period features were still shining through the gloom
Having hired a team of local builders following a tender process, their first step was to strip the property back to it’s bare bones (including taking out and replacing all of the upstairs floors the joists of which turned out to be rotten). This is what the cottage looked like when I first popped round “Kevin McCLoud” style at the start of their renovation journey.

The upstairs landing and staircase. The entire upper floor had to be removed as part of the renovation and replaced after the joists were found to be rotten


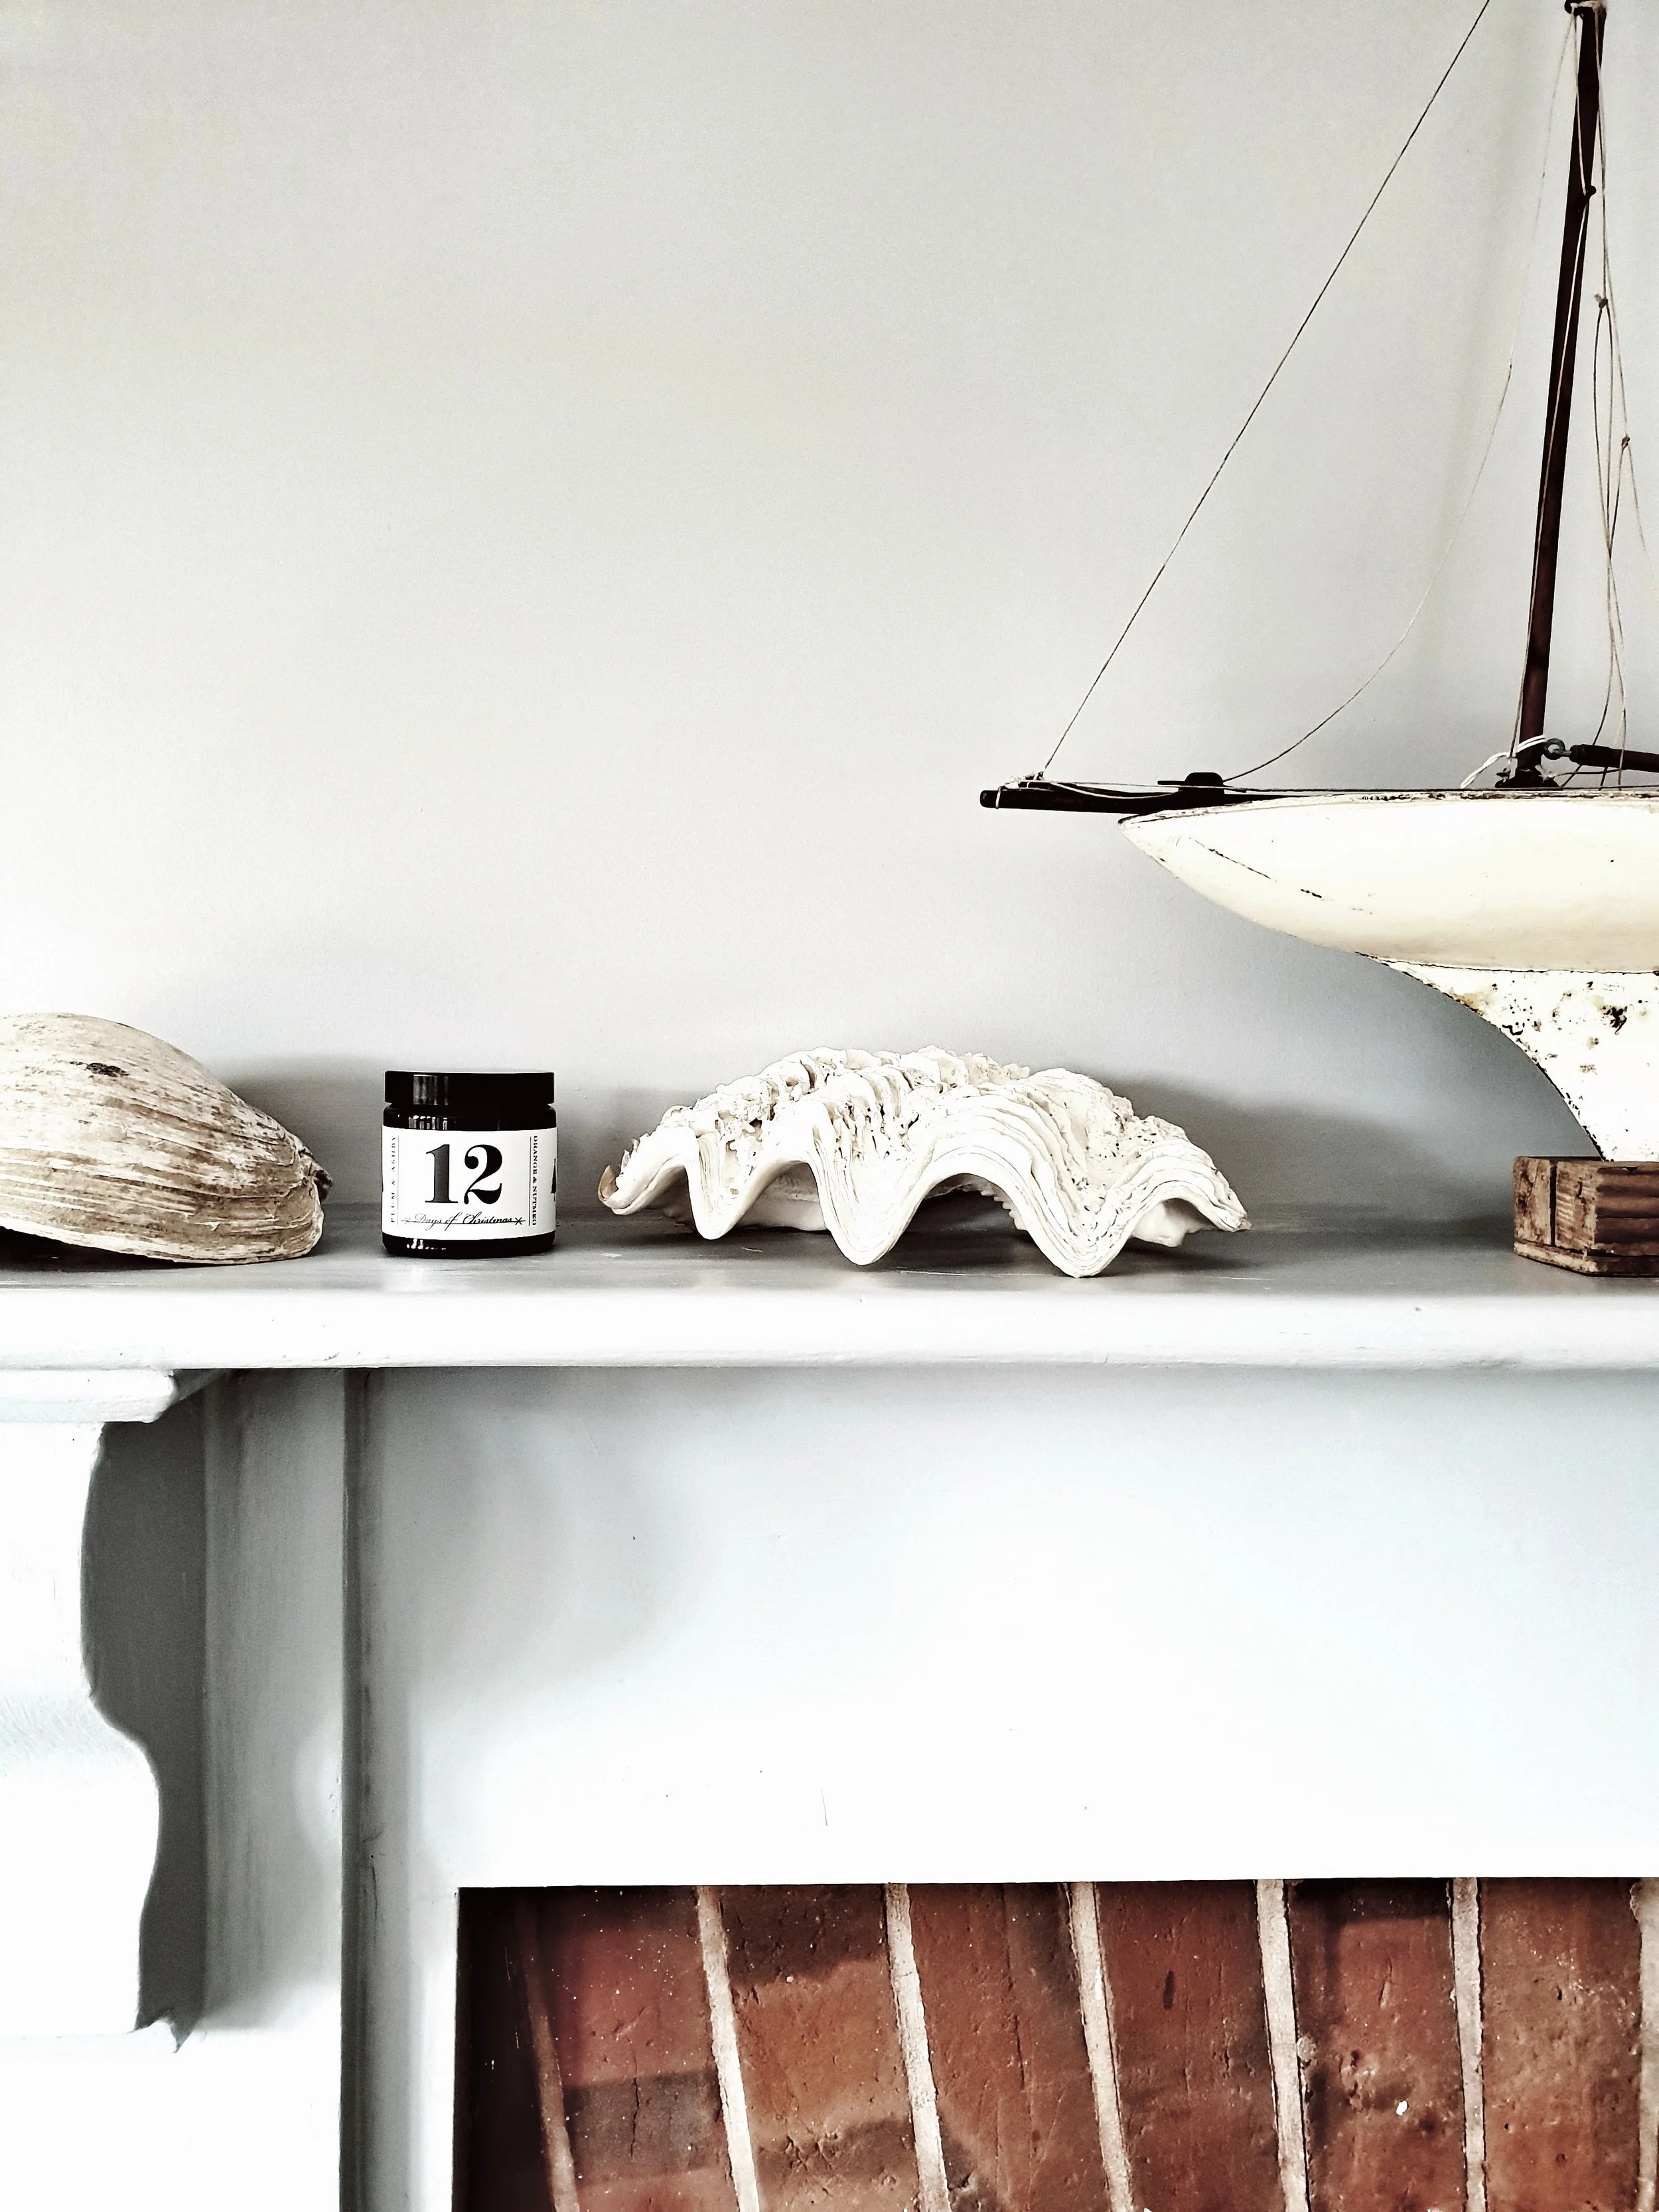
Vicky and Chris kept and restored the original brick fireplace
The Interiors
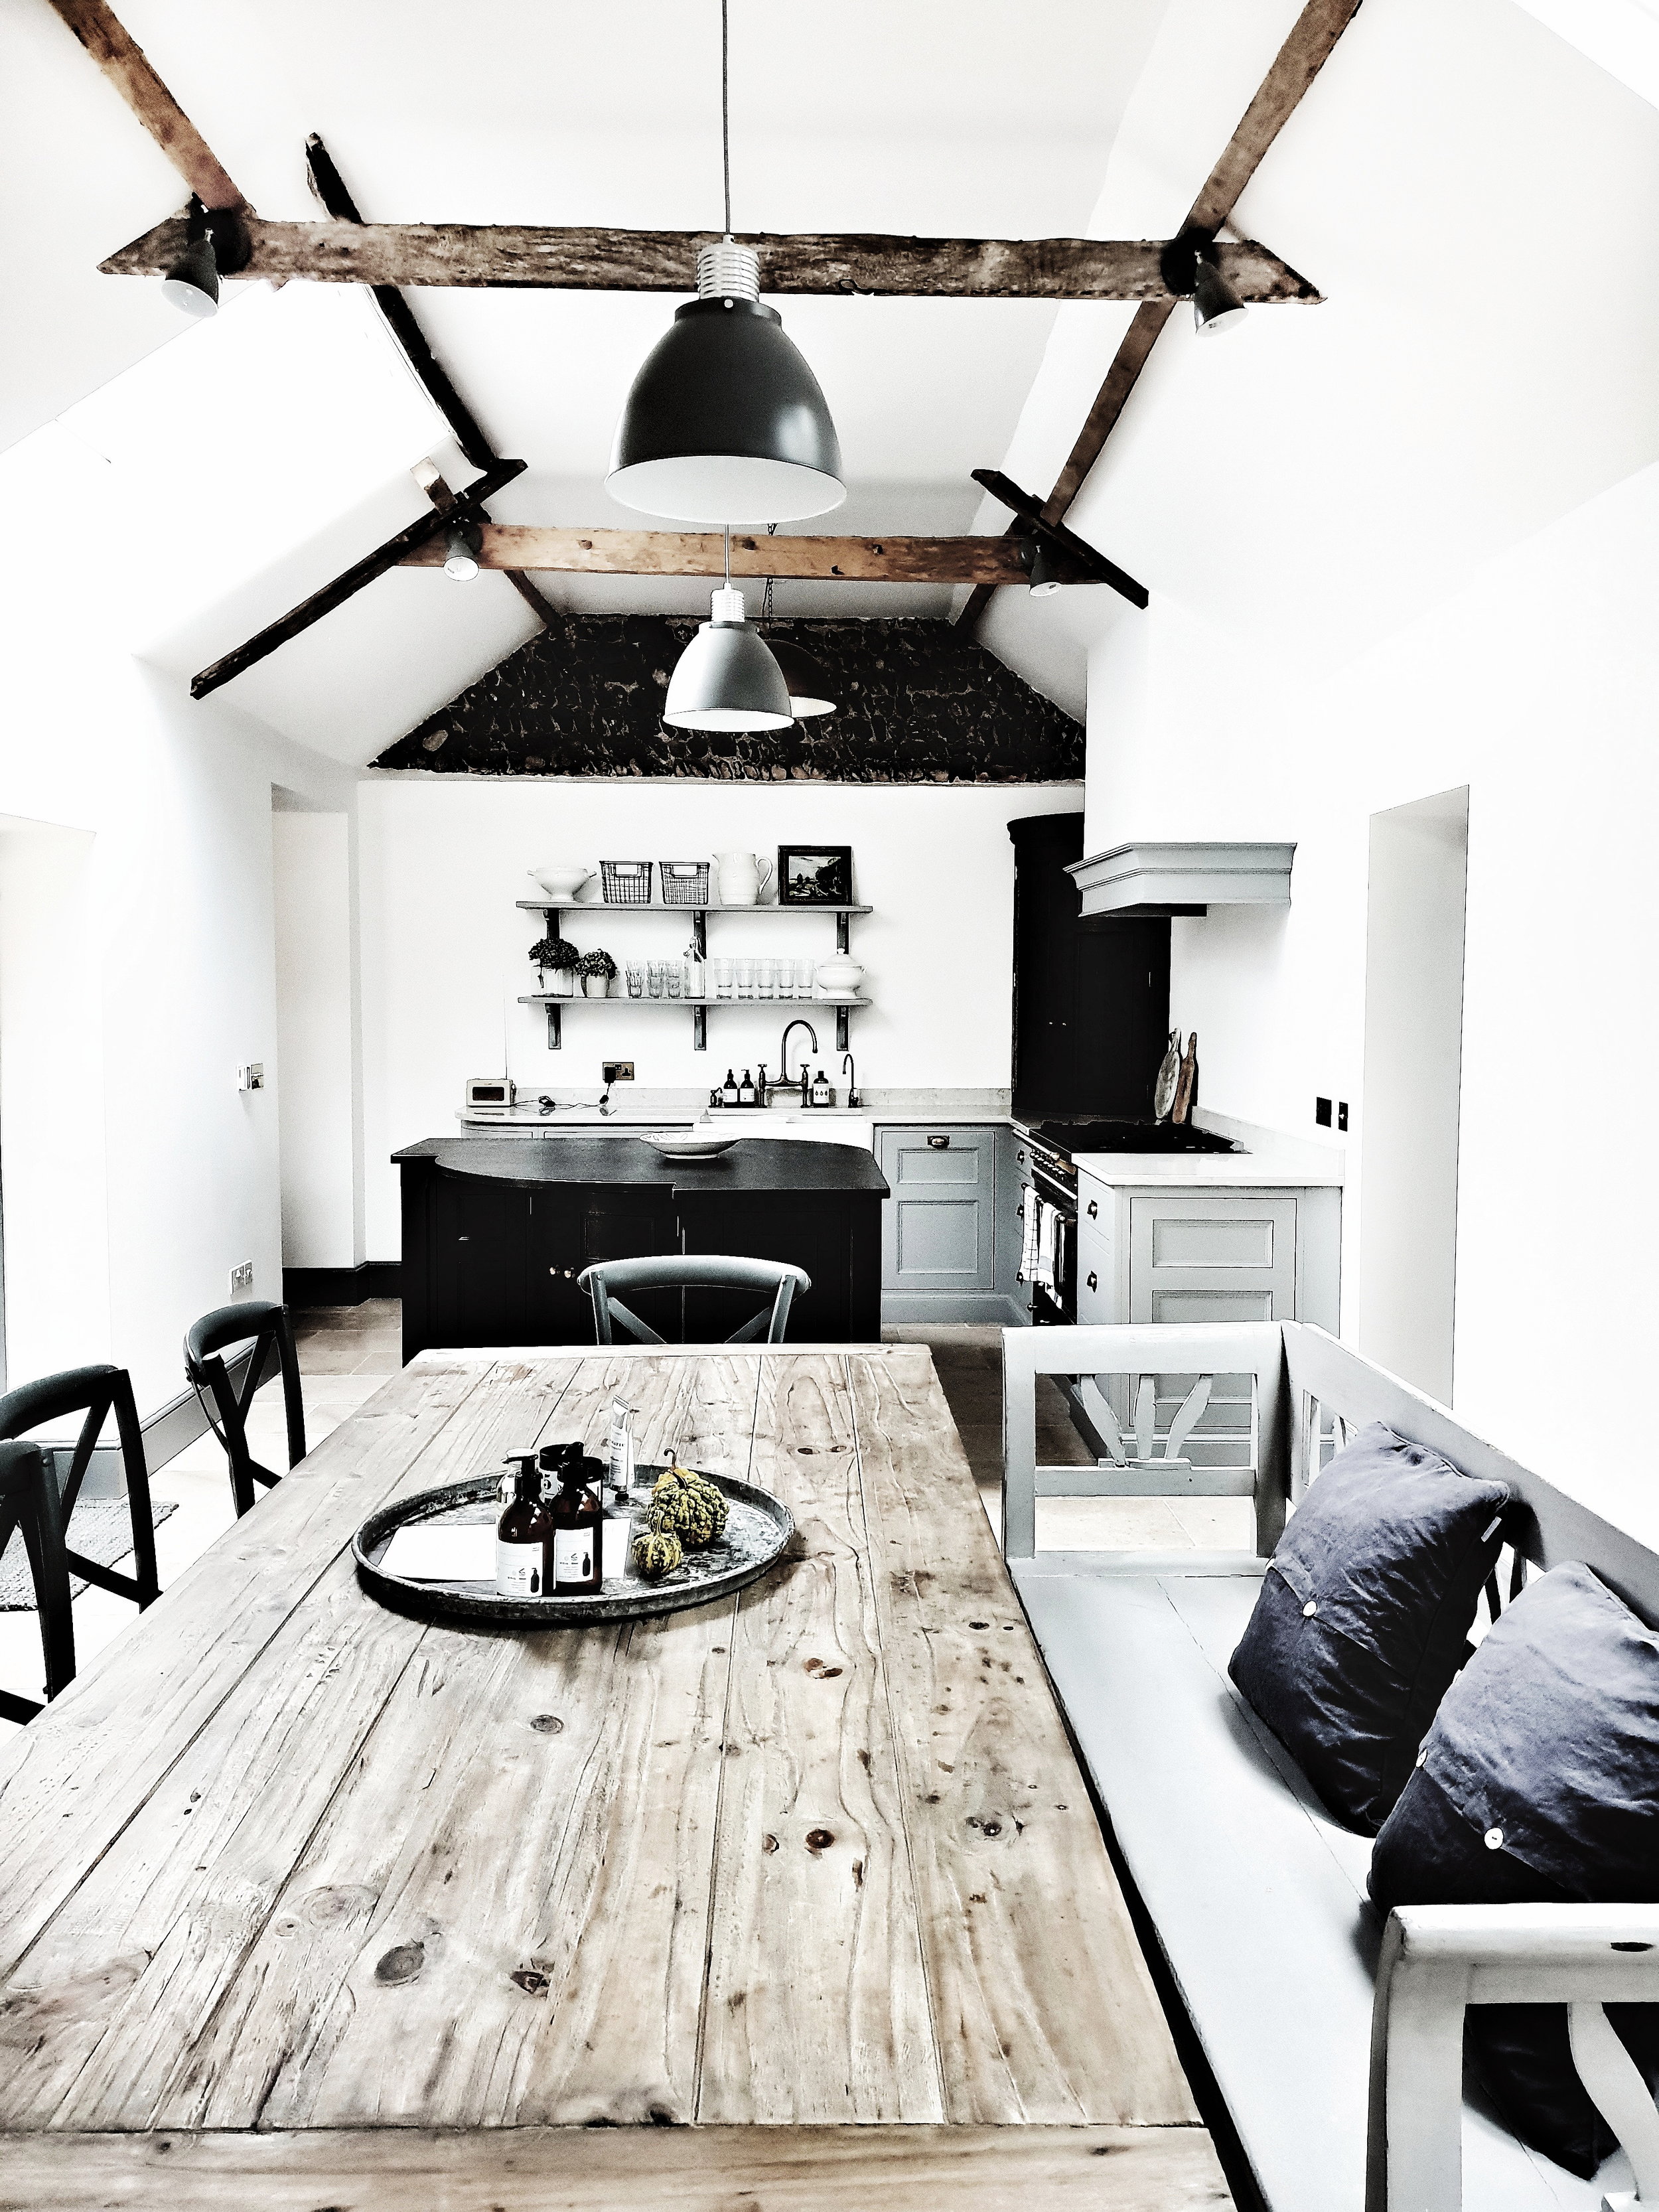
By the time Malmo McCloud returned to stay as one of their first guests in October 2018, it was virtually unrecognisable. With the renovation complete, the cottage has five double bedrooms (three of which are ensuite), a stunning kitchen diner with vaulted ceilings, a relaxed sitting room with open fire, a family bathroom with a gorgeous cast iron roll top bath and a boot room and separate utility. There is a lovely secluded patio garden at the front and a large lawned area at the back (perfect for letting our pack of lad labradors off the leash).

Vicky battled her builders to have vaulted ceilings in the kitchen/dining space that is at the heart of the house
The rowing oars are a subtle nod to the cottage’s coastal location

The family bathroom blends contemporary and vintage features with a huge rolltop bath to relax in
Vicky said that her aim for the interiors was to create an English take on an American beach house and it is a triumph of Nantucket come to Norfolk. The walls are painted in a pallet of clean minimal neutral colours which act as the perfect backdrop to some seriously luxurious furnishings from brands such as Neptune, Rowen & Wren, Also Home and the White Company. There is not a jaunty anchor or whimsical shell in sight.

The relaxed sitting room is at the front of the house and opens on to a secluded patio courtyard garden


The star of the show has to be the duck egg blue Humphrey Munson kitchen which is at the heart of the house and fabulously well equipped. I loved the way that Vicky and Chris had chosen to leave sections of the original flint walls exposed in the kitchen to provide a rustic contrast to the contemporary units.

The Humphrey Munson kitchen Vicky chose in duck egg blue works perfectly with the flint walls left exposed

The perfect shelfie

Those flint walls

Marble worktops and brass taps add a vintage edge to the
We stayed at the house as a group of ten (with 5 friends rather than 5 children I have previously failed to mention in case you are wondering). The layout of the cottage is perfect for groups of friends or families.. Upstairs are two generous double bedrooms (one of which is ensuite) and a further single with bunk beds and some lovely touches for children staying like a minature teddy version of Bertie the dog. Upstairs is also host to the family bathroom of dreams which has Georgian style panelled walls, a huge roll top bath and gorgeous brass taps. The bath products are all from Plum & Ashby’s beautiful range made in the UK.

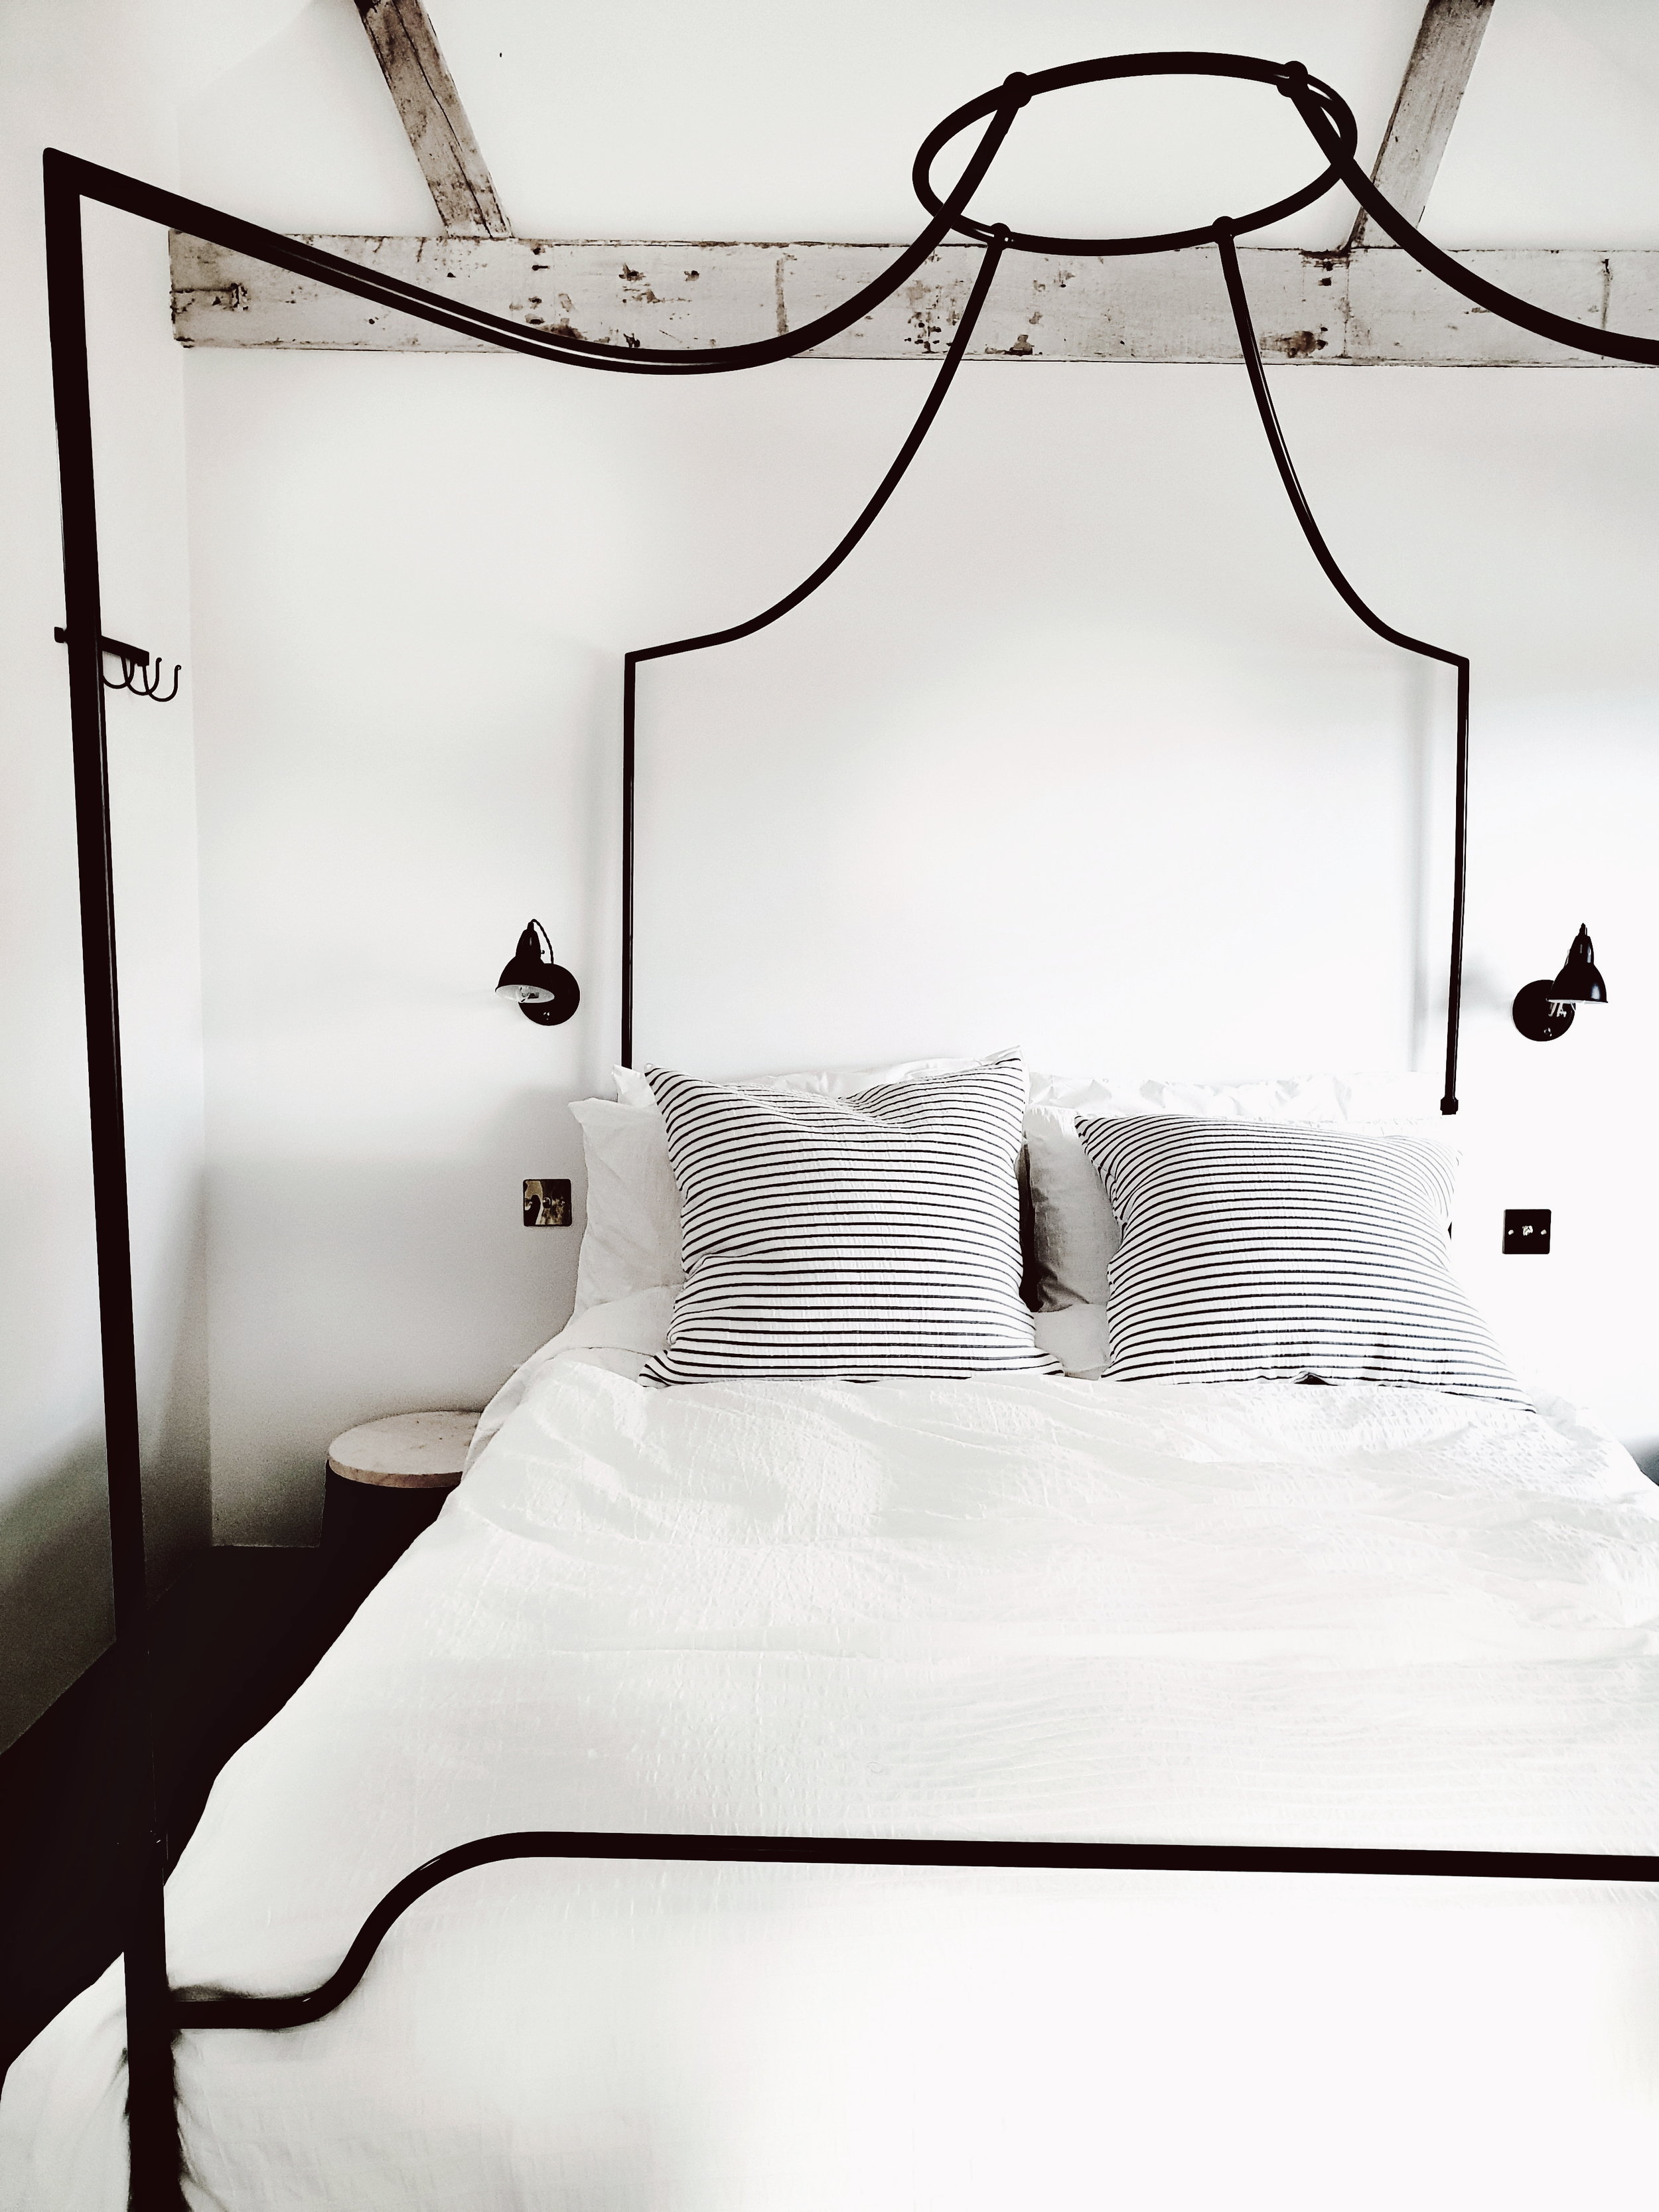
The upstairs ensuite bedroom with gorgeous striped headboard and exposed wooden beams

I have this thing with the amazing honeycomb tiles on the floor in the ensuite


The second upstairs double bedroom which is a great size

The family bathroom with fabulous Georgian style pannelling

The lovely single bedroom complete with bunk beds and lots of thoughtful touches for junior guests

I love that Vicky and Chris were able to keep the original window frames
Downstairs are two further double bedrooms both of which are ensuite. This layout meant that those in our party with kids could sleep upstairs whilst those without occupied the bedrooms downstairs so that they were spared a 7:30am wake up by the Octonauts/Fireman Sam/Mr Tumble emptying his spotty bag.

One of the downstairs double bedrooms. I love the panelling painted in a lucious dark green

Pinstripe cushions from Also Home up the comfort levels in all the bedrooms
The bedrooms are all beautiful but the one to fight over is definitely the master suite off the kitchen which has both a four poster bed and roll top bath of it’s own. It is set off the kitchen/diner and is like a mini hotel in it’s own right. I loved the vintage boathouse sign that hangs above the doorway to this room adding a nod to the coast.

Prepare to duke it out for who gets to sleep in the stunning master bedroom
The four poster bed of my dreams from the White Company in the master bedroom


A peek into the ensuite which has a roll top bath of it’s own

And a shower to with marble metro tiles
We all then enjoyed big communal breakfasts together with papers around the huge kitchen table which can easily seat 12. Bacton, where the cottage is based has a small local shop which stocks all of your bread/milk/Sunday papers essentials. Though it is not the kind of the place where you will be able to source artisan pate or gluten free granola so maybe stock up in advance if those things are your daily essentials.


Evenings were spent slobbed out on the two huge comfy sofas in front of the fire. The zinc coffee table is truly a sight to behold, I am pretty sure that it may be bigger than one of our bedrooms at home. If you have been out taking the sea air during the day then coming back and running a bubble bath in the stunning main bathroom of an evening is also to be recommended.
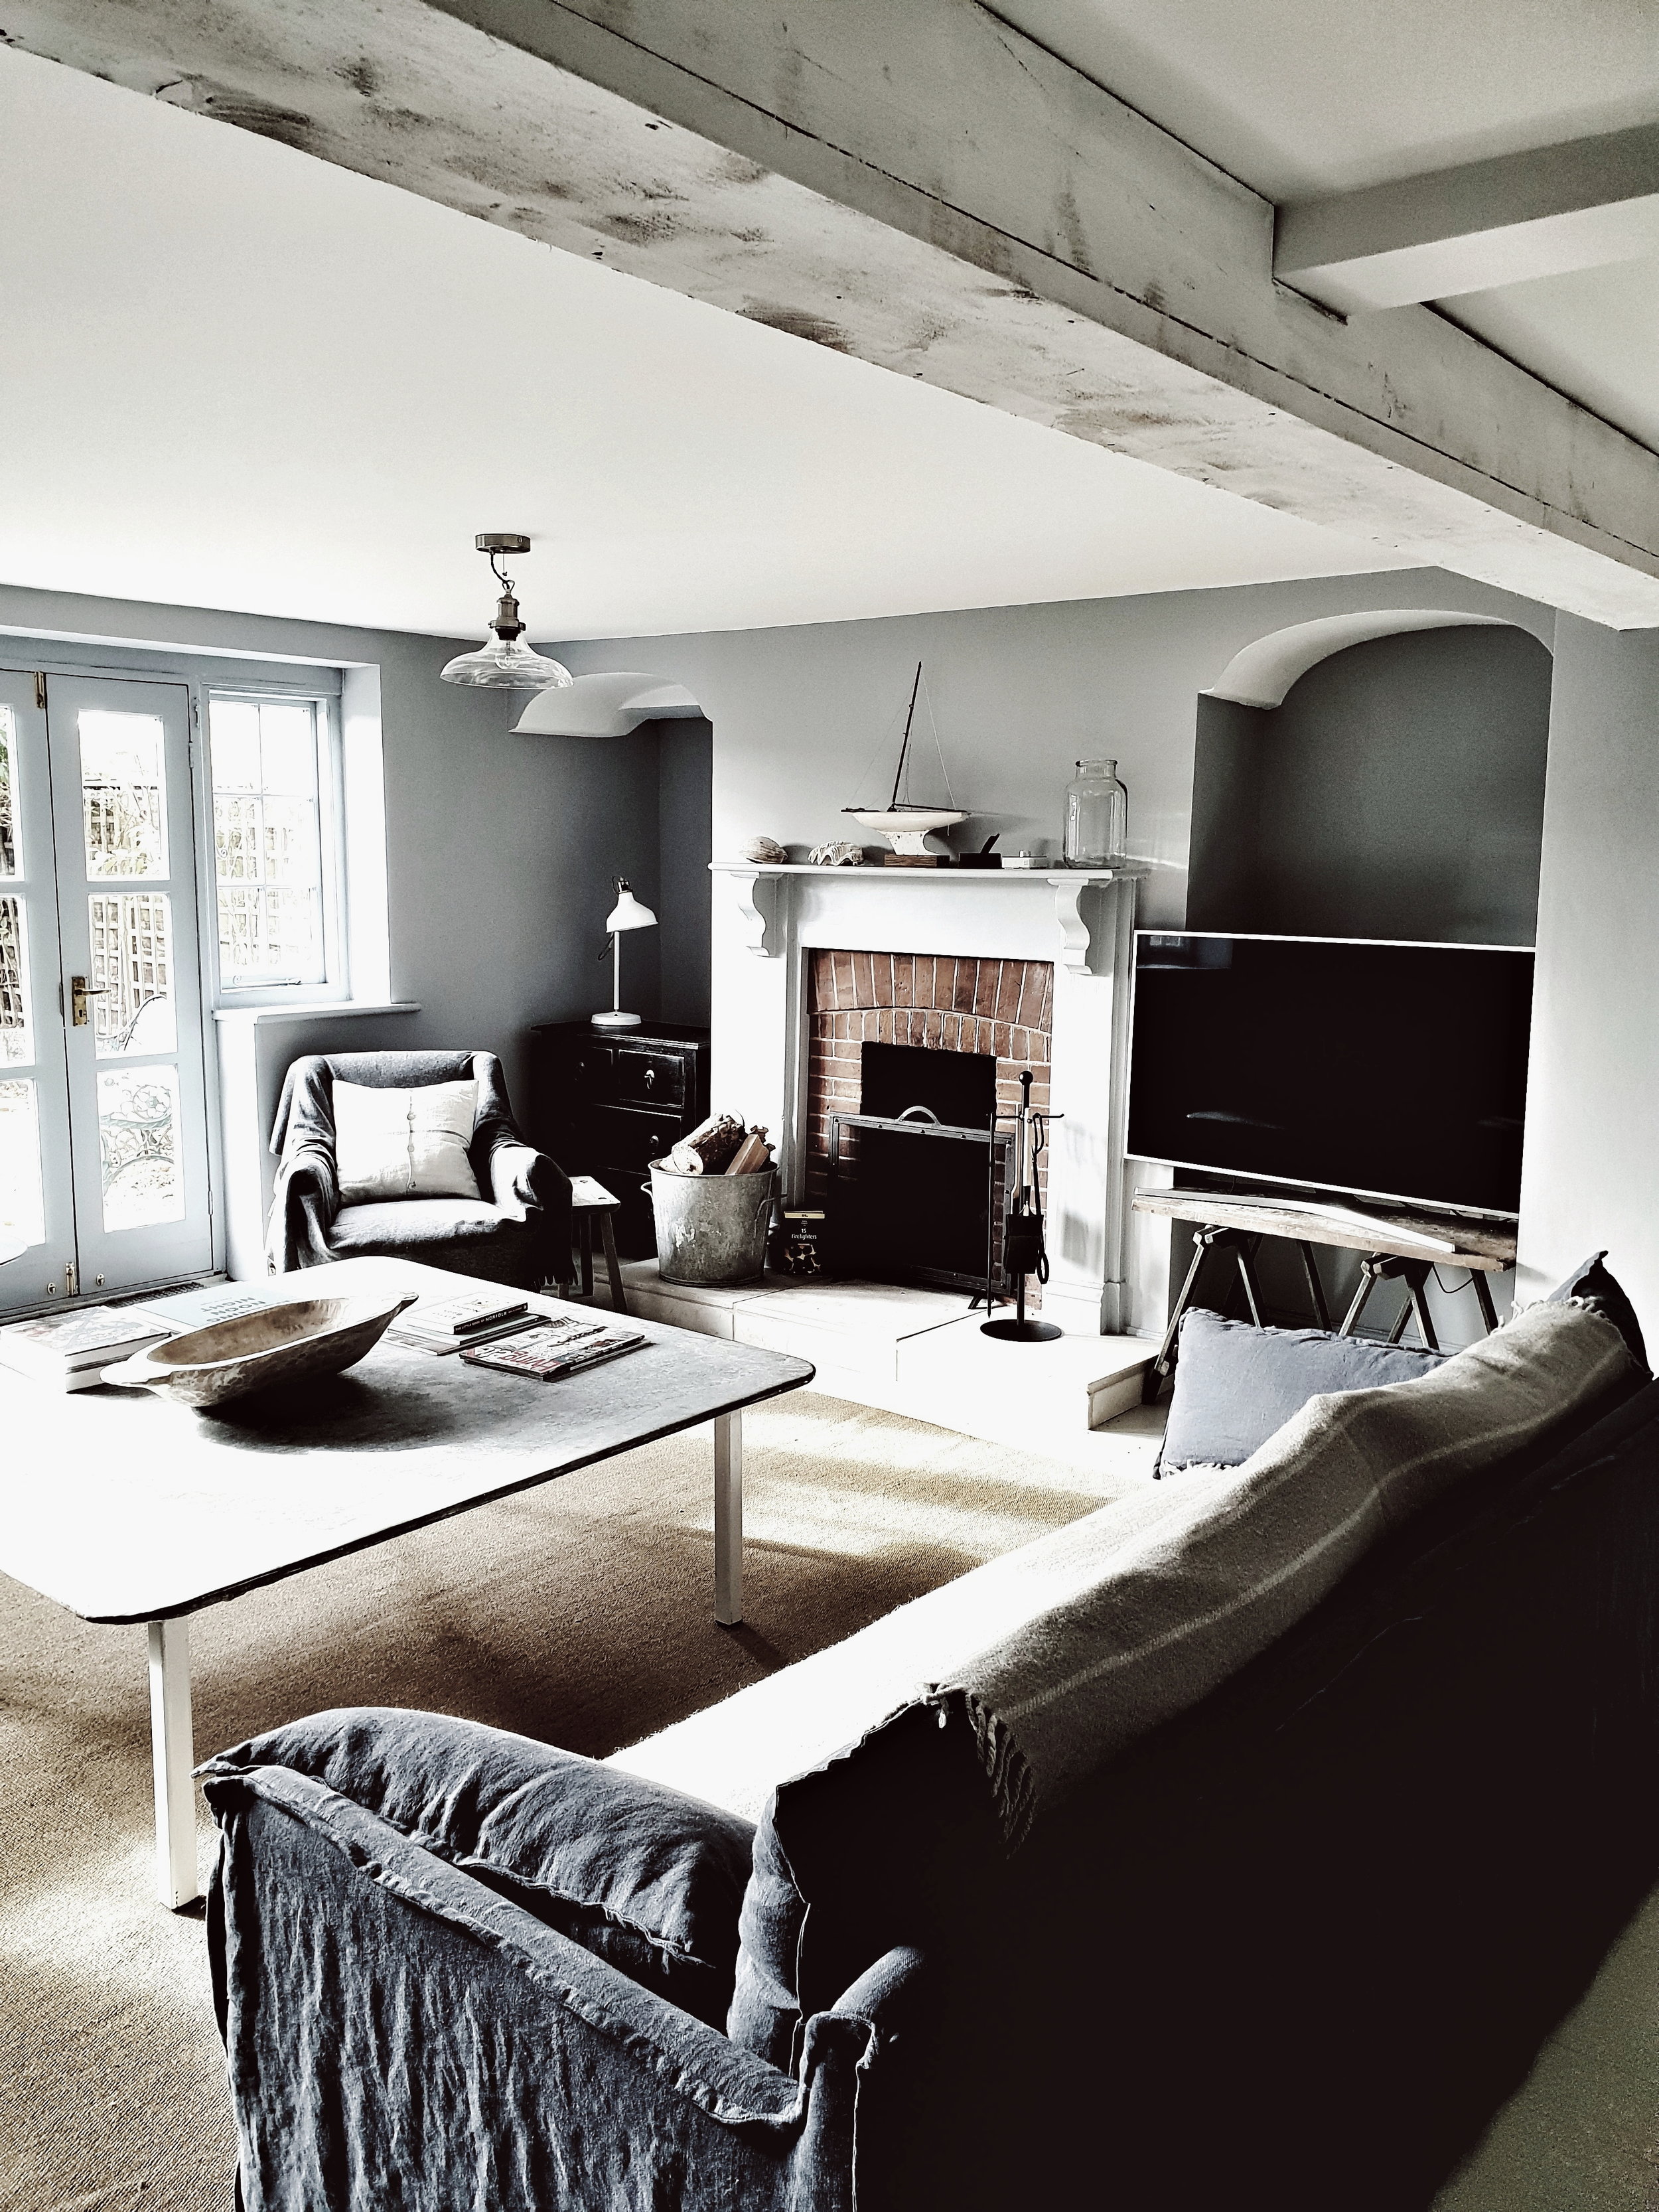
The living room with open fire and that zinc coffee table!
I love all of the subtle nods to coastal decor that Vicky has included in the cottage without it ever feeling beach themed

Settle down on one of the two huge sofas and enjoy a film

The kind of bath you want to linger in with Plum & Ashby products on tap

The Surrounding Area
If you can bring yourself to leave the comfort of the house then there are two stunning (and nearly deserted) beaches close by. The one at Carts Gap has a little café and Happisburgh boasts a Lighthouse and an excellent playground.

The seafront in Bacton on a slightly stormy day

The lighthouse at Happisburgh which is just ten minutes drive from the house
Bacton woods close to the house offer excellent dog walking/Gruffalo hunting opportunities and if you are in need of a National Trust top up then Felbrigg Hall is just 10 minutes away. The delights of the rest of the North Norfolk coast are also within easy reach with Holt (a lovely Georgian market town) just twenty minutes drive and beyond that gems including Wells on Sea, Blakney, Stiffkey, Holkham and more.
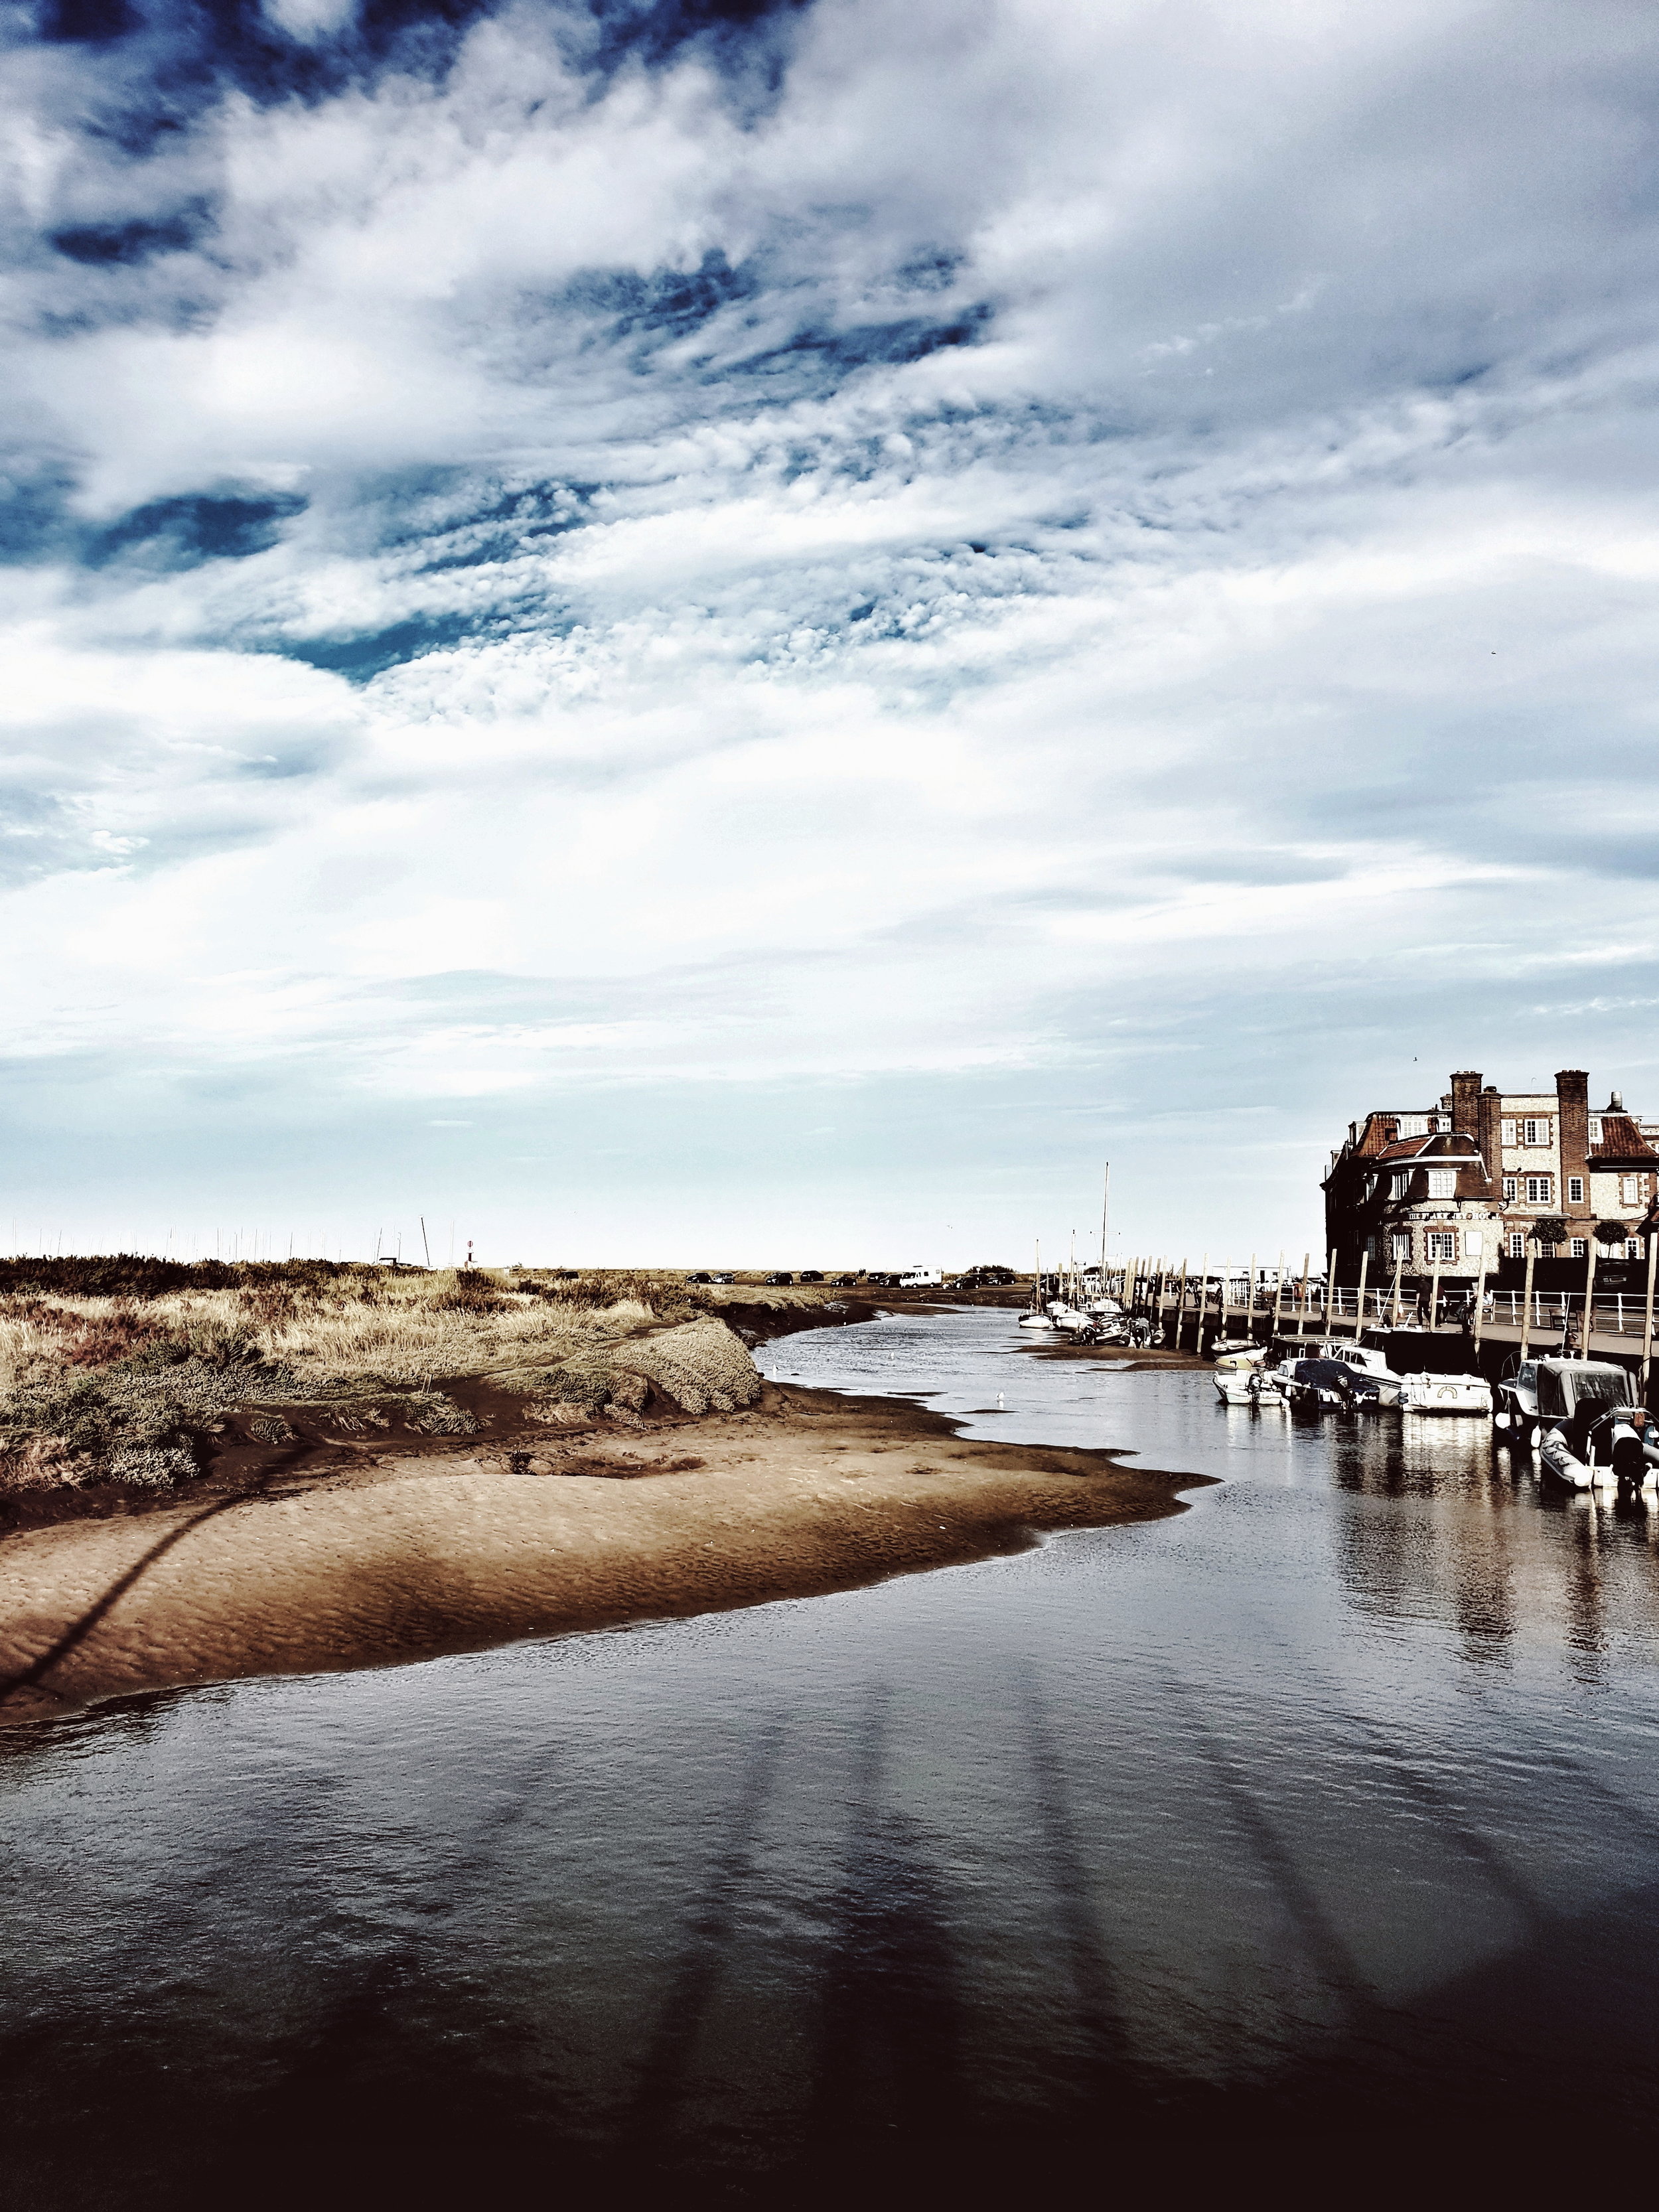
The harbour in Blakeney a lovely place to visit about an hours drive from the cottage


HUge open skies and miles of sand on Holkham beach

Disclosure 5 minutes after this idyllic mother and son photo was taken he did an emergency poo in a sand dune
We enjoyed a delicious pub lunch at The Victoria at Holkham and then a run on the vast and beautiful beach. We also called in at Stiffkey Stores for a coffee and spot of modern rustic interiors shopping. The kids loved a) the cabins for sitting in outside and b) the excellent selection of sweets for less than 50p on offer. I should also mention that the Gunton Arms (rated in the Top 50 places for a pub lunch by [ ]) is also just ten minutes away from the house. Be sure to reserve a table well in advance of your stay though as it gets really booked up!

The Victoria Inn at Holkham where we enjoyed a delicious pub lunch

Stepping inside Stiffkey Stores in like stepping into my Modern Rustic paradise
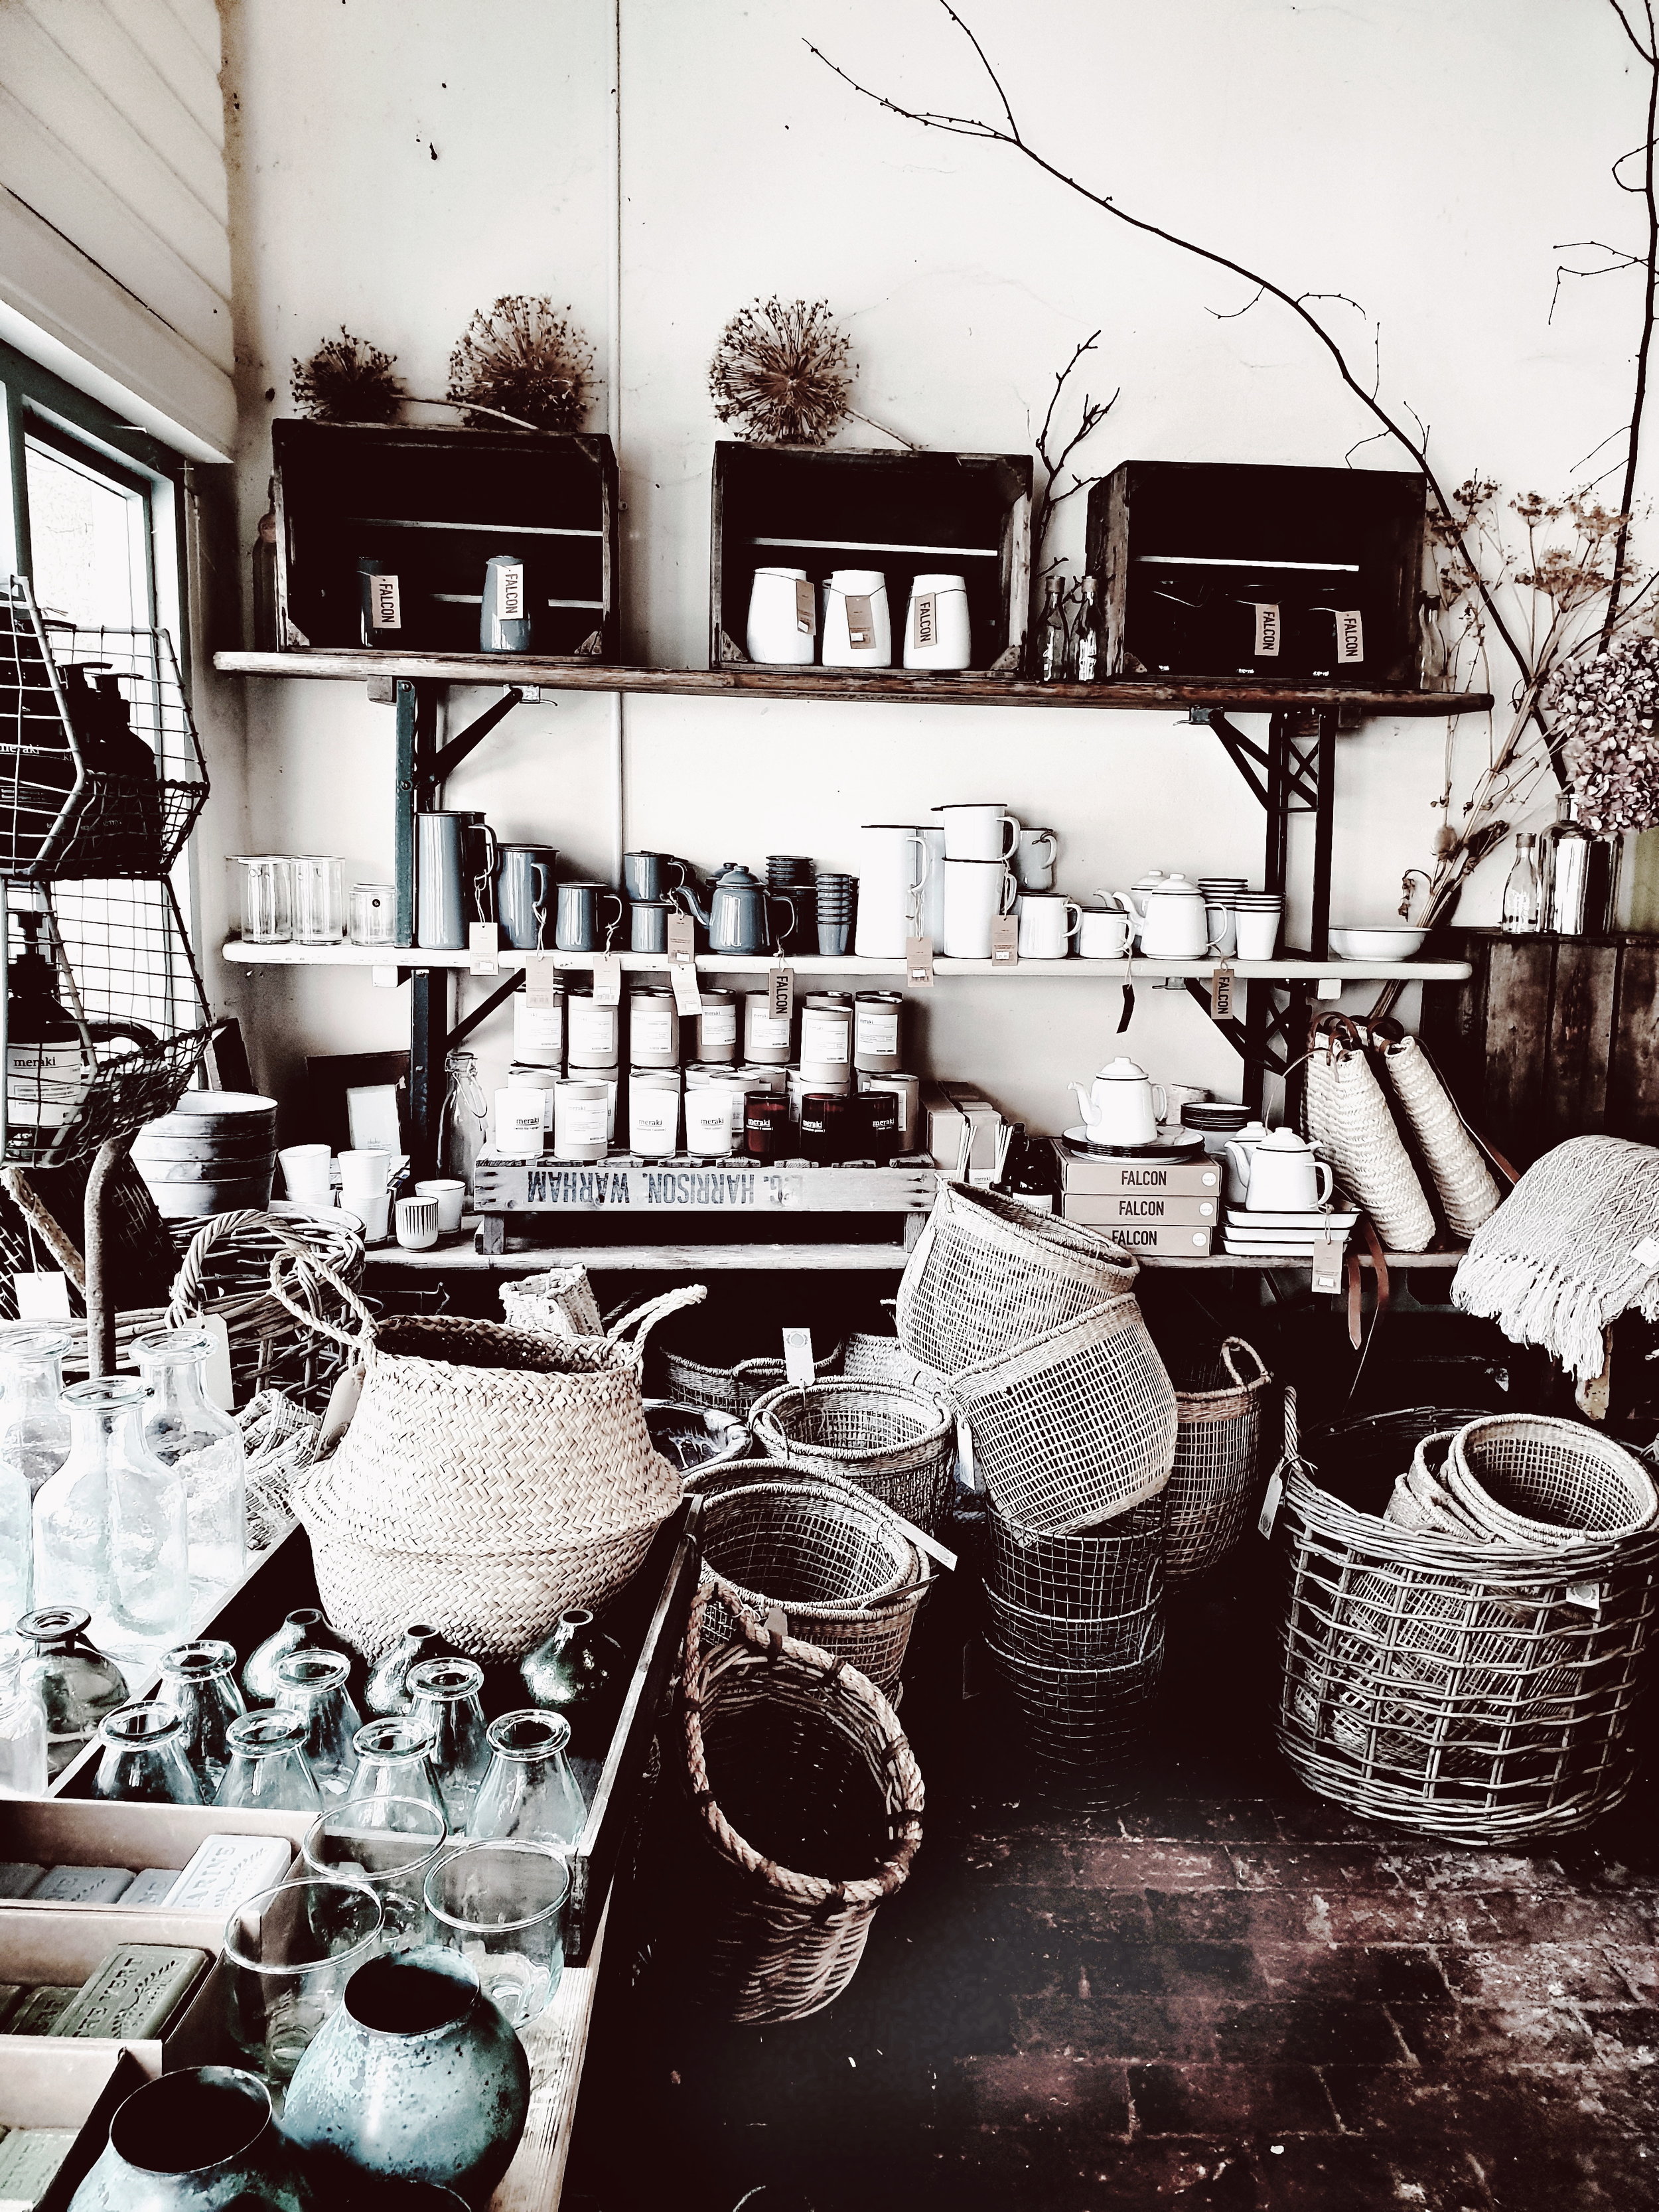
Some of the beautiful displays in Stiffkey Stores
So Anneka hang your jumpsuit back up and return to presenting the Sunday Morning Sizzle on Radio Colchester as this is one challenge I have solved without your helicopter even having to leave Broadcasting House. If you would like to book a stay at Edenhall Cottage click here you can also follow the cottage on instagram here. We were lucky enough to be guests of Vicky and Chris when we stayed but at less than £2000 for a stay even at the height of peak season it is a complete bargain compared to anything I have found of similar size/quality anywhere else in the UK!
*We did not pay for our stay at Eden Hall but I was not asked to produce any content in return for our stay. I am writing up our stay for the blog because it is genuinely one of the nicest places I have ever stayed and I wanted to share it with you *
My Living Room Makeover Plans
Do you have a room or area of your house that is off limits for Instagram? Without wishing to sound too Joseph Fritzl, our “hidden room” is our dining room. I call it the dining room because 8 years ago when we first moved in (and prior to doing the kitchen extension) this is where our kitchen table used to be. Once the extension was complete we moved the table to the bottom end of the kitchen, opened up the wall between the kitchen and this room and made it into a second living room. Confused?

This side of the room often pops up on Instagram as it features one of my favourite additions to the house: these faux crittal doors

The kitchen table which has been relocated to the new extension
I want to say I will artfully sketch you a floor plan in charcoal so you can see how it all fits together but unfortunately I have drawing skills that are on a par with those of a worm drunk on tequila so I am hoping that these next photos will help to make things a bit clearer!

The kitchen used to be accessed by a narrow door to the left of this picture. Knocking out more of the wall and shifting the entrance has allowed lots more light into the “dining room”
Opening the artist formerly known as the dining room to the kitchen has made a huge difference to our family life and we use it lots as a relaxed family living room but this space very rarely graces the grid for the following reasons:
1) It is home to a toy storage unit which regularly belches out brightly coloured plastic objects and which can only be moved with the assistance of a small crane or Hulk Hogan

Thanks to Hulk Hogan for popping round and helping me move it for the purposes of this blog. The whimsical rustic ladder was all Hulk’s idea.
2) There is a 1980s radiator stranded behind the sofa shitting on every shot with it’s Soviet Era bad looks (although it does come in incredibly handy for resting a mug of tea on). In all seriousness as well limiting my insta possibilities it’s current location means it is mainly heating the back of the sofa rather then us.

My temporary radiator cover up solution!
3) The kids treat the sofa as both a trampoline and dinner table meaning it looks like the kind of two piece suite you often find in a mini cab office that has been sat on by 27,876 15 stone men called Keith eating kebabs whilst waiting for a cab.
But I have some plans for this space which may see it making more of an appearance on Instagram in 2019 which I thought I would share with you here (mainly to give myself a kick up the arse to get on with them)
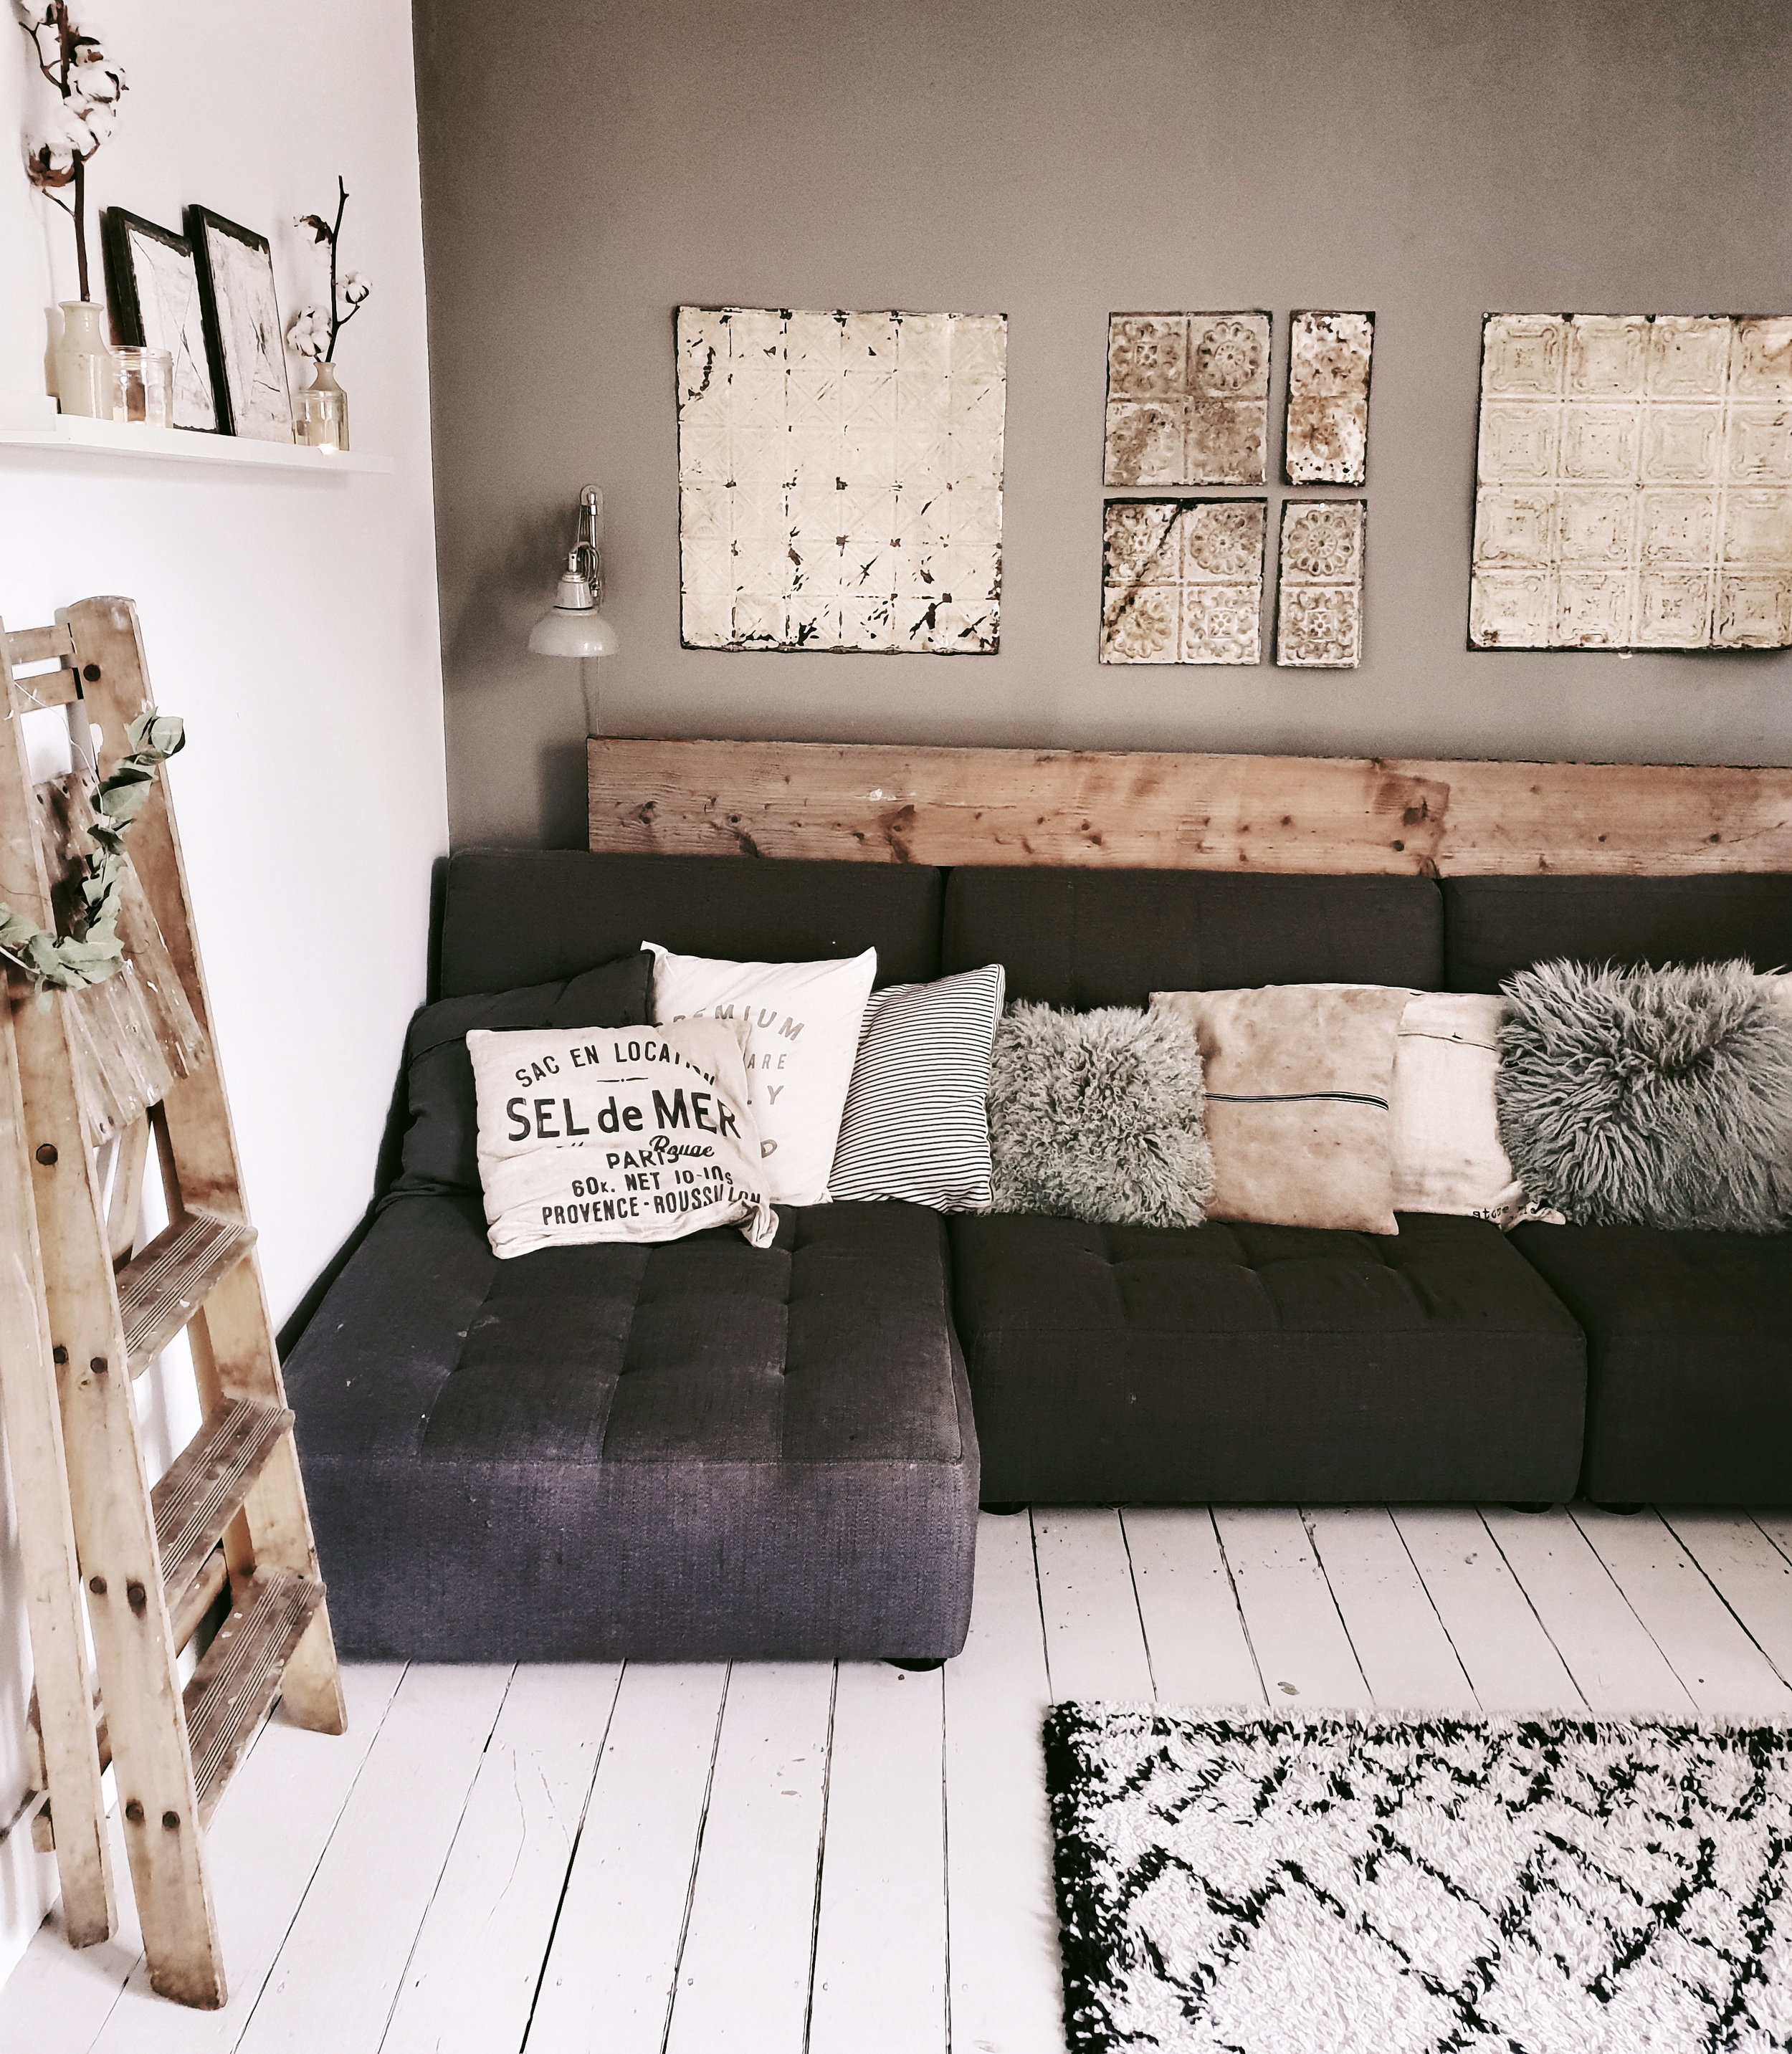
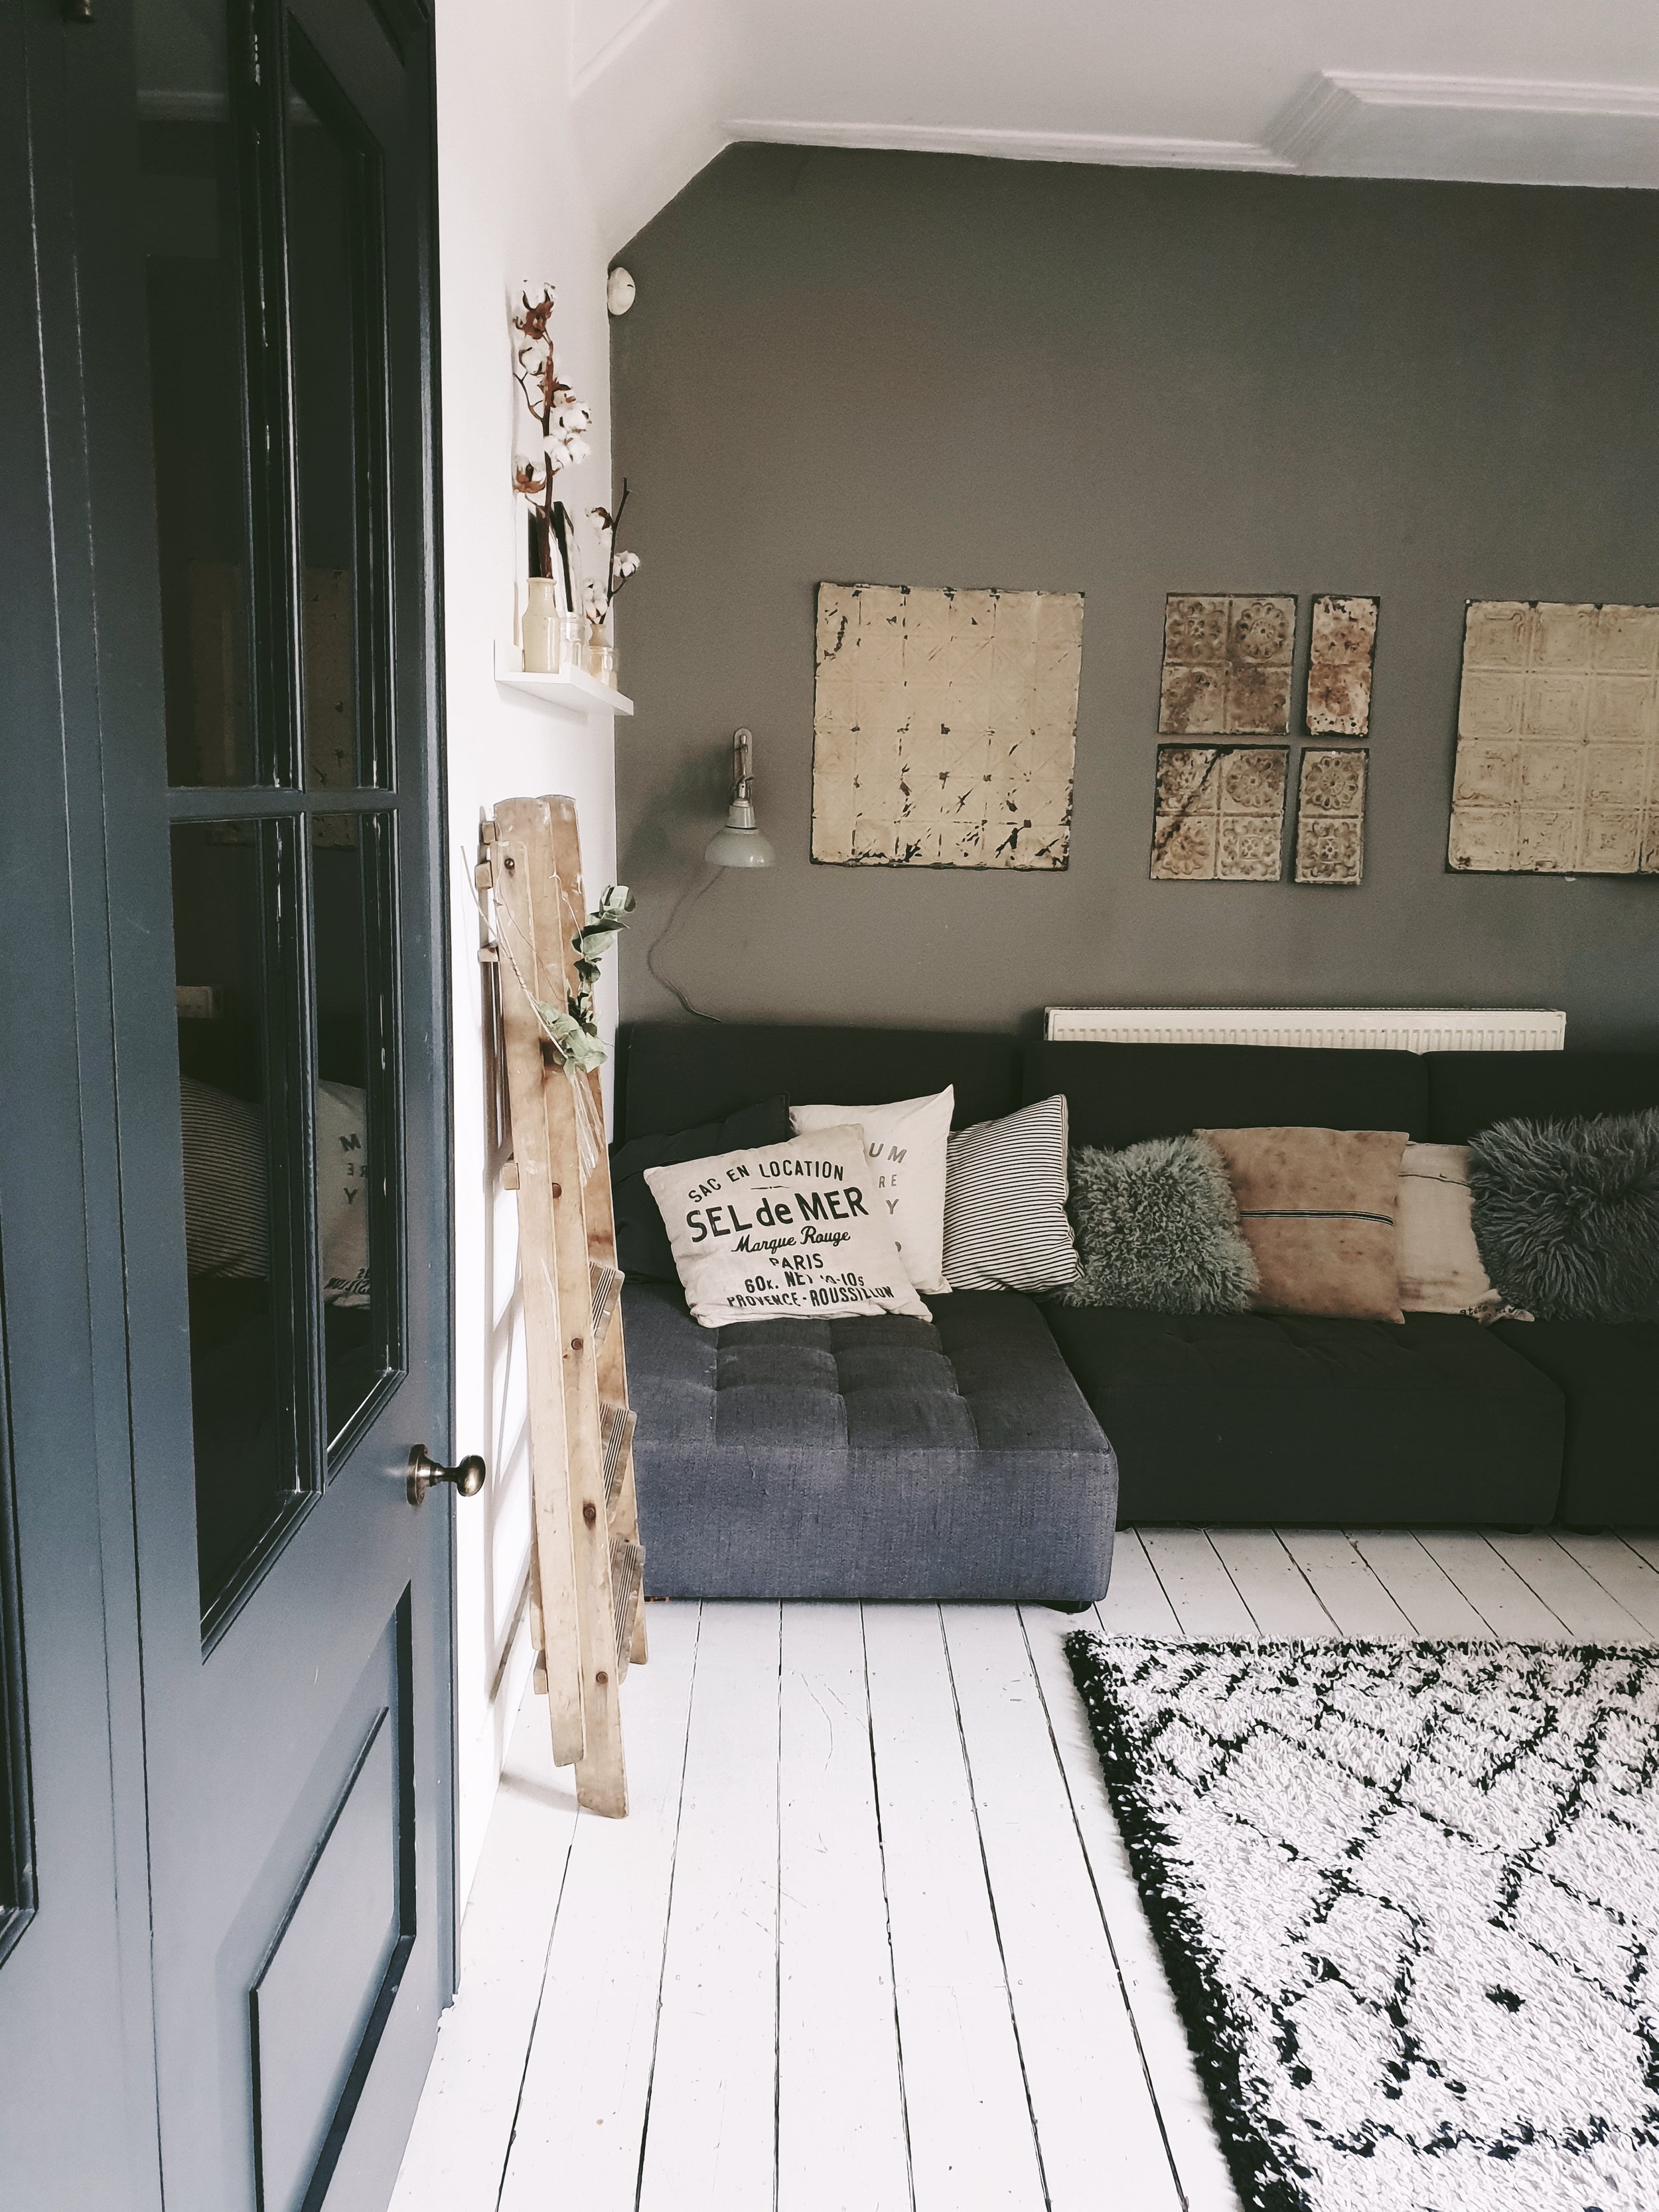
The sofa in all of it’s banana and butter stained glory

Hoping that my mum isn’t reading this blog as I know she will be telling me off for having my shoes on the sofa!
Step One: Re-positioning the Shits On Every Shot Radiator
This is 95% because all of the heat it emits gets lost behind the sofa and 5% because it limits my insta possibilities in it’s current position (ok maybe more like 75%/25% but still…). Kevin my quotes guy has been round to suss out alternative positions and assures me it can fairly easily be removed from this wall and a new vertical column radiator positioned on the wall leading to the kitchen instead. I haven’t mentioned this plan to Mr Malmo yet on the basis that it involves taking floorboards up and he will probably therefore receive it as warmly as an invitation to set his own pubic hair on fire. There were some murmurings from Kevin about BTUs (which I believe relates to heat output rather than the currency of Moldova) which may slightly restrict the choice of radiator I can go for but I am thinking of either a white or light grey one so that it is not too noticeable in it’s new location.


The re positioned radiator will go on the wall to the right in this picture
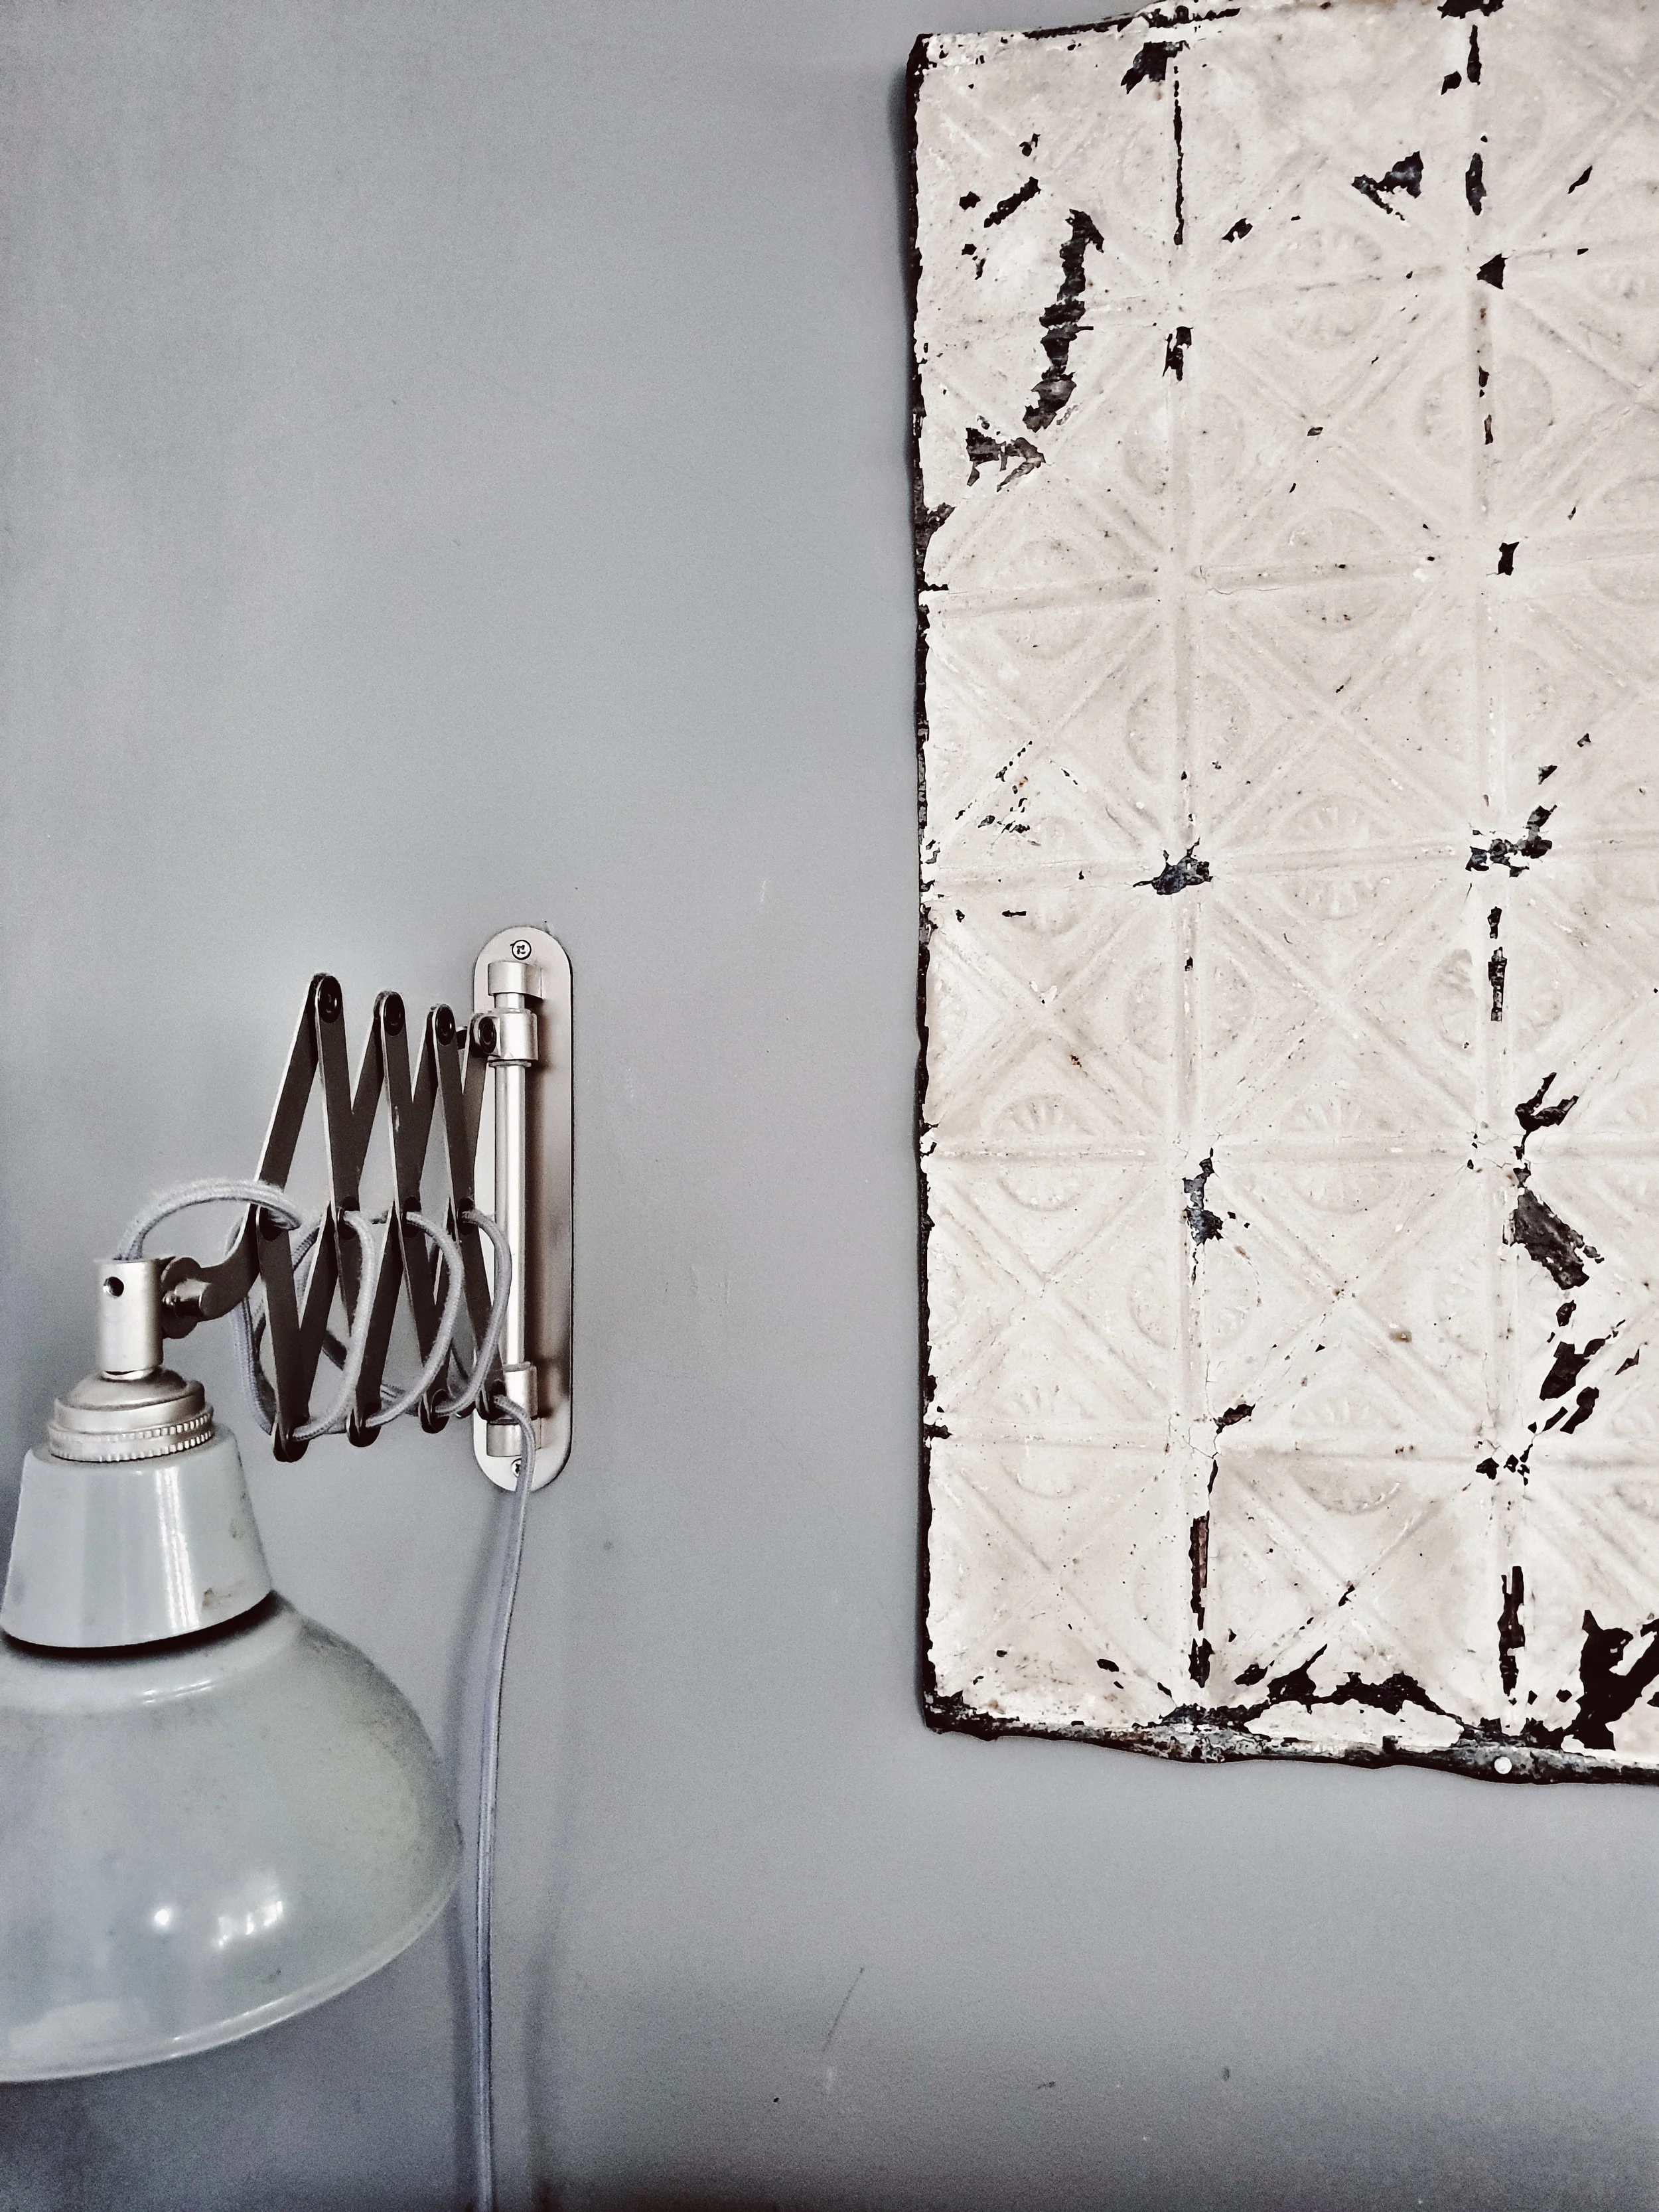
Step Two: Pimp My Wall Rustic Industrial Style
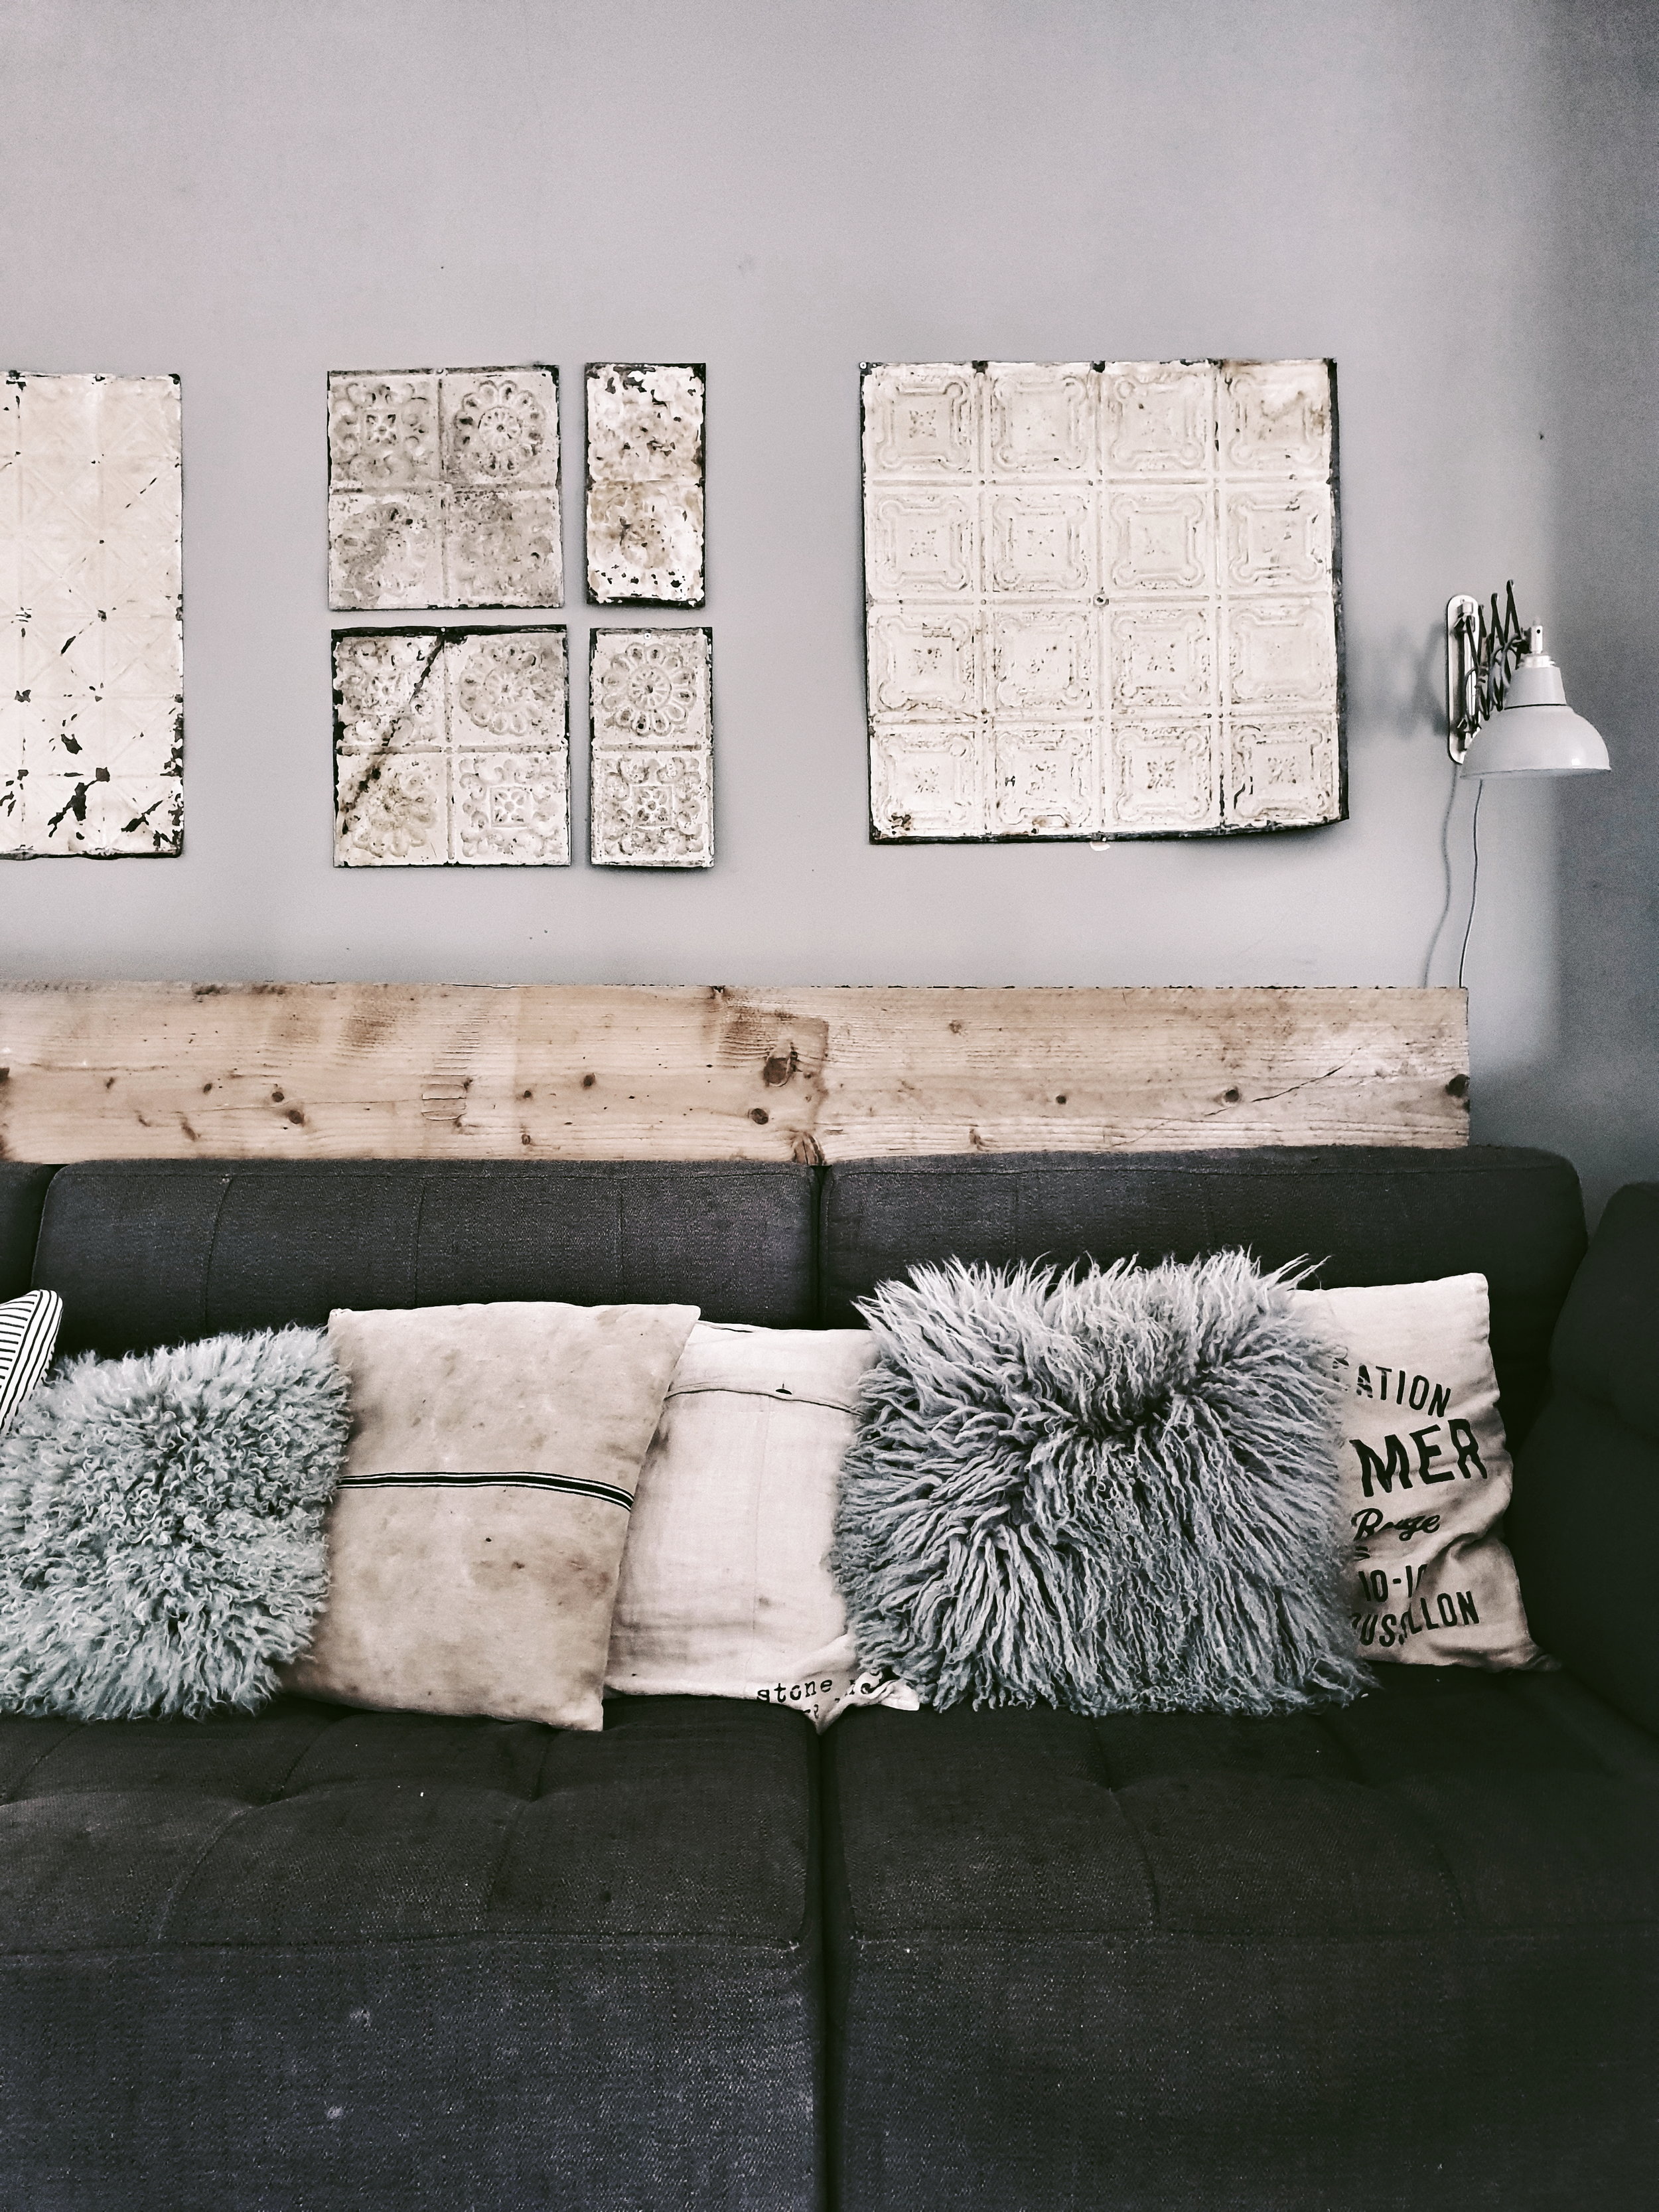
With the radiator shot cock block out of the way I am planning on making the wall behind the sofa more of a feature wall. Not in the Lawrence Lwellyn Bowen flocked wall paper sense obviously. It will not surprise you to learn that I have a more rustic/industrial plan up my sleeve. I currently have three of these gorgeous old Brooklyn ceiling tiles on the wall but I now want to go large and cover the whole wall with them. I know that you can now get wall paper with them printed on but I really want the texture and feel of the real deal. My inspiration comes from Baileys Home and Garden where they have done this to stunning effect. Nailing 50 of them to the wall should be simple right? If in the big room reveal it actually turns out to be a feature wall of LLB’s new satin flocked wallpaper you will know that it has turned out to be anything but.

Ceiling tiles on the bar at Baileys Home and Garden as captured by @kinshipcreative_dc

I picked up three of these beautiful Brooklyn ceiling tiles at Sunbury antiques fair a couple of years ago.
Only need to find another 49 of them now…..
Step Three: Saying Goodbye to the Seatdrop Sofa
There is a school of thought that says that we should hang on to the minicab office sofa until the boys are of an age when they are able to eat a banana without nearby surfaces ending up looking like they have a bad case of fruit based thrush. However, I am going with a different more visually pleasing school of thought that says that if we have the corner sofa of my dreams in a smoky grey velvet they will love it so much that eschew their previous #badbananamanners. Has anyone else combined velvet soft furnishings and three boys without having to take a Valium anytime they go near it?

Trying to demonstrate to the boys that the sofa is for sitting pretending to read a coffee table interiors book on rather than trampolining

Step Four: Trimming down the Toy Storage and Creating a Magazine Library
We are currently in the midst of a lengthy rearrangement and redecoration of the boys bedrooms which make building the Taj Mahal look like a quick project. Once that is complete I am hoping to relocate the current toy storage holder upstairs and replace it with something that belches plastic less frequently (ideas on a postcard please!). I would then love to add some more picture shelves to this wall to display some of my abundant collection of interiors mags because what woman doesn’t love to get her Kinfolk out for the lads? Although do you think that having more picture shelves might be too much with the wall of many rustic tiles as well?

This stunning shot from the home of @bloggabis is inspiration for my picture ledge extension

The wall to the left is where I am envisaging the additional picture shelves going

But do you think it will be too much with my rustic tile feature wall as well?

So there you have it my Living Room makeover plans for 2019. Apologies for the slightly analogue presentation of them. Learning how to create a digital mood board is one of my life goals for 2019 after I have nailed more regular (by which I mean more frequently than twice yearly) maintenance of my bikini line and the art of loading the dishwasher so that it doesn’t look like it has been done by Gazza upon returning home from a night on the lash.
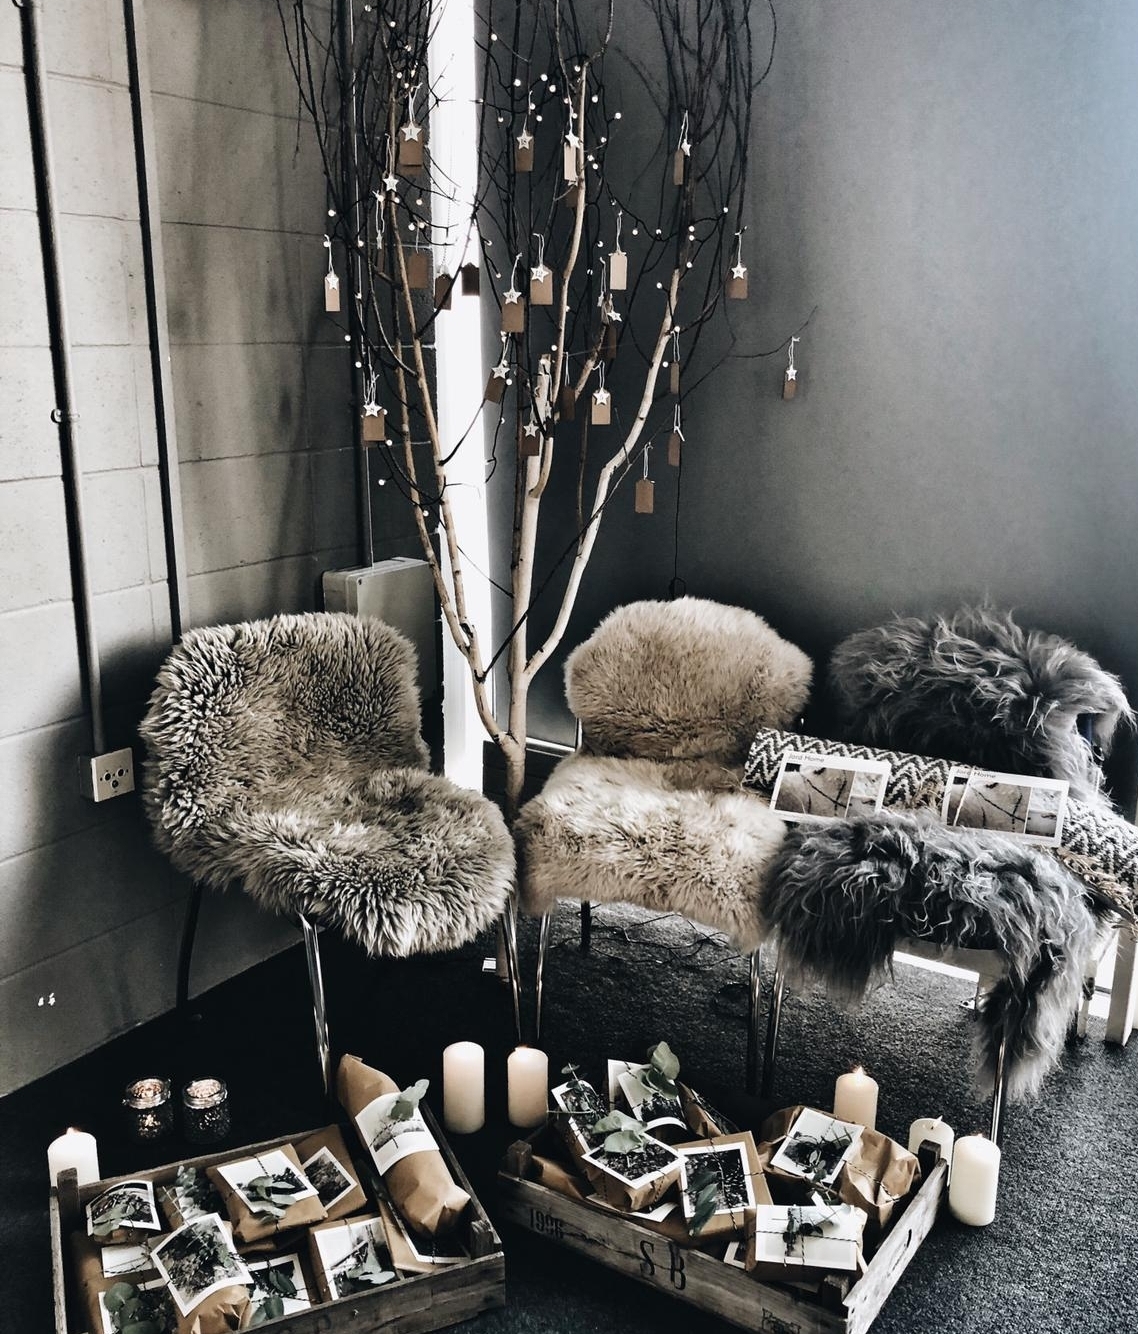
Styling a Scandinavian Christmas Table
Christmas can be an expensive time of year with presents, parties and panto combining to mean you have taken on the national debt of Belgium by the 1st of January. I love decorating my home for Christmas but I don’t think you need to spend a fortune doing it or to invest in loads of stuff that you are going to chuck away after Santa has set off back to the North Pole. If, like me, you are operating with more of a Morrisons than Macy’s budget then going for a Scandinavian inspired Christmas look is ideal. Our Scandinavian friends like to keep things simple and minimal and to use lots of natural foliage that you can forage from your garden or local parks under the cover of darkness.
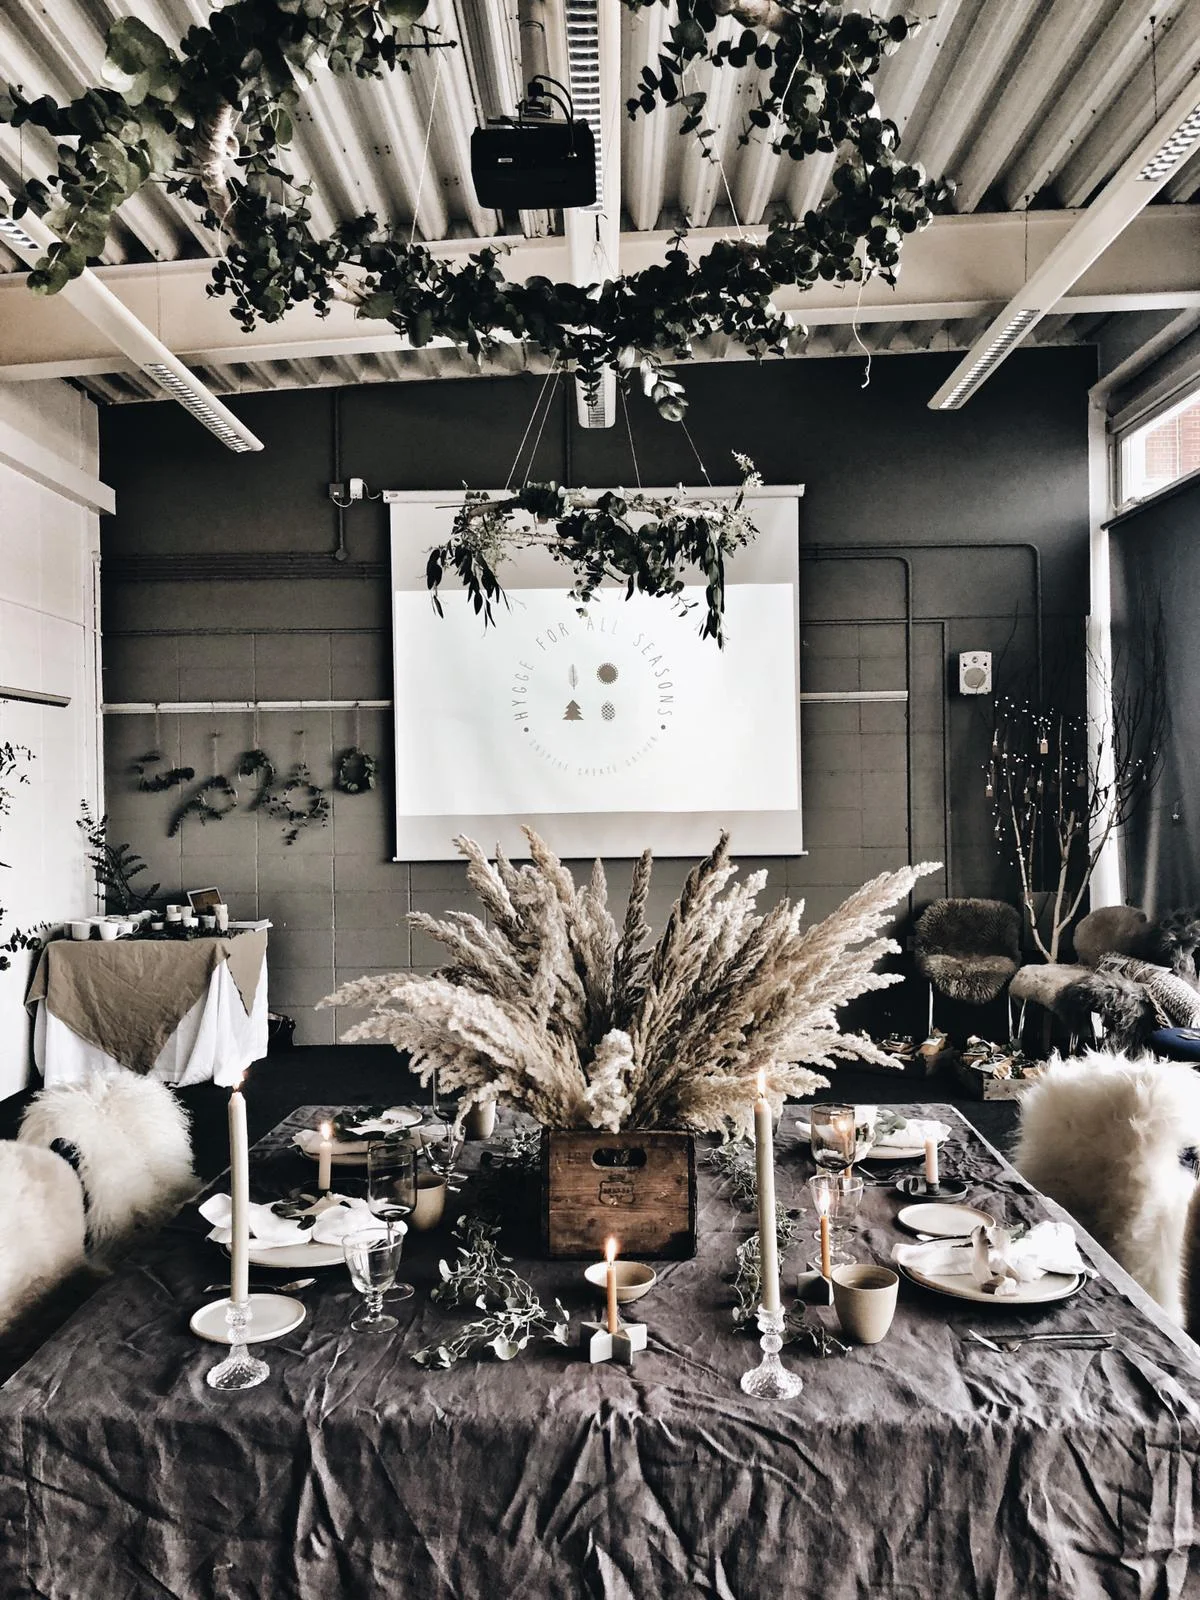
The Christmas table Reena and I created at our recent Hygge for all Seasons workshop
At our recent Hygge for all Seasons workshop at the Occasional Home Store, Reena (@hygge_ for _ home) and I created a Modern Rustic/Scandi inspired Christmas table scheme featuring 3 simple ideas for table decorations inspired by our favourite Nordic instagram accounts and nature. If you are not already following our inspiration accounts then you are in for a treat

The beautiful account of German sisters @babes_ in _boyland
Cool white Christmas with a boho twist in the Swedish home of @bytrineravn

Rustic maximalism in the Finnish home of @storm_ and _ clay
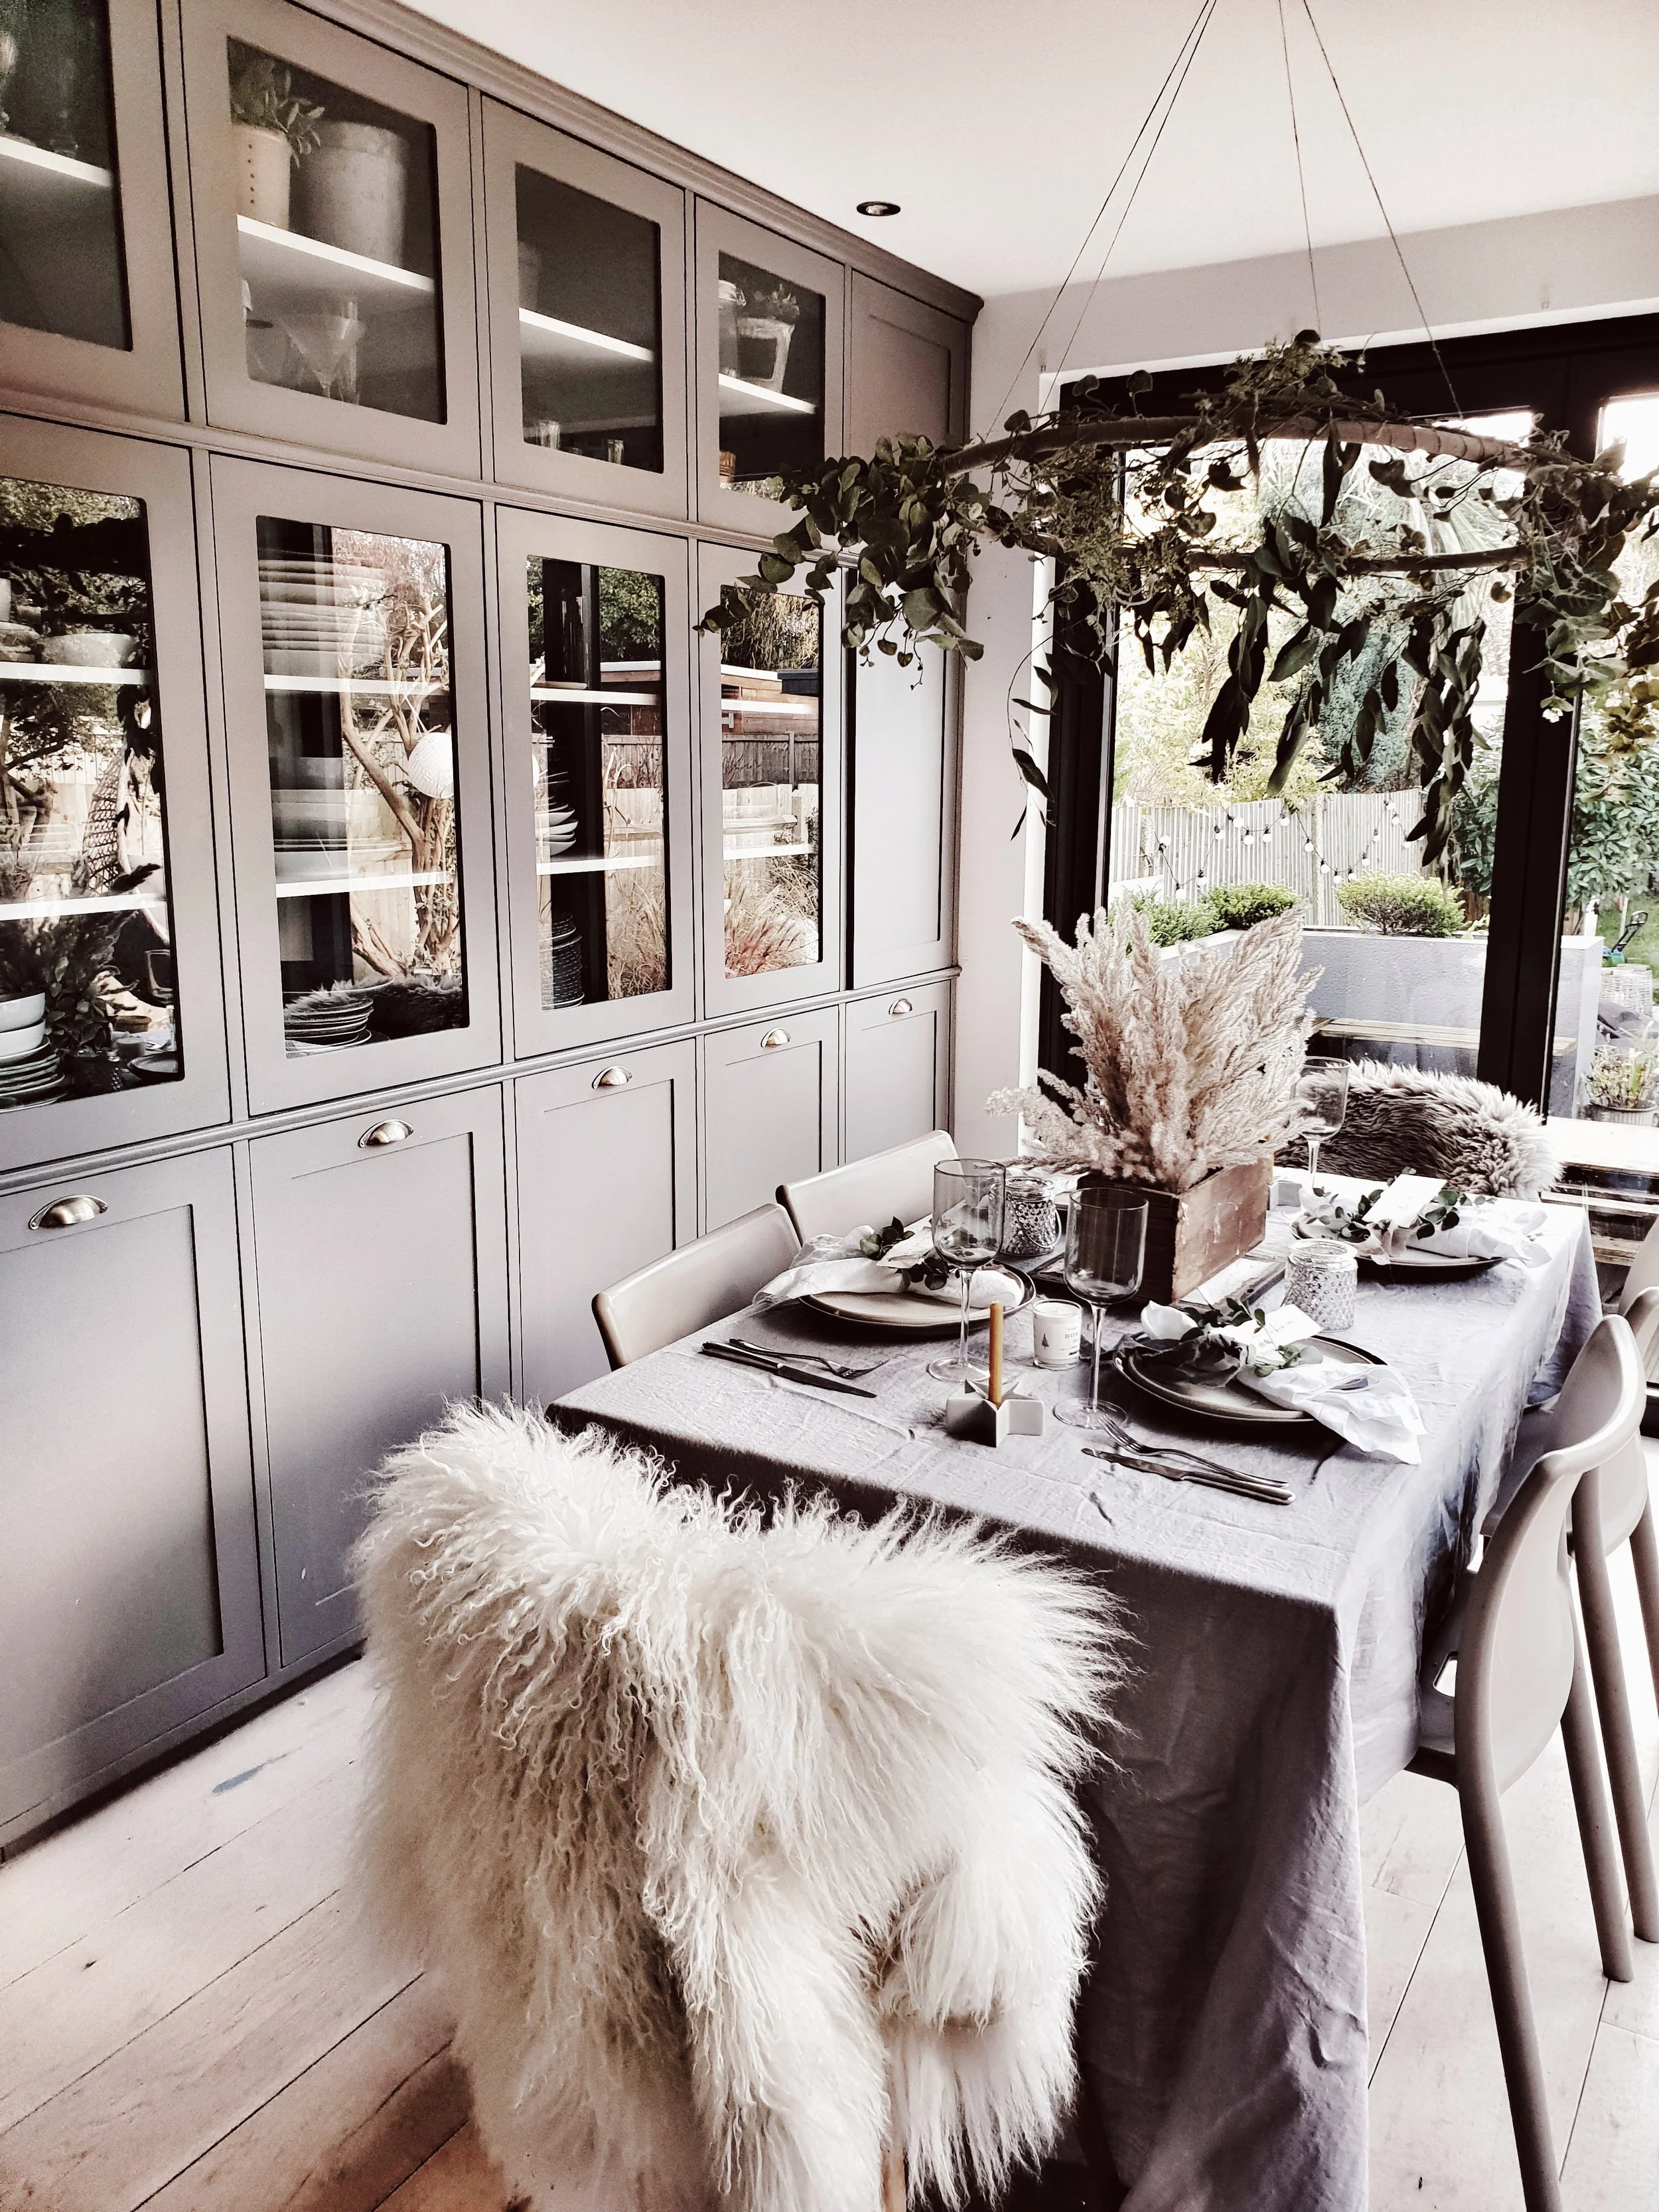
The space we were transforming for Hygge for all Seasons was a big lecture room overlooking a beautiful reservoir. It meant we were working with quite high ceilings and a bigger table than the average family would be sitting down to on the 25th December. But to show that the ideas can work in any setting I have also recreated them at home so you can see just how easy it is to do

The view out over the West Reservoir from our workshop room

Our workshop venue, a beautiful 1930s former water filtering station
We used a dark grey linen tablecloth kindly loaned to us by Chalk Pink Linen for the base of our table along with some of their lovely crisp fresh white linen napkins. They also do all of their linen in a gorgeous dove grey which I used when I styled my table at home. For our tableware we used earthy ceramic plates and beakers in muted neutral colours from Igigi General Store and then added interest to the table with some simple Scandi candle holders in the shape of stars from The King and I and I and for a tiny touch of twinkle some vintage crystal ones from Hellish Designs. We added a bit of Nordic drama to the table with our dramatic pampas table centrepiece and hula chandeliers.
Our gifting advent tree allowed Scandi Santa to share some suprises with our guests from Jord Home, Malako Skincare, Sevin London, Thornback and Peel, Lovestruck Interiors, Kate and the Ink, Igigi General Store, and A Little Botanical

A charcoal grey tablecloth from Chalk Pink Linen provided a great backdrop to our table scheme

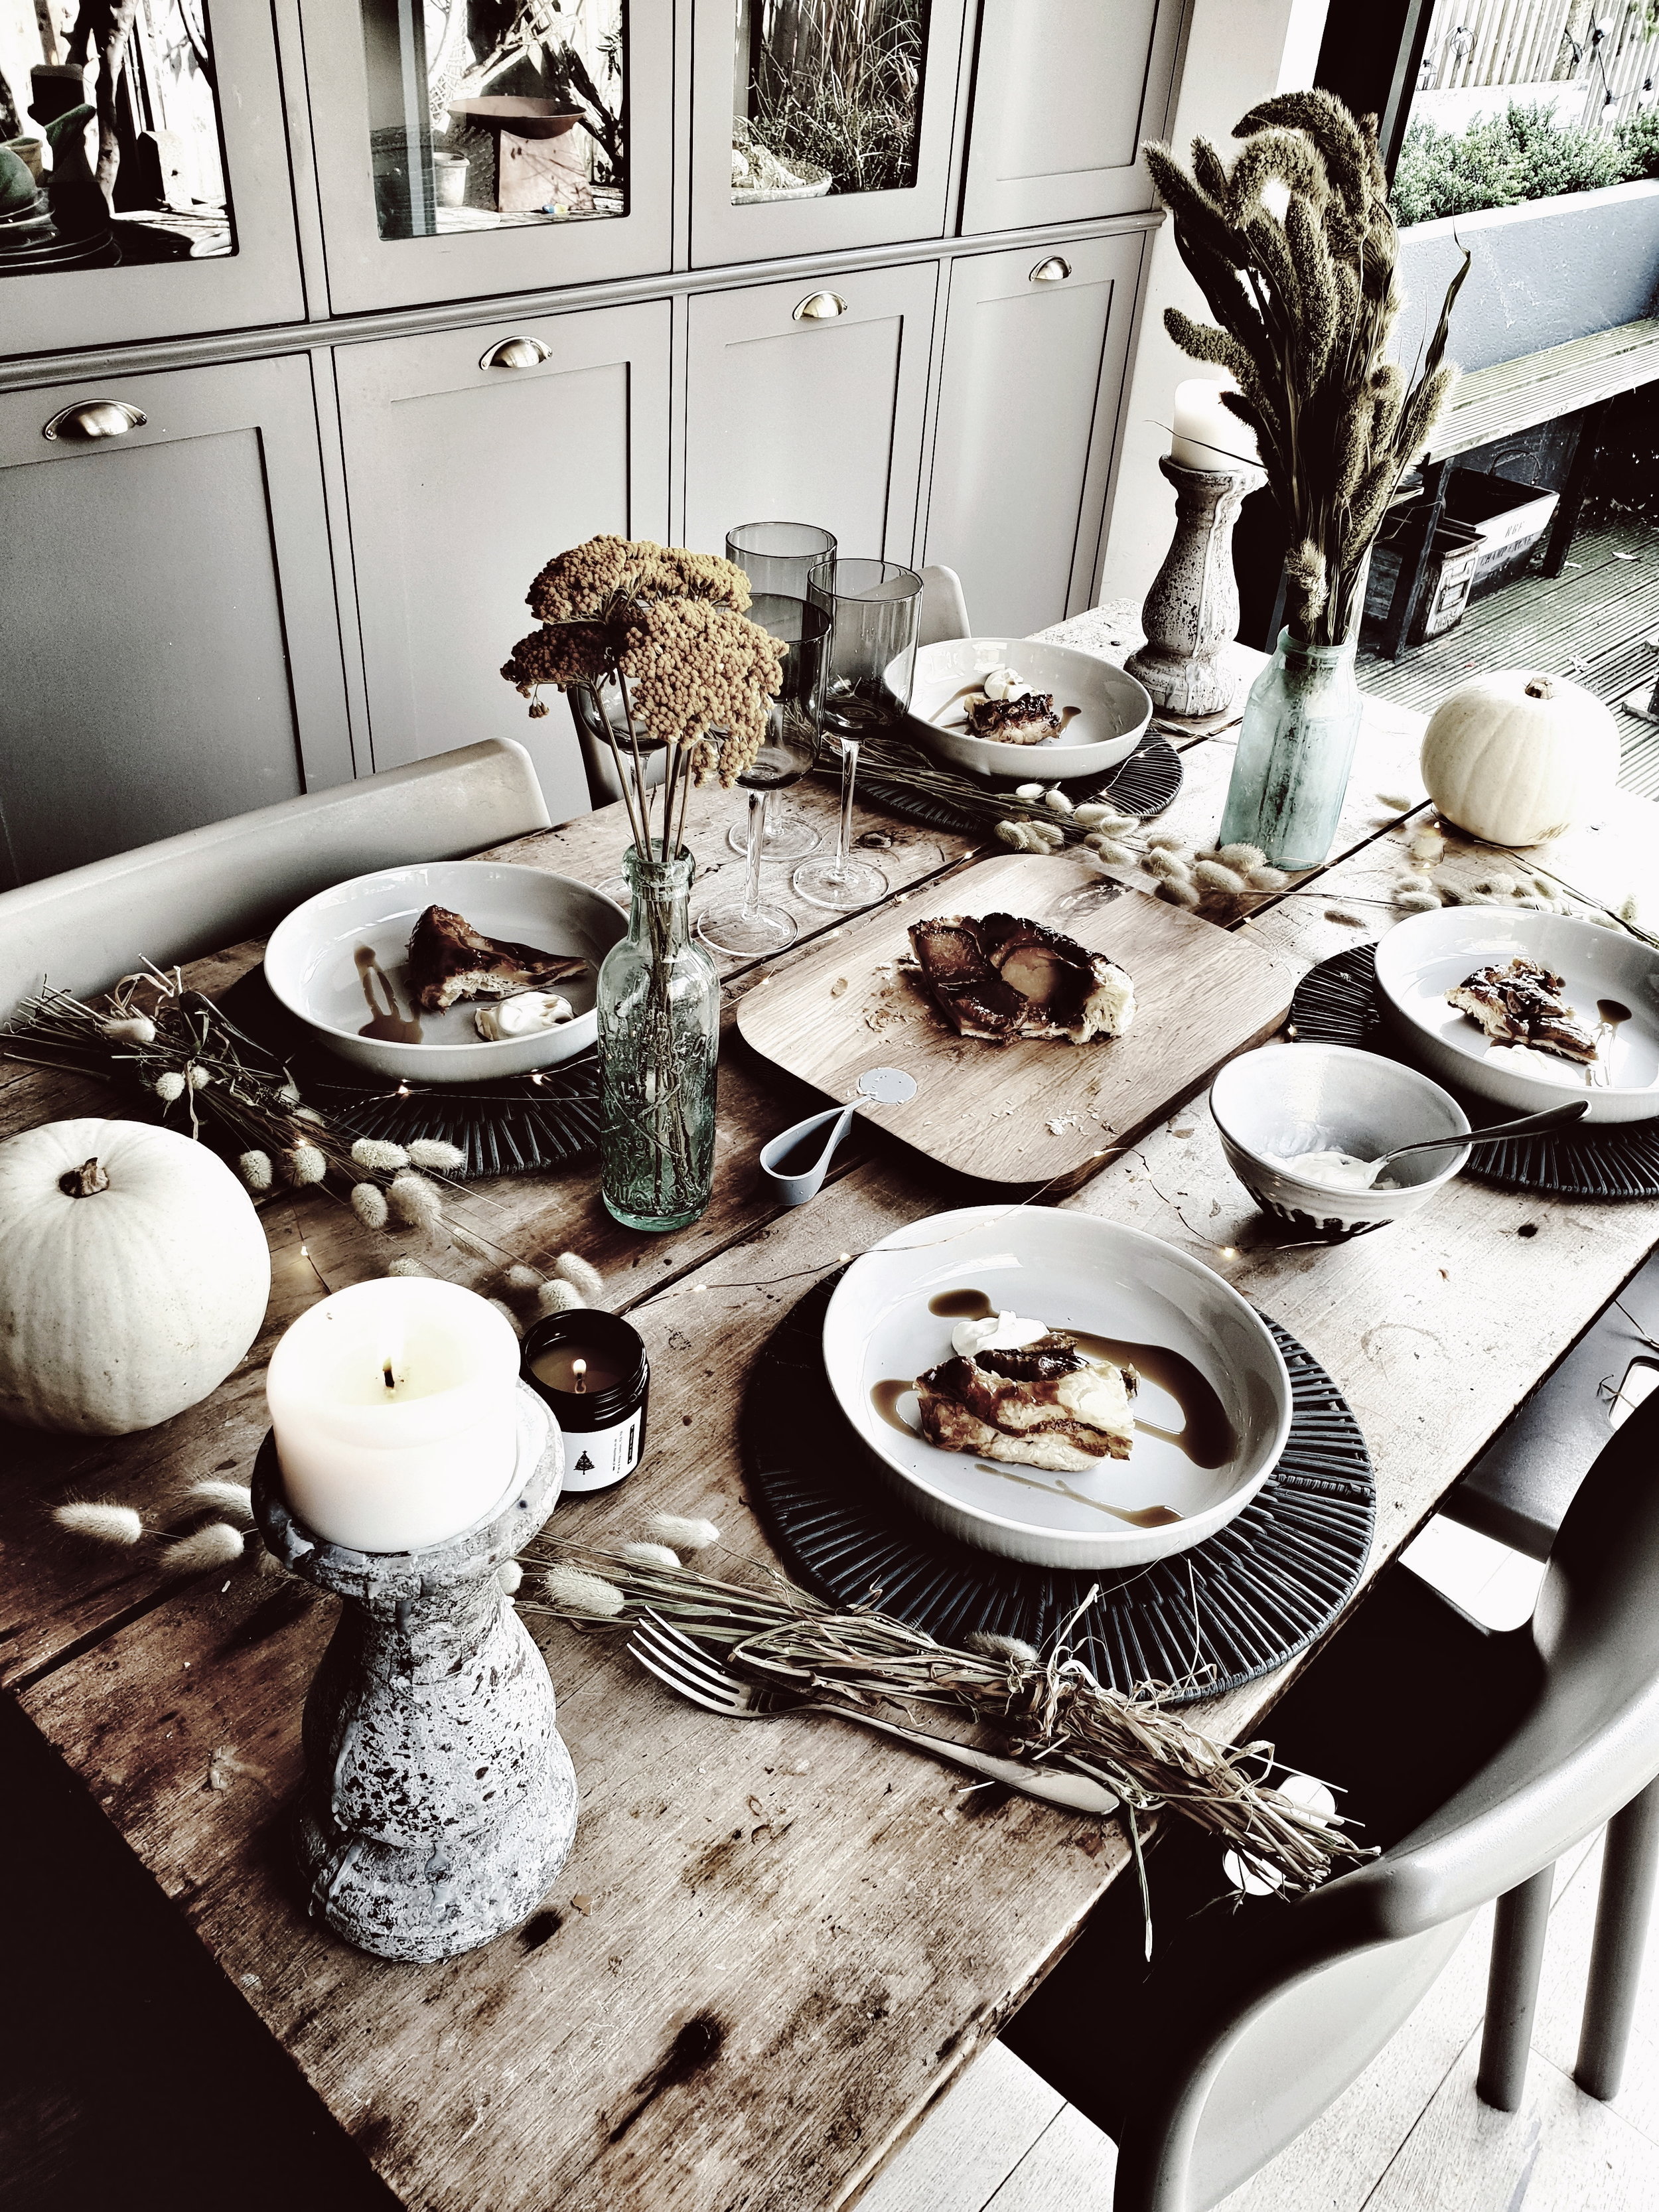
We were working with quite a big space so went for a dramatic table centre piece using pampas grass and made the table cosier by adding sheepskins to our chairs from Jord Home
After feasting on Bronuts from Norahs Brownies (it turns out that combining two of my favourite cakes together creates a third cake I like even more) our work shoppers went home with a luxury botanical candle from Join London which are hand poured in Jen’s South-East London riverside studio and use only natural ingredients. If you were not able to come along on the day but would like to create a similar modern rustic look for Christmas table then read on and find out how to use chicken wire, a hula hoop and fencing wire to create a Nordic Noel.
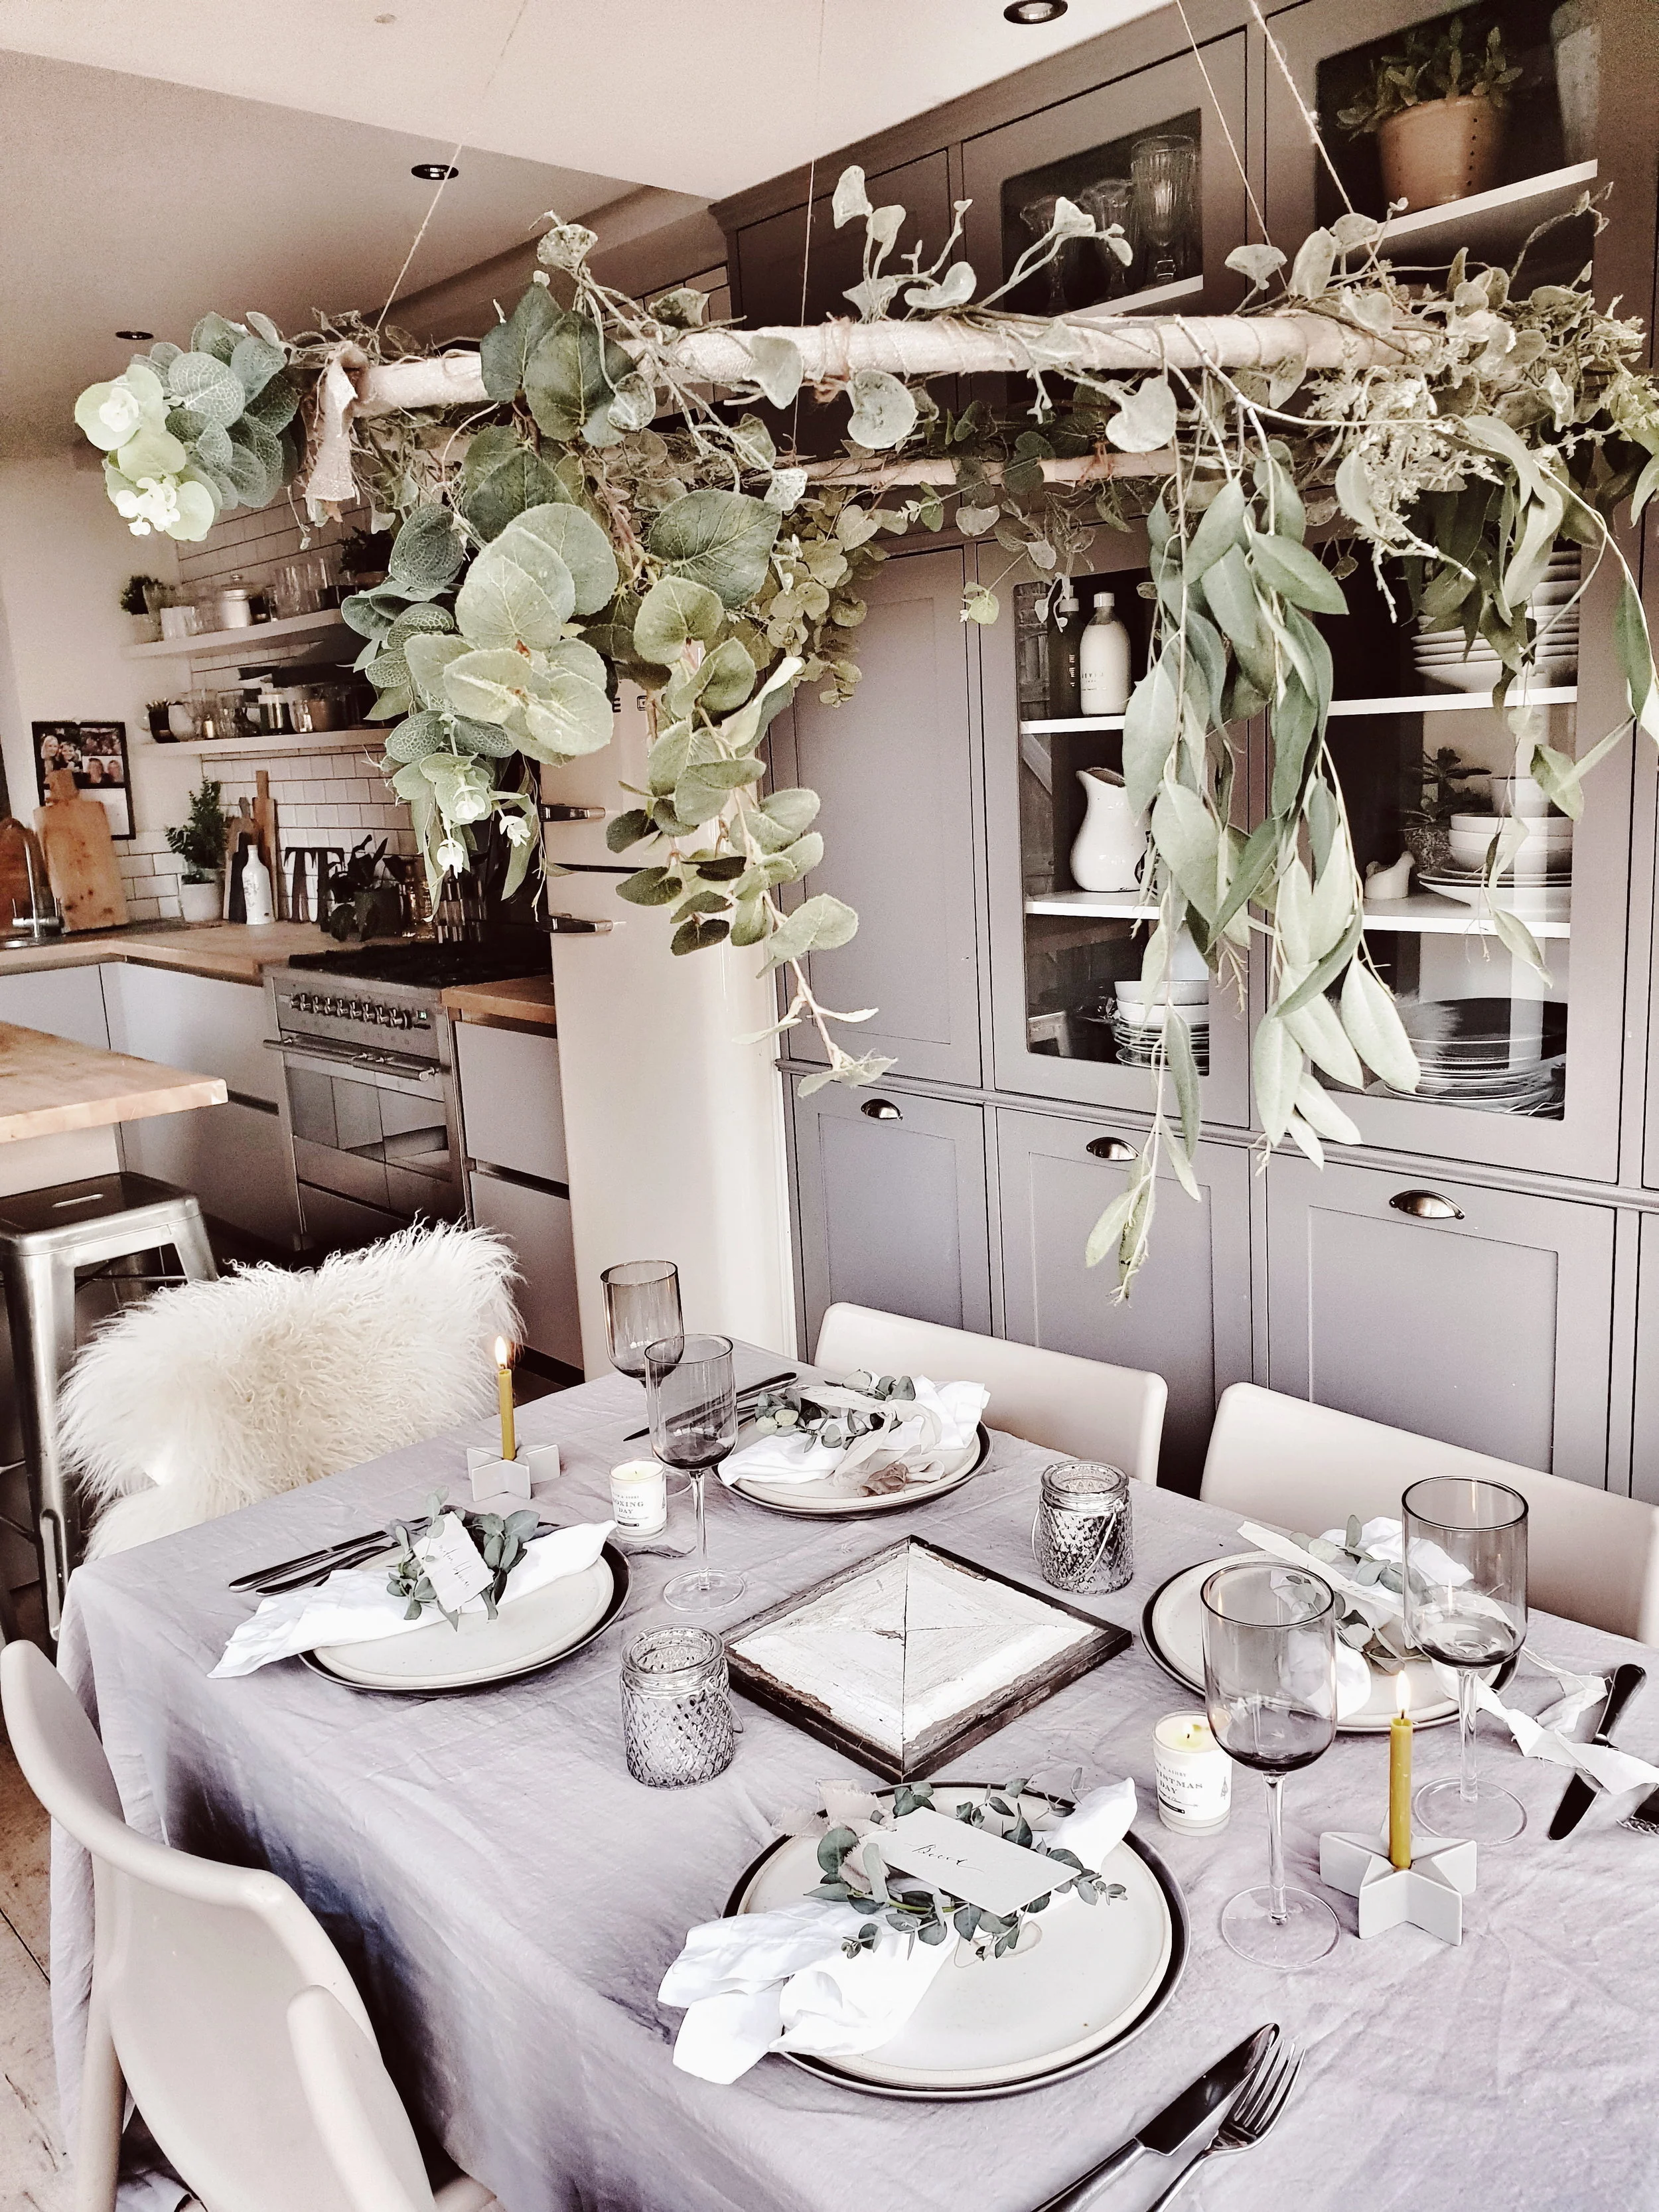
The Hygge for all Seasons look recreated on a slightly smaller scale in my kitchen
Make your own rustic advent chandelier
What you need: One hula hoop, approx 1 metre of linen or hessan, masking tape, floristry wire, mixture of faux and real foliage of your choice
Ok so you maybe reading this think a chandelier?? I thought she said this was going to be full of affordable ideas not looks to steal from the Palace of Versaille. But bear with me because the chandeliers in question are made using the humble hula hoop. I sourced mine off E-Bay for about £3 but charity shops often have them too. To cover them I used natural linen but a cheaper alternative would be to use hessian which is roughly £5 a metre.
Start by cutting the hessian into 10cm wide strips. Either tie on to the hula hoop or, for a neater look you can use masking tape to secure it in place. Wrap the strips around the hoop until it is fully covered, this is your base. The next step is to wrap a foliage garland around the hoop securing using florists wire. I used a simple garland made by Parlane that cost me £8. Depending upon how dramatic you want your hoop to look tie on mixture of faux and natural foliage (eucalyptus is good as it looks fine even when dried). I wanted mine to have a bit of drama so i tied springs of eucalyptus on pointing downwards using florists wire. Finally, cut four lengths of twine (mine were about 60cms long but it depends on the ceiling height you are working with) and tie each length on about 30cm apart around the hoop.
The humble hula hoop transformed into a stunning scandi chandelier
Once you have completed all of those steps, all you need to do is find a way to suspend it from your ceiling. I got Mr Malmo to screw a small hook in (i think I made this request after he had had a couple of beers as screwing things into plasterboard usually sets off his ‘no fucking way’ alarm). You could equally just use command hooks if you are willing to accept that at some point in December they may lose their stick and deposit a chandelier on your crackers.
Pampas Grass Table Centrepiece
What you need: 30cm x 20cm wooden box, chicken wire, plyers and 10-15 stems of pampas grass
Pampas grass has been all over Instagram this year which either means swinging is having a big revival or that there is a massive trend towards using natural dried grasses in floral arrangements. I am really hoping it is the latter as I don’t fancy throwing my car keys in a bowl and going soixante neuf with my 86 yr old neighbour George who last possessed his own teeth sometime around 1987 and favours using an outside toilet. I have seen some great ideas for using pampas in your home, from creating a stunning hanging installation (check out the account of Signe Bay for inspo) to the more suited to a surban semi option of using it in a vintage box that I have gone with.

Because the scale of the venue at our Hygge for all Seasons workshop was big with high ceilings I was able to go a bit more dramatic creating lots of height with a vintage Canadian Dry box (which I am careful never to leave Reena alone in a room with in case she disappears off into the modern rustic mist with it). However back home I used a smaller box I picked up for £10 from Sunbury antiques and a bit less grass to create a slightly pared back version.

My box was about 30-40cm long and 20cm wide. If you are struggling to source a vintage one then H&M Home also have some similar size ones with a rustic look to them. All you need apart from the box is some chicken wire, plyers and a bunch of pampas grass. I got my chicken wire online (which am fairly sure may have placed me on some sort of Interpol list) but you can also source from petshops.

Pampas looks beautiful but be warned it sheds more fluff

Chicken wire is quite sharp so maybe pop some gardening gloves on for this bit
Cut a roll of wire that will fit inside of your box (maybe wear gardening gloves to do so as I emerged from my skirmish with it looking like someone who had stuck their arm in a holly bush). Then basically just poke your pampas grass into the holes in the chicken wire in a manner that creates an arrangement you are happy with! If you have you mother-in-law coming round for Christmas lunch and want to avoid making chit chat with her about Barry from her Bridge group’s prostate then leave the stalks long. But if not maybe cut them to a more conversation friendly level of about 30cm. You may want to be careful about how closely you position it to candles as pampas is right up there with a shellsuit in terms of flammability.

I used a mixture of natural and faux foliage on my hoop chandelier. Dunelm is my favourite place to source realistic looking reasonably priced faux.

I love the height that the pampas adds to the table.

The wooden box adds warmth and texture to the Christmas table

Mini Eucalyptus Wreaths
What you need: euclyptus, wire and floristry wire.
To add some greenery into our Christmas table we made mini eucalyptus wreaths which acted as a backdrop to beautiful calligraphy christmas labels from Oysterbridge Co. My original idea was to make mini rosemary wreaths having seen them on Pinterest. I don’t know if it was because my supermarket rosemary was just too short but 45 minutes into my minature wreath making all I had was a herb heavy lap and a sprig of rosemary balder than Kim Kardashian’s bikini line tied in a circle. So I went back to the drawing board, rejected the rosemary and turned to the far more plyable eucalyptus instead.
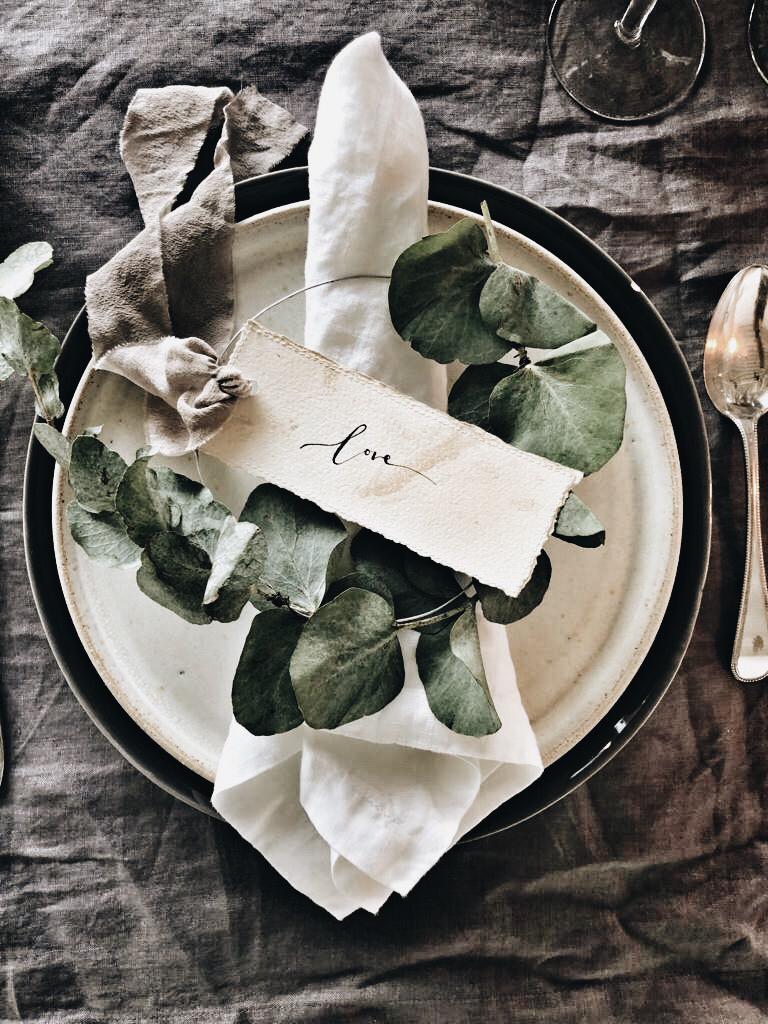
The wire helps to create structure and it means you can secure the foliage in place using floristry wire. You can make them as big or as small as you like in terms of the size of the hoop (this idea would equally work to make hoops to hang on a wall as the wire is quite sturdy). And you can go simple or more dramatic in terms of how much foliage you add. I kept ours quite simple because we were putting the labels on top and didn’t want to detract from them. The mini wreaths will also make your christmas table smell amazing.

Create a wire base (close your loop by simply wrapping the wire ends together) and then secure your foliage in place with small lengths of floristry wire.

Et voila one mini eucalyptus wreath

Add a personal touch to your table with these gorgeous handwritten labels from Oysterbridge Co

I made this wreath a little bit less neat as I loved how it looked with the sprigs fanning out slightly
We would like to say a huge thank you to the 31 lovely people who came along to Hygge for all Seasons in November and made it so much fun. We have loved seeing how people have incorporated the ideas from the workshop into their Christmas decor already. We would also like to thank all of the brands that collaborated with us in providing gifts for our works shoppers (including Join London, Sevin London, Malako Skincare, Igigi General Store, Love Struck Interiors, Thornback & Peel, Kate and the Ink and Chalk Pink Linen) and items to use in our table styling (Chalk Pink Linen, Igigi General Store, Lights 4 Fun, Hellish Designs and The King and I).

Autumnal Table Styling Ideas →
There are a couple of job interview questions I always struggle to answer. The first is “what is your greatest weakness”. This is not tricky because I think I am perfect but more because the answer on the tip of my tongue is always Cornish Cruncher Extra Strength Cheddar Cheese and a packet of Pickled Onion Monster Munch rather than the more employment friendly “a small blind spot when it comes to understanding full functionality of the wrap text field of Microsoft Excel.” Second on my list of dreaded questions is “tell me about your hobbies”. I am pretty sure the “You’re Hired” answer has something to do with running triathlons whilst reading ‘A Brief History of Time’ whereas in truth one of my favourite ways to while away my leisure time is creating seasonal tablescapes. So when Sainsbury’s Home asked me if I would like to pick a few items from their Autumn/Winter range for my kitchen I was in my hobby heaven

My kitchen in October
After 11 years of marriage and 14 years of dating a remarkably high percentage of our shared kitchenware still dates back to our student days when it was put through its paces cooking high end cuisine such as beans on toast and fish fingers on a bed of super noodles (don’t knock it until you have tried it people). With the motely selection we have accrued approaching the end of its life I chose a selection of kitchen and tableware from the rustic retreat and escape ranges that Sainsbury’s have introduced this Autumn/Winter. I selected Scandinavian inspired items in a neutral colour palette of soft greys and natural materials such as wood that would stand the test of time in my kitchen beyond this season. Affordable homeware doesn’t have to mean disposable homeware.

I put them through their paces cooking a couple of my favourite autumnal recipes, taken from a book I cook from on repeat: Seasons by Donna Hay. The photography and the food are both amazing. The recipes I selected both use just 4 main ingredients and can be whipped up with about 5 minutes preparation: perfect for a quick but delicious midweek meal if, like me, you often need to cook with a toddler attached to a leg and whilst shouting at someone to stop playing FIFA and start doing their homework.


I sourced all of the ingredients for the recipes from our local Sainsbury’s which I think it is fair to say is where I spend about 35% of my life in trying to keep up with the insatiable appetites of 3 hungry sons who consume sliced bread, bananas and milk at an alarming rate.
Butternut squash after a struggle chopped up and ready to go in the oven once mixed with some olive oil and seasoned
Butternut Squash, Mozzarella and Palma Ham Salad
Ingredients (serves 2-3)
2 Butternut Squash, 375g Mozzarella Cheese, 500g Palma Ham, handful of thyme, salt and peppper to season
Method
It is so simple to make there is almost need to type out instructions! Basically you peel the Butternut squash then chop into wedges (this is the hardest part as I ending up sweating like a shotputter trying to slice through a particularly stubborn butternut), place on a tray, drizzle with olive oil and season then cook for 25-30 mins. In the meantime tear up the mozzarella and cut the palma ham into strips. Take the butternut squash out of the oven and combine in an instagram friendly fashion on a plate scattering chopped up thyme on to taste. Simple to make but totally delicious

Larking around with my big butternuts….

I may look calm and composed in this picture but the outtakes capture me looking like an irate Bulgarian shotputter after the butternut refused to yield to my knife.
Having emerged victorious from the #BattleOfTheButternut I set to work on the fun part: creating my tablescape. I chose dinner plates and pasta bowls from the Urban Escape range in a lovely muted grey. They are the kind of plate that you can use everyday without fear of chipping and stick in the dishwasher but their simple Scandi good looks lend themselves to fancier dining as well (featuring non-beige food). To compliment the plates I also selected a really lovely carafe and set of wine glasses in a smoked grey and I loved the contrast they create with the plates

Smoked grey wine glasses and carafe from the Urban Escape range and an oak chopping board from the Rural Retreat range

Tablescape set and ready to receive food! I love how the simple minimal scandi style of the tableware and glasses works against vintage items that I added to the table to create texture and warmth

The oak chopping board makes the perfect centre piece for bread to share, this is clearly not a tablescape for dining with the kids as the bread would be the far less instagrammable Hovis 50/50 medium sliced otherwise…

Butternut squash, palma ham and mozzarella salad. Simple but totally delicious and the battle with the butternut guarantees you will probably burn more calories in preparing it than you will consume eating it!

I love the contrast that the smoked grey glasses create with the plates and it all pops out when using a dark linen table cloth as a backdrop


For pudding I turned once more to Donna and selected a delicious sounding maple and pear tarte tatin.
Maple Pear Tarte Tatin
Ingredients (serves 4-6 depending upon how greedy they are!)
6 dessert pears, 375g puff pastry, 4 spoonfuls of golden syrup, 80g of butter
Method
Peel and slice the pears to about a one pound coin thickness (which are a joy to work with compared to the bastard butternuts). Melt the butter in a pan over a medium heat and then add to syrup and bring to the boil. Turn down to a simmer for 2 minutes and then remove from the heat. Arrange the pears to cover the bottom of a 20cm oven proof pan and then pour over the butter/syrup mixture. Then place over the top the puff pastry cut to a 22cm circle and place in the oven. Cook for 20 mins (or in my case until the smoke alarm goes off because some of the syrup mixture has escaped the pan and formed a mini bonfire on the bottom of the oven). Serve with creme fraiche or clotted cream

The kitchen set read for round two. Gorgeous grey mixing bowl and wooden and grey silicone cooking utensils pictured all from the Rural Retreat range

Taking time out for a cup of tea and praying that pears are easier to peel than butternuts…

Bowl and whisk pictured from the Rural Retreat range. Behold the Maple Pear Tart Tatin of dreams

But will mine turn out this well?!
It is a stunningly easy and delicious dessert to make and it was a dream to use new kitchen utensils which had not seen active service in the University of Manchester Halls of Residence kitchens mainly stirring supernoodles. I love the earthy contrast of the oak handles of the rural retreat range against the scandi inspired grey. They look great against the white metro tiles in my kitchen and make my utensil selection about 100% more stylish!

Mixing the pears in with the butter and syrup mixture and trying not to set light to my ill advised take on chefs whites
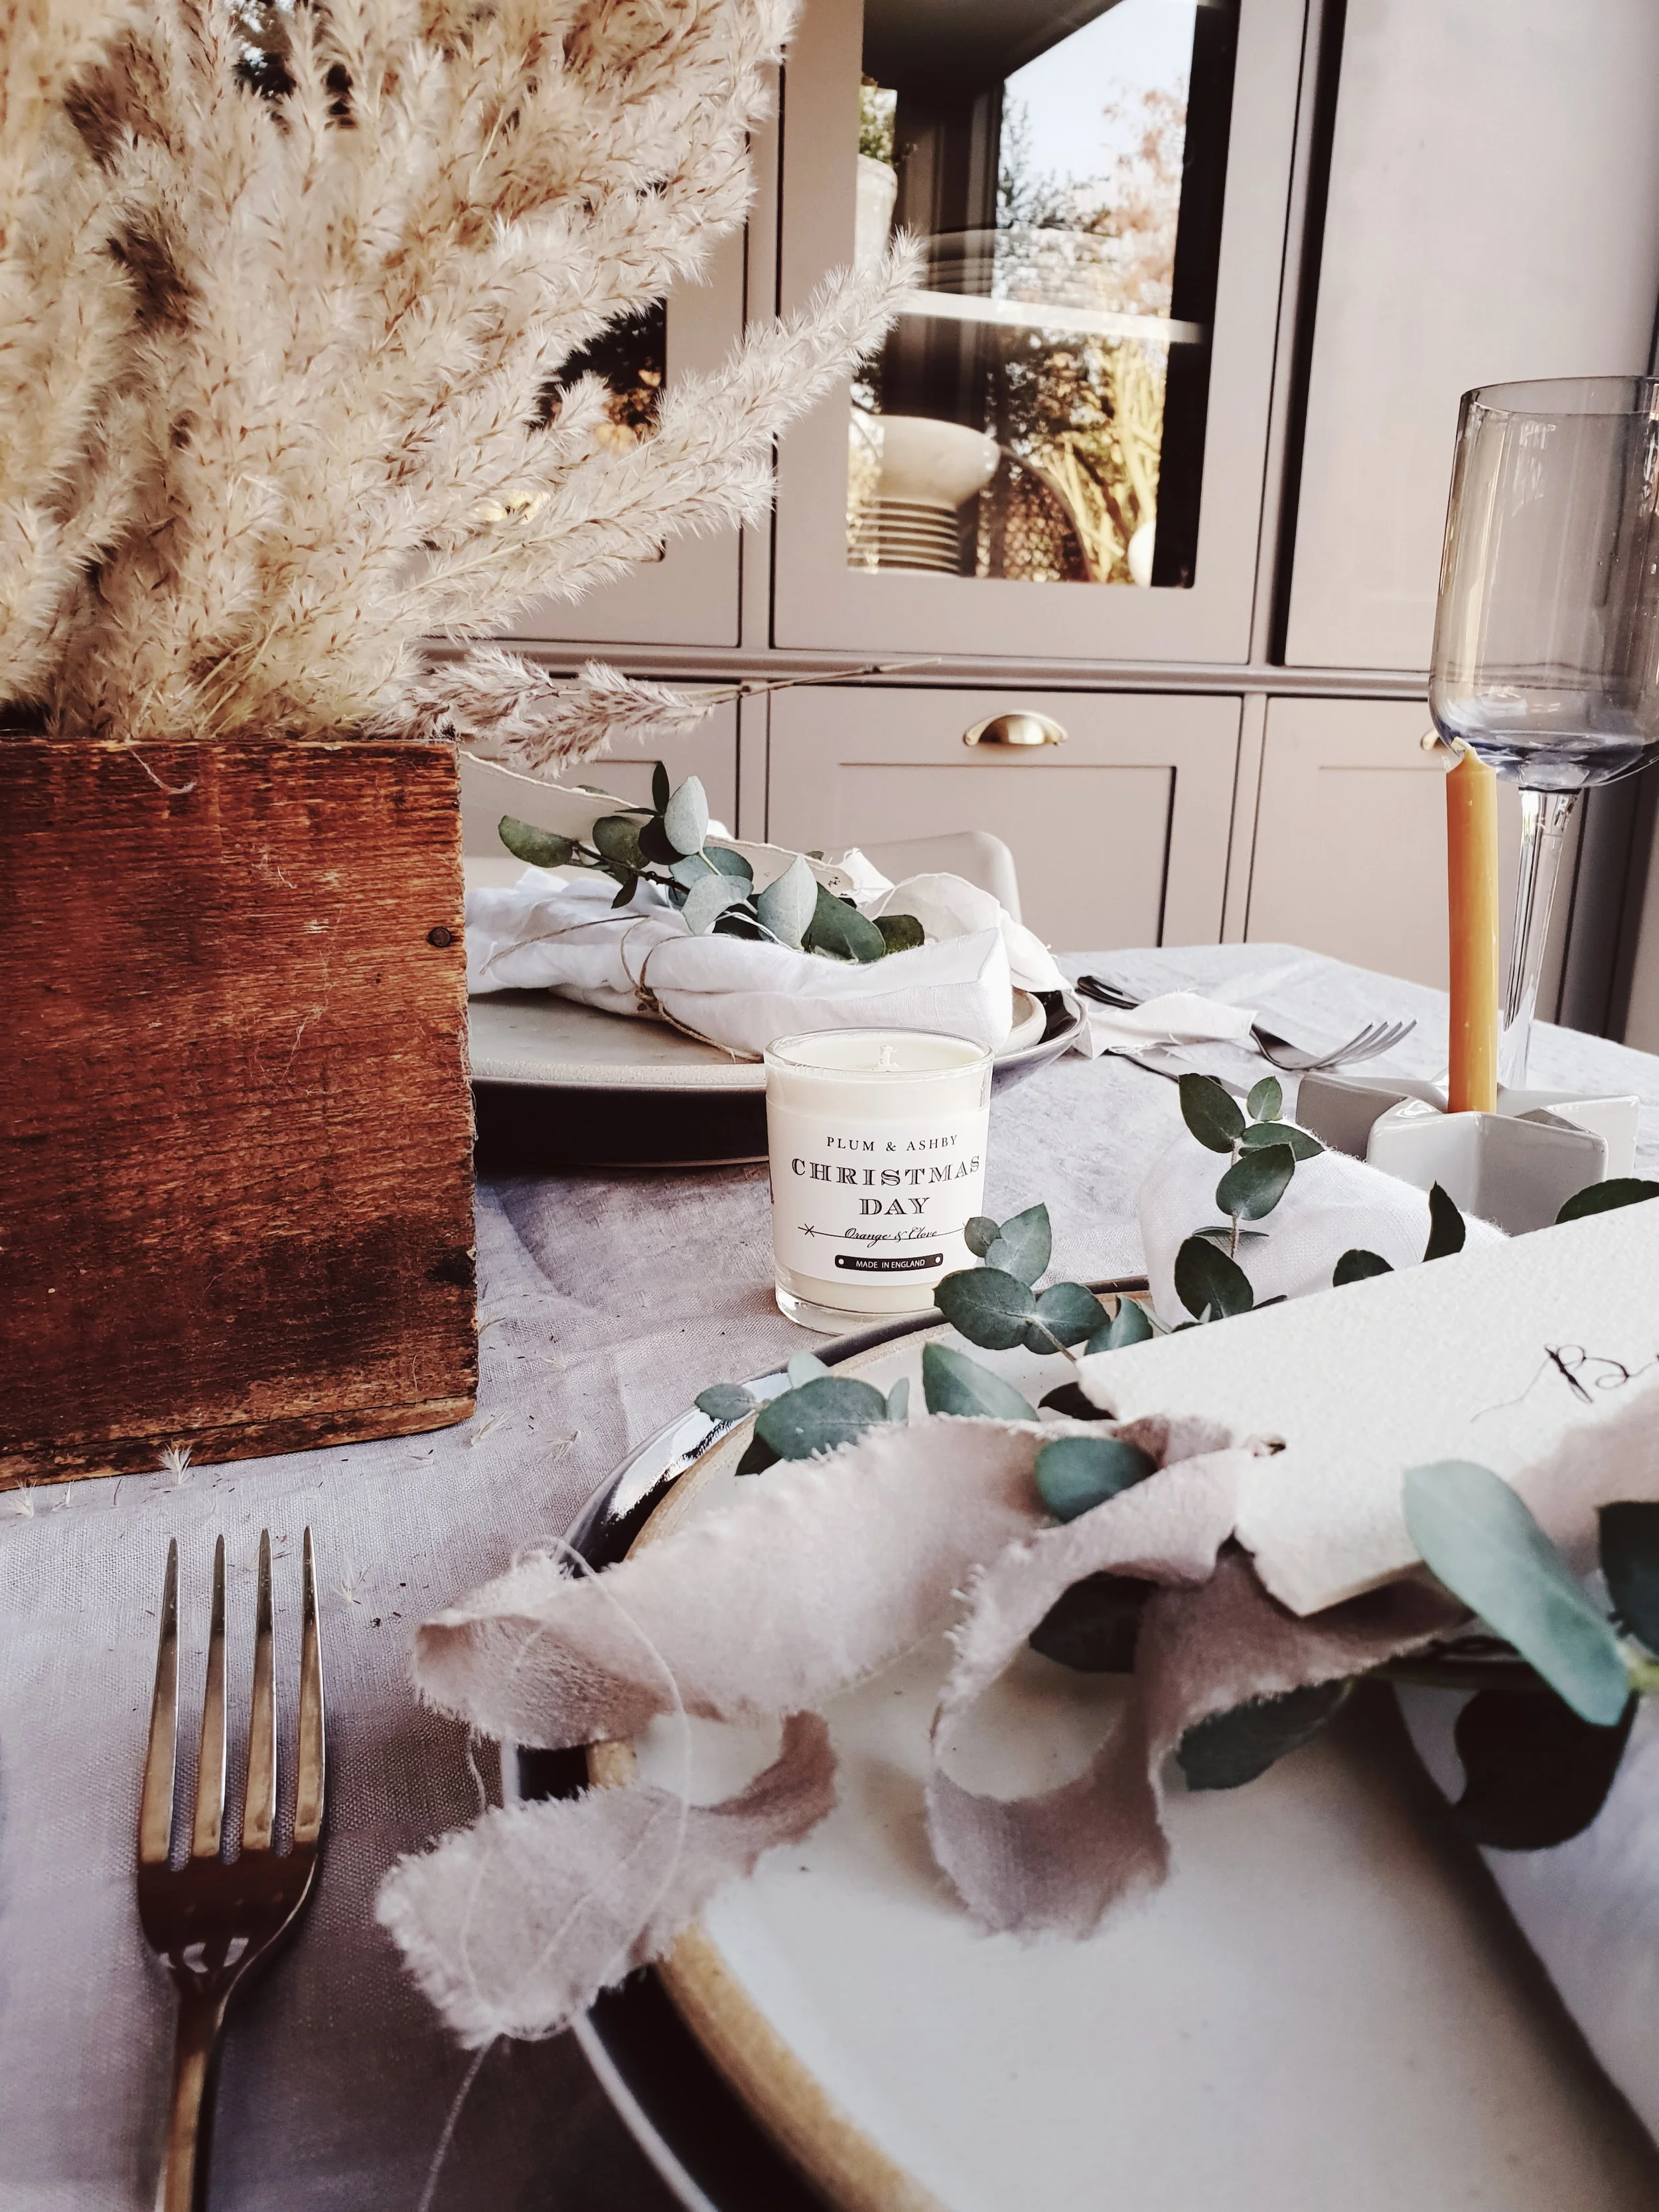
With the tarte tatin in the oven I performed a quick turnaround on tablescape number two. Whipping away the table cloth to reveal the natural texture of our vintage farmhouse kitchen table and adding in some gorgeous dried flowers in autumnal colours and some scandi white pumpkins to up the autumn factor. I love the contrast between the texture of the table and the simple pale grey of the plates. The pasta bowls are great for serving dessert in as you can add in a drizzle of maple syrup and dollop (is there a more satisfying word known to man?!) of creme fraiche without fear of it escaping!

The dark grey table mats look great against my vintage farmhouse table. They are available in store but not online

White pumpkins adding a modern rustic touch to the table
I also added in these lovely rattan table mats from the Urban Escape range (available in store but not online) to provide a bit of additional contrast, they are a timeless style and colour that I know I will get lots of use out of. I used the oak chopping board to display the tarte on which turned out pleasingly like the picture despite its emergency evacuation from the oven

Dried flowers are a great alternative to fresh as they can last you through the Autumn season and beyond and are really versatile.

I love how the new items I have added from the Rural Retreat and Urban Escape ranges mix with my collection of vintage bottles and the natural texture of my french farmhouse table

Just add creme fraiche and a drizzle of maple syrup to serve

So there you have it, two ideas for autumnal tablescapes with a rustic Scandi twist. I hope you enjoy giving the recipes a try and updating your kitchen with the Rural Retreat and Urban Escape ranges from Sainsbury’s Home.
This blog post was kindly sponsored by Sainsbury’s Home