In a straw poll of reasons why people move house I reckon the most common answers would be: up sizing or down sizing; change of location; moving closer to family; school catchment; taking on a renovation. I would possibly be one of the only people to respond with: to gain a girthier entrance. There were of course other drivers behind our recent move but it really was a close of love at first sight of spacious vestibule for me.

The skinny hallway in our old house (I miss those tiles!)
Our old house was an Edwardian Semi with the stairs located in the middle of the house meaning much of the hallway was a long thin corridor. When the boys were smaller manoeuvring a buggy and bulging nappy bag out of the front door was like a challenge from the Krypton Factor. On at least one occasion I became an unwitting hallway hostage after the zip of my coat got caught on a rogue radiator valve leaving me effectively manacled to the wall for a good 15 minutes.

The radiator upon which I got impaled and ended up a #hallwayhostage

In contrast, in our new house when you walk in the door the stairs are directly in front of you and there is double the width to play with so my days of corridor struggle are over. We also have a separate utility room with an extra set of pegs where a platoon of the army of anoraks can be kettled slashing the likelihood of being hit in the face by a smalls boys anorak as you take your shoes off.

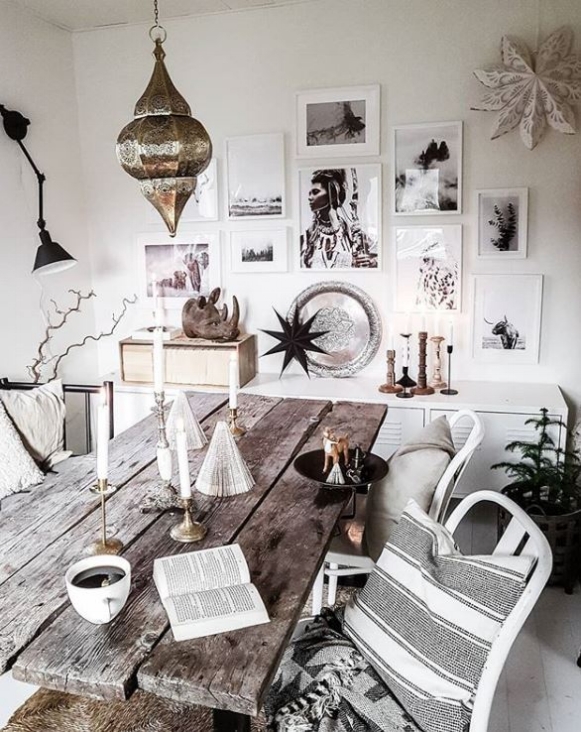
It might not look like much but this was the #vestibuleview that won me over to our new house
My Hallway Makeover Plans
The extra space and high ceilings alone are hallway heaven for me and it was all pretty neutrally decorated but this month I have undertaken a mini hallway makeover, in partnership with Cox & Cox to further “enhance my entrance” so to speak.
The main things on my hallway hitlist were: 1) finding a solution to the soviet sized radiator and accompanying cover that dominated the space to the left of the door; 2) changing the mirror for something with a more contemporary, clean feel; 3) finding a way to de-anagylpta that didn’t involve replastering the walls; 4) fitting in some more storage; and 5) lightening up the look and feel in particular of the floors.
Overall the look and feel that I wanted to achieve with the makeover is what I would describe as 1930s Scandi Rustic Chic. Am thinking Neville Chamberlain was a huge fan of the relaxed Ibiza beach club look.

The decor is all light and pretty neutral it is just not quite Malmo so I will be looking to downgrade the orange factor on the floors and take things more 1930s Scandi Rustic

The anaglypta wallpaper is on my hallway hitlist even though I know it is coming back into fashion!
One of my go to brands when I am searching for Scandi/Rustic furniture, lighting and home accessories has always been Cox & Cox. I have been shopping with them since right back in 2007 when I bought vintage table place holders from them for my wedding. 14 years and 3 kids later they still tick all my design boxes so I was over the moon when they said they wanted to collaborate with me on the revamp.
Adding Panelling
The first step in the makeover was to call Darren, my long suffering carpenter (who did the kitchen cupboards in my old house) and see if he would take on #Project Panelling aka my solution to “The Anaglypta Issue” (which, by the way, I think makes a great title for a Robert Ludlum Thriller!). My plan was to remove the dado rail and just panel over the anglypta to avoid a lengthy battle with a wallpaper steamer.

Panelling dilemmas: to stick below the dado or go above?
I deliberated long and hard about what height to go for. The safe option was to stick below the dado rail whilst more adventurous option would be to go all the way to the celling. In the end I went for a halfway (well ¾ way) house and panelled just under line of the doorway.
I would love to show you an inspiring DIY tutorial of me doing the panelling but the reality was Darren doing battle with several large sheets of MDF in his garden shed and then attaching them to the wall with a mix of nails and glue with quite a bit of swearing along the way. I am pretty sure he will be ghosting my calls in future.

Despite a few doubts along the way I am thrilled with the 3/4 height of the panelling
Radiator Solutions
Once the panelling was on the next big decisions was what to do about the radiator and what colour to paint the panelling. The radiator cover that was on the left hand side of the hallway as you walked in was my no means hideous but it pretty much dominated the whole space and precluded us having any storage on that wall.

The before with a large radiator on the left hand wall which took up lots of space

The after with the radiator dropped in height beneath a bench. The woven fringed cushion and black and white chevron cushion are both Cox & Cox

It no longer dominates the space and I actually love the look of the column one
The solution I came up with was to go for a much shorter radiator that would sit much lower on the wall and build a seating bench over the top thus ensuring the radiator was no longer the dominant feature in the hallway and we had somewhere to sit to put our shoes on. The bench was to be built out of reclaimed scaffold planks which I sourced from our local salvage yard and which cost £7 a plank. They are my number one favourite building material although I don’t think Darren shares my love of reclaimed materials judging by his reaction when I brought them home. Sample quote “you want me to leave the paint stains on??” accompanied by the kind of look you give someone who has just told you that they would like a threesome with Eaamon Holmes and Boris Johnson.

The Scaffold Planks that I love but which baffle Darren! This natural striped runner from Cox & Cox looks great against the sanded floorboards
Paint Choices
With my radiator strategy in place it was time to make a decision about the colour of the panelling. My first thought was to go dark after I came across this image in a Neptune catalogue. However because the panelling was going on both sides of the hallway I was worried that it might narrow the room down so in the end I erred towards the light side. A tester pot orgy later I had tried out every shade between bracken beige and perfect putty and arrived at my final choice: Ammonite by Farrow & Ball.
Slightly too late for me but excitingly next year Cox & Cox are launching their own brand of paint. There will be 16 dreamy shades and Flaxen or Landsdown would be a brilliant match for the look in my hallway. It will be formulated by Mylands so expect a great quality consistent finish.


Enjoying posing againg my newly Ammonite background with a rather spectacular faux string of pearls
With the panels painted it was time to install the radiator and build the bench. I opted for a more contemporary column radiator which I bought from this website for roughly £170 which I think is pretty good value. With the boards sanded down and installed over the top the radiator is now barely visible and it has transformed this side of the hallway.

Malmo vs Mahogany
My final step in lightening things up before I could tackle the fun finishing touches was to tone down the mahogany factor from the floor and the door which were a good 7.5 on the David Dickinson after a week in Barbados scale. The floorboards are actually really nice pine ones and sanded down they look so much better. In the longer term I would like to get a new door but for now just painting it in Railings has been a bit of a game changer (don’t look too closely at slapdash Scandi Handy Andy’s paint job!).

Adding the finishing touches with Cox & Cox
With all of the structural changes complete it was time for the fun stuff: enter Cox & Cox. I have been obsessed with rattan style pendant lights ever since visiting Ibiza last year and Cox & Cox has some beauties. We are blessed with pretty high ceilings so we could afford to go for one of the bigger ones to make a bit of a statement. I really like this one because it allows a view through it and doesn’t dominate the space too much (or hit us on the head every time we walk down the stairs.

The other big decorative item I was after to complete the makeover was a new mirror. With the radiator dropped and the bench in place I wanted to add a circular one to break up the square lines of the panelling a little bit. I think I lost about 1.5 days of my life to the google search large circular mirror until I hit upon this oversized thin frame beauty from Cox & Cox. Unlike lots of the ones I looked at it has a really thin black rim and adds a really subtle crisp contemporary edge to the hallway revamp.

The Oversized Mirror of dreams
I know some people might have opted to put pegs where I have put the mirror but I think it really opens up the space and reflects light and I have, instead, added pegs further back so they are not in your face as you wanted in the door. Oh and when I say added pegs let me introduce you to these #heavenlyhooks from Cox & Cox with a black slate base and burnished gold hook . You can buy a set of three but I opted for four five individual hooks instead and think they add a nod to understated glamour.

Obviously the insta reality of this photo is 5 primary coloured anoraks rather than an artful rattan bag and a pleasingly pale cream coat
I have four behind the door for coats and practical items and one is located next to the mirror for maximum insta faffery. I am imagine it will play host to artfully poised baskets, bags of impractical pampas and oft be draped in fairy lights.

Let the faffing commence. I am looking forward to the styling possibilities offered by the hook!
The First Noel …..in my hallway
With the hallway revamp complete just in time for the opening of advent calendars I am super excited by all the fresh festive styling opportunities that it affords me.
First and foremost the bannister! Our old one was boxed in by the downstairs loo totally raining on my garland parade. This year I will be going to Scandi town on our new ones. Cox & Cox have a great range of garlands to grace your stairs and work with a variety of different looks. I chose this really simple but effective pre lit pine one . It looks great even just on its own but has really nice thick branches/foliage that are perfect for adding further foliage of the faux or real variety to if you wanted to add more drama to your bannister.

The pre lit eucalyptus garland is lovely and bushy and easy to manipulate and can easily have foliage added to it for extra drama

There is also a matching pre lit wreath which fits rather perfectly on my insta faffery hook by the mirror. Again you could leave it plain of add extra foliage if you wanted to dial up the drama.

With thanks to Your London Florist I have added some extra eucalyptus and soft white dried grasses to complement the wreath


I have struggled for years with winding fairy lights into wreaths and trying to disguise the wires so really love the pre-lit one
The bench has not only created a handy place to sit when putting our shoes on but also lends itself to lots of great display possibilities. I love these beautiful crackle glaze ceramic Christmas trees that Cox & Cox have introduced this year to help you achieve a pared back minimal Christmas look. They look great on their own or in small groupings. I would happily have a whole forest of them!

These speckle glaze trees are a lovely minimal take on Christmas
But my very favourite type of tree has to be these beautiful illuminated ones. They add such a soft pretty twinkly light to the hallway and you can either keep them plain or hang them with baubles in the same way as a normal tree.

Welcome to Malmo’s Winter Wonderland created with a little help from these illuminated snow tipped trees from Cox & Cox

It was the night before Christmas….

I love the soft warm white light of the trees
Cox & Cox have a fantastic selection of baubles for all looks and plenty that appeal to my Scandi aesethic, I particularly like these ones which wooden cut out stars and trees in the middle of a thin gold ring which are from their New Neural Noir range.

White chevron baubles adding all the boho feels to my hallway

If you wanted to add a bit of extra twinkle to your Christmas scheme then I have to let you in on a fairy light secret. I have had my fingers burnt in the past by fairy lights which promised to be warm white on the box only to turn up and turn out to be football stadium floodlight florescent but Cox & Cox have some naked wire cluster lights which are genuinely the warmest of whites!

My own mini forest of illuminated snow tipped trees
To complete the warm white winter wonderland feel to my entrance I have also add a couple of great outdoor lighting products from the Cox & Cox range. I think I may love the 7ft outdoor illuminated tree more than any Christmas tree I have ever owned. Mr Malmo I fear has less fond feelings towards it after a botched erection attempted on his part saw the top section hit him on the head at 7:30am on a Monday morning! I have also given our porch a dusting of twinkle with a brilliant indoor/ourdoor star. The lights on both the star and the tree are also the warmest of warm whites #fairylightwin.

Announcing our arrival in the neighbourhood with some Christmas twinkle!

The new apple of my eye, our outdoor Christmas tree

The fairy lights along with all of the other Cox & Cox products I have used in the make over are listed below if you would like to shop my look!
Illuminated Indoor/Outdoor Star
Outdoor light up Christmas Tree
Indoor/Outdoor Magical Light Up Snow Tipped Trees
Grey and White Chevron Baubles
Indoor/Outdoor Pre-Lit Wreath and Garland
Indoor/Outdoor Naked Wire Cluster Lights
Hanging Potted Faux String of Pearls
Black and White Chevron Cushion
There are a few final finishing touches I need to make to finish the makeover off like applying a stain to the newly sanded floors and deciding whether to paint the bannister or sand it down but those can wait until I have finished my figgy pudding.
This blog post was part of a paid partnership with Cox & Cox. Many thanks also to Your London Florist for providing me with some foliage for styling my hallway and to Tia Talula for coming to my outdoor photography aid this week!